Tweeq help screen, Getting started with tweeq, Preset – Oxmoor TWEEQ-MAC User Manual
Page 5: Mute, Bypass
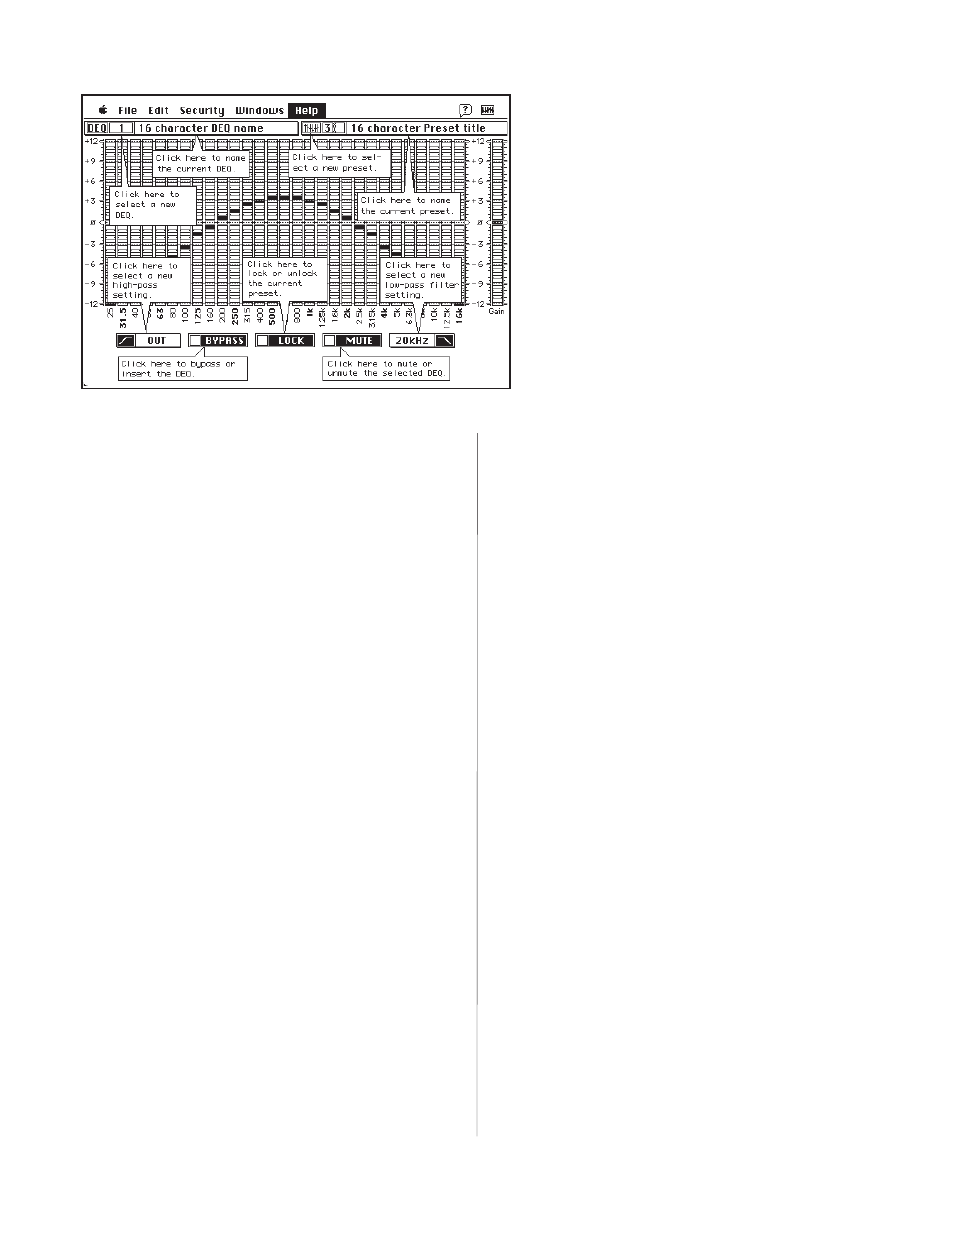
Page 3
TWEEQ HELP SCREEN
GETTING STARTED WITH TWEEQ
When you open TWEEQ by double clicking on the
TWEEQ icon, you should see the screen as described
on page 2 of this manual. First, try to move a "slug.”
Move the computer mouse so the cursor is inside one
of the filter bands, then press the mouse button and
watch the slug move to the cursor position. While
you continue to hold down the mouse button drag
the cursor up and down the filter band. You will see
the slug follow along with the cursor.
Release the mouse button. Now move the cursor to
the Gain Band and press the mouse button. You
should see the slug move to the cursor position. Now
drag the cursor up and down the Gain Band and
watch the slug follow.
Once you have captured a slug, and you continue to
press the mouse button, you can move the cursor any-
where within the Filter Bands or Gain Band areas
without losing control of the captured slug. This al-
lows you to capture a slug and then move the cursor
to the dB scale located on each side of the Filter Bands
for precise positioning of the slug.
To set the High-Pass or Low-Pass filters, position the
cursor inside the High-Pass or Low-Pass rectangu-
lar box, then press the mouse button. A menu box
will open displaying other filter choices. While you
continue to hold down the mouse button drag the
cursor to the frequency setting desired and release
the mouse button. Now you should see the frequency
selected appear in the rectangle box.
To Bypass/Insert, Lock/Unlock, Mute/Un-Mute,
position the cursor inside the desired box and press
PRESET #
By using the numeric keys (1-8) on the
keyboard the user may also select new Presets.
MUTE
The spacebar on the keyboard will also Mute or
Un-mute the active DEQ.
BYPASS
The 0 key on the keyboard will also Bypass or
Insert the active DEQ.
the mouse button. You will see an “X” appear or
disappear (depending on its original status) at the
left side of the box. Press the mouse button again to
return it to its original state.
To select a DEQ address, position the cursor inside
the area where the DEQ address is displayed.
NOTE: If no DEQs are connected, you will get an
error message when you select a new address.
Press
the mouse button, a menu will open listing the DEQ
addresses. While you continue to press the button
on the mouse, move the cursor to the desired num-
ber and release the mouse button. Now you should
see the selected number in the box. To name an
active DEQ, position the cursor inside the Active
DEQ Name area and press the mouse button. A
dialog box will open and you may use the keyboard
to type the desired DEQ name. When you are fin-
ished typing, move the cursor to the OK box and
press the mouse button.
To select a Preset number, position the cursor in-
side the area where the Preset number is displayed.
Press the mouse button, a menu will open listing
the Preset numbers available. While you continue
to press the button on the mouse, move the cursor
to the desired number and release the mouse but-
ton. Now you should see the selected number in
the box. To title an active Preset, position the cur-
sor inside the Active Preset Title area and press the
mouse button. A dialog box will open and you may
use the keyboard to type the desired Preset Title.
When you are finished typing, move the cursor to
the OK box and press the mouse button.