Checking your barbecue – Fire Magic Custom Gourmet Unibody Series 12 & 13 User Manual
Page 8
8
4. CONNECT THE GAS SUPPLY TO YOUR CUSTOM
GOURMET BARBECUE
a. You will need a C.S.A. approved stainless steel flex
connector to bring the gas supply from the gas line stub to the
valve manifold. A 1/2" x 36" or 48" flex connector with 1/2" flare
to 1/2" pipe adapter on one end, and a 1/2" flare female fitting
on the other end is suitable for most installations.
CAUTION: Use only stainless steel flex connectors that
are C.S.A. listed.
WARNING: A rubber or plastic connector will rupture or
leak, resulting in an explosion or serious injury if used
inside the barbecue enclosure.
b. Make sure that your gas supply is turned 'OFF'. Then
connect the 1/2" pipe adapter fitting supplied with the stainless
steel flex connector to the gas supply stub. Use pipe joint
compound that is resistant to all gasses on the male pipe fitting
and tighten securely. DO NOT use pipe joint compound to
connect the flare fittings.
c. Slide your barbecue into place, making sure not to pinch or
kink the gas connector.
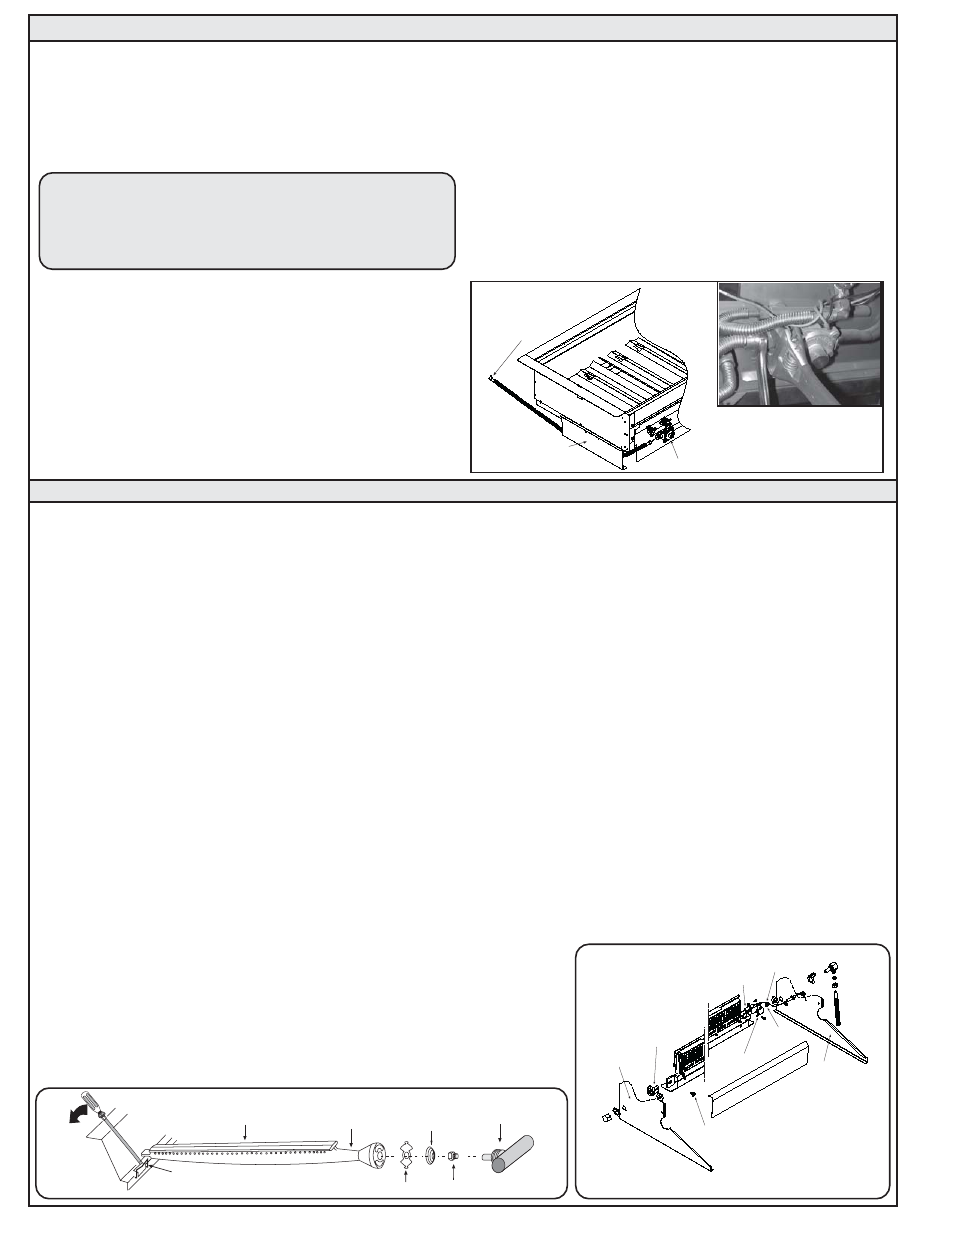
d. Bring the flex connector under the left-side support wall of
the frame (see Figure 4A) and through to the regulator on the
valve manifold.
e. Connect the flex connector to the flared fitting of regulator
on the valve manifold. Support the regulator fitting with a
wrench to avoid applying excessive torque to the regulator
assembly while tightening this connection securely (Figure
4B). DO NOT use pipe compound on flare fittings.
f. Make sure the barbecue burner valves are in the 'OFF'
position. Turn the gas supply on. Then carefully check all gas
connections for leaks with a brush and soapy water before
lighting. NEVER USE A MATCH OR OPEN FLAME TO TEST
FOR LEAKS.
g. Refer to the "Air Shutter Adjustment Instructions" on page 9
and "Lighting Instructions" on page 10 of this manual before
replacing barbecue face and knobs.
CHECKING YOUR BARBECUE
BARBECUE FUEL ORIFICE SIZE
Custom Gourmet Unibody Barbecues are equipped with fuel
orifices for natural gas, unless otherwise indicated. To use with
propane gas, you must install smaller orifices to avoid
hazardous overheating.
For Custom I Barbecues: The proper orifice size for Natural
Gas is #49 (drill size). The proper orifice size for Propane Gas
is #57 (drill size).
For Custom II Barbecues: The proper orifice size for Natural
Gas is #47 (drill size). The proper orifice size for Propane Gas
is #56 (drill size).
IF YOU ARE NOT SURE YOU HAVE THE CORRECT
BARBECUE BURNER ORIFICE SIZE
a. Remove the cooking grids and flavor grids from the barbecue.
b. If the gas supply has been connected, make sure the burner
valves are in the 'OFF' position. Then pull the valve knobs from
their stems. Use a phillips screwdriver to turn the face fastener
screws counterclockwise to release the face and remove it
from the barbecue. Retain the screws and finish washers for
reattaching the face.
NOTE: Carefully lift the face away from the frame. The spark
generator for the ignition system is attached to the inside of
the face panel. The spark generator knob need not be detached,
but the wires must be unplugged from the generator before the
face is removed.
c. Using a flat blade screwdriver, pry the burner retaining clip
from rear wall of the barbecue frame (see Figure 5A). Remove
the burner by; A) Pulling it to the front of the barbecue, B) Lift
the far end out of the notch, C) Pull the burner away from the
manifold, taking care not to lose air shutter and spring, which
may become detached when the burner is removed.
d. Using a 3/8" socket, remove orifice from the orifice holder
on the burner manifold and check the number stamped on the
face (see "Barbecue Orifice Size" above). Repeat for each
burner as necessary.
e. If your barbecue is not orificed for the gas supply you plan
to use, replace them with the orifices supplied with the
barbecue or orifices supplied by your local dealer.
f. After checking orifice drill size or replacing the orifice, install
the air shutter spring and the air shutter over the orifice holder
fitting, between the burner and the burner manifold, in the order
and position shown in Figure 5A.
g. Replace the burners in the holding groove, ensuring that
the brass orifice and orifice holder fittings project deeply into
the burners. Replace the burner retaining clips.
3. CHECK BACKBURNER FUEL ORIFICE SIZE
If your barbecue includes a backburner it is equipped with
a natural gas orifice unless otherwise indicated. To use propane
gas, you must use a smaller orifice. The proper orifice for
Natural Gas is #45 (drill size). The proper orifice for Propane
Gas is #1.25mm.
Hazardous overheating will occur if a natural gas (#47 or #49)
orifice is used with propane gas. If you are not sure, or if an
orifice change is necessary, refer to the instructions included
with the
replacement
orifice which is
packed with
the barbecue.
MOUNTING
SCREW
IGNITOR
WIRE
ORIFICE
AIR
SHUTTER
ELECTRODE
MOUNTING
BRACKET
OVEN
(LEFT SIDE)
OVEN
(RIGHT SIDE)
CONNECTING YOUR CUSTOM GOURMET BARBECUE TO THE GAS SUPPLY
Figure 5B
Backburner Orifice
Diagram
AIR SHUTTER
BURNER
MANIFOLD WITH
ORIFICE HOLDER
BURNER
ORIFICE
SPRING
BURNER NECK
BURNER CLIP
Figure 5A - Burner Orifice Diagram
REGULATOR
LEFT-SIDE
SUPPORT
WALL
FLEX CONNECTOR
FROM
GAS SUPPLY
Figure 4A
Figure 4B