Checking your barbecue cont'd, Adjusting your custom gourmet barbecue – Fire Magic Custom Gourmet Unibody Series 12 & 13 User Manual
Page 9
9
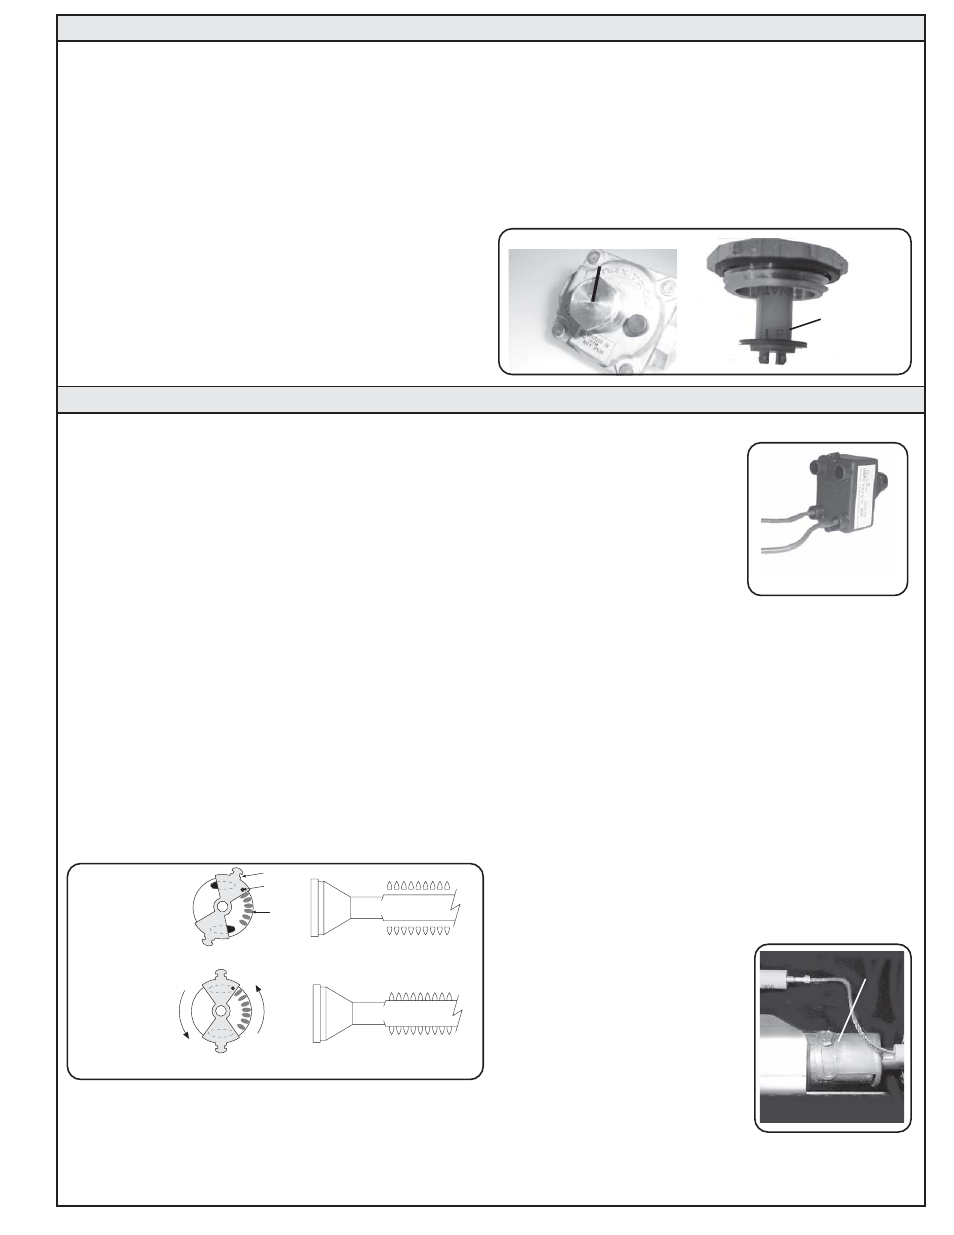
CHECKING THE BARBECUE REGULATOR
The barbecue regulator, located behind the front panel (Face),
must be set for the type of gas used to fuel the barbecue. To
check the regulator setting remove the cap in the center of the
regulator (Figure 7A). Holding the cap vertical (see Figure 7B),
the letters at bottom of the plastic stalk should indicate the
gas type that the regulator is currently set up for. If regulator is
not set for your gas type, remove stalk from cap, invert and
replace into center of cap. Replace cap on regulator, screwing
down until snug.
Figure 7A
Figure 7B
READ GAS
TYPE HERE
BARBECUE REGULATOR.
NOTE THE CAP ON TOP
CHECKING YOUR BARBECUE cont'd
REATTACHING THE FACE & IGNITOR WIRES
Pull the drip tray out far enough to
support the face in the vertical
position. Lean the face forward and
plug the 2 wires into the terminals
on the spark generator (Figure 8).
The wires can be plugged into either
terminal.
IMPORTANT: Test the Electrodes
for spark before securing the face to
the frame (see page 12 for Battery Replacement). Place the
face on the frame so the front lip of the face covers the lip on
the frame.
ADJUSTING THE FLAME HEIGHT
The large knobs on the face of the barbecue control the valves
and adjust flame height. The first position is 'HIGH', the second
'MEDIUM' and the final 'LOW'. Flame height can also be set
anywhere between the High, Medium and Low settings for all
cooking requirements and methods.
Height of the flame with the
valve in low position may be
regulated by means of a small adjusting screw in the center of
the valve stem. This screw is accessible by removing the
plastic valve knob which pulls straight off the end of the valve
stem.
After burning for 2 minutes, open the air shutters until the
flames lift off, or appear not to be touching the burners. Then
begin closing the air shutters until the flames appear to burn
while touching the burner ports (Figure 6). You may then see
short yellow tips on the flames. If flames are a lazy yellow,
open the air shutters until the flame is blue with yellow tipping.
NOTE: Barbecues in some installations achieve a better air/
gas mixture and will ignite more quickly if the valve is first
turned beyond 'HIGH' to 'MEDIUM' or 'LOW' for lighting.
ADJUSTING YOUR BARBECUE
IMPORTANT: This appliance may not light or heat evenly
or cook properly unless the air shutters are adjusted
following installation (see "Air Shutter Adjustment" below).
AIR SHUTTER ADJUSTMENT
Burner air shutters are easily accessed by removing the front
panel (Face). The air shutters are located at the front of the
burners behind the face (see Parts List). The air shutter has a
small dimple (see Figure 6), which allows it to lock into
notches in the burner face. This prevents the air shutter from
moving. Close the air shutters by turning the tabs to a vertical
position (Figure 6). Light your barbecue in accordance with the
lighting instructions (page 10) and burn for 2 minutes with the
valves on 'HIGH' and the oven open.
ADJUSTING YOUR CUSTOM GOURMET BARBECUE
IF YOU ARE NOT SURE YOU HAVE THE CORRECT
BACKBURNER ORIFICE SIZE
1.
Remove the backburner assembly (Figure 5B).
a.
Remove the backburner cover if in place.
b.
Unplug the ignitor wire from the electrode.
c.
Remove the mounting screw from the mounting bracket
at the left end of the backburner assembly. Be careful not
to lose the 3/8" spacer (if equipped) when the screw is
removed.
d. Carefully pull the left end of the backburner assembly
forward, keeping it against the left side of the oven, until
the right end of the burner clears the orifice.
2.
Check the size stamped on the orifice.
3.
If an orifice change is necessary, use a 3/8" hex nutdriver
or appropriate wrench or pliers to replace the orifice.
4.
Replace the backburner assembly, following step a. through
d. above, in reverse order.
5.
Recheck the air shutter instructions located on page 9.
Figure 8 - Spark
Generator
IMPORTANT: It is normal for the backburner to smoke when
it is burned for the first time. Burning your backburner on 'HIGH'
for approximately 15 minutes will eliminate the smoking.
BACKBURNER AIR SHUTTER ADJUSTMENT
a. The air shutter on your backburner
is preset at the factory. However, due
to atmospheric conditions and
different gas pressures, it may be
necessary to adjust the air shutter to
obtain a proper burn.
b. First remove the backburner cover,
then loosen the air shutter screw (See
Figure 9). It may be necessary to use
pliers to turn the air shutter. Light the
backburner. With the control knob on
'HIGH' adjust the air shutter to have a blue flame that is not
lifting off the burner (It may also have slightly yellow tips).
c. Tighten the air shutter adjustment screw.
Figure 9
AIR SHUTTER SCREW
CLOSED
Figure 6 - Air Shutter Adjustment Diagram
PARTIALLY
OPEN
FLAME ON PORTS
FLAME OFF PORTS
TAB
(TURN TABS)
DIMPLE
NOTCH