Highgear Axis XT User Manual
Page 6
SETTING TIME & DATE
- From the Settings Sequence, with TIME flashing in the display,
PRESS COMP to enter the TIME-DATE setting sequence.
The variable being programmed will flash in the display:
T1/T2 > DAYLIGHT SAVINGS TIME (DST) > HOUR > MINUTES > SECONDS > 12/24 HOUR FORMAT > YEAR > MONTH >
DATE > MONTH/DATE FORMAT > KEY TONE
- PRESS ALTI and / or BARO to make changes.
- PRESS COMP to move to the next value.
- When all variables are programmed, the watch will return to the SETTING SEQUENCE.
- PRESS ALTI to move to the next value in the setting sequence or PRESS MODE
to exit the setting sequence and return to TIME mode.
SETTING UNITS OF MEASURE
- From the Settings Sequence, with UNIT flashing in the display,
PRESS COMP to enter the UNIT setting sequence.
The variable being programmed will flash in the display:
ALTIMETER (FT or M) > BAROMETER (hPa or inHg) >
TEMPERATURE (F or C)
- PRESS ALTI and / or BARO
to make changes.
- PRESS COMP to move
to the next value.
- When all variables are programmed,
the watch will return to the
SETTING SEQUENCE.
- PRESS ALTI to move to the next value
in the setting sequence or PRESS MODE
to exit the setting sequence and return to TIME mode.
COMPASS CALIBRATION
NOTE:
Find a known cardinal point (using an analog compass). If the digital compass displays an accurate reading (in
PRIMARY COMPASS mode), there is no need to calibrate. If the reading is incorrect, follow the instructions below.
- From the Settings Sequence, with COMP flashing in the display,
PRESS COMP to enter the COMPASS setting sequence.
The word CAL will blink in the display.
- When ready, PRESS COMP to enter the CALIBRATION sequence.
- Keeping the watch level,
ROTATE the watch clockwise two times. Each
revolution should take approximately 15-20 seconds. The word DONE
will appear in the display to denote that the calibration was successful.
SETTING DECLINATION
- To continue to the magnetic declination setting, with COMP flashing in the
display,
PRESS COMP to enter the COMPASS setting sequence.The word
CAL will blink in the display.
- When ready, PRESS ALTI / BARO until the word DEC (declination) flashes
in the display, then PRESS COMP to enter the DECLINATION sequence.
- PRESS ALTI and / or BARO to toggle to your known magnetic declination direction (EAST or WEST),
then PRESS COMP.
- PRESS ALTI and / or BARO to toggle to your known magnetic declination degree, then PRESS COMP.
- To exit the DECLINATION portion , PRESS MODE until COMP is flashing in the display, then PRESS ALTI to move to
the next value in the setting sequence or PRESS MODE to exit the setting sequence and return to TIME mode.
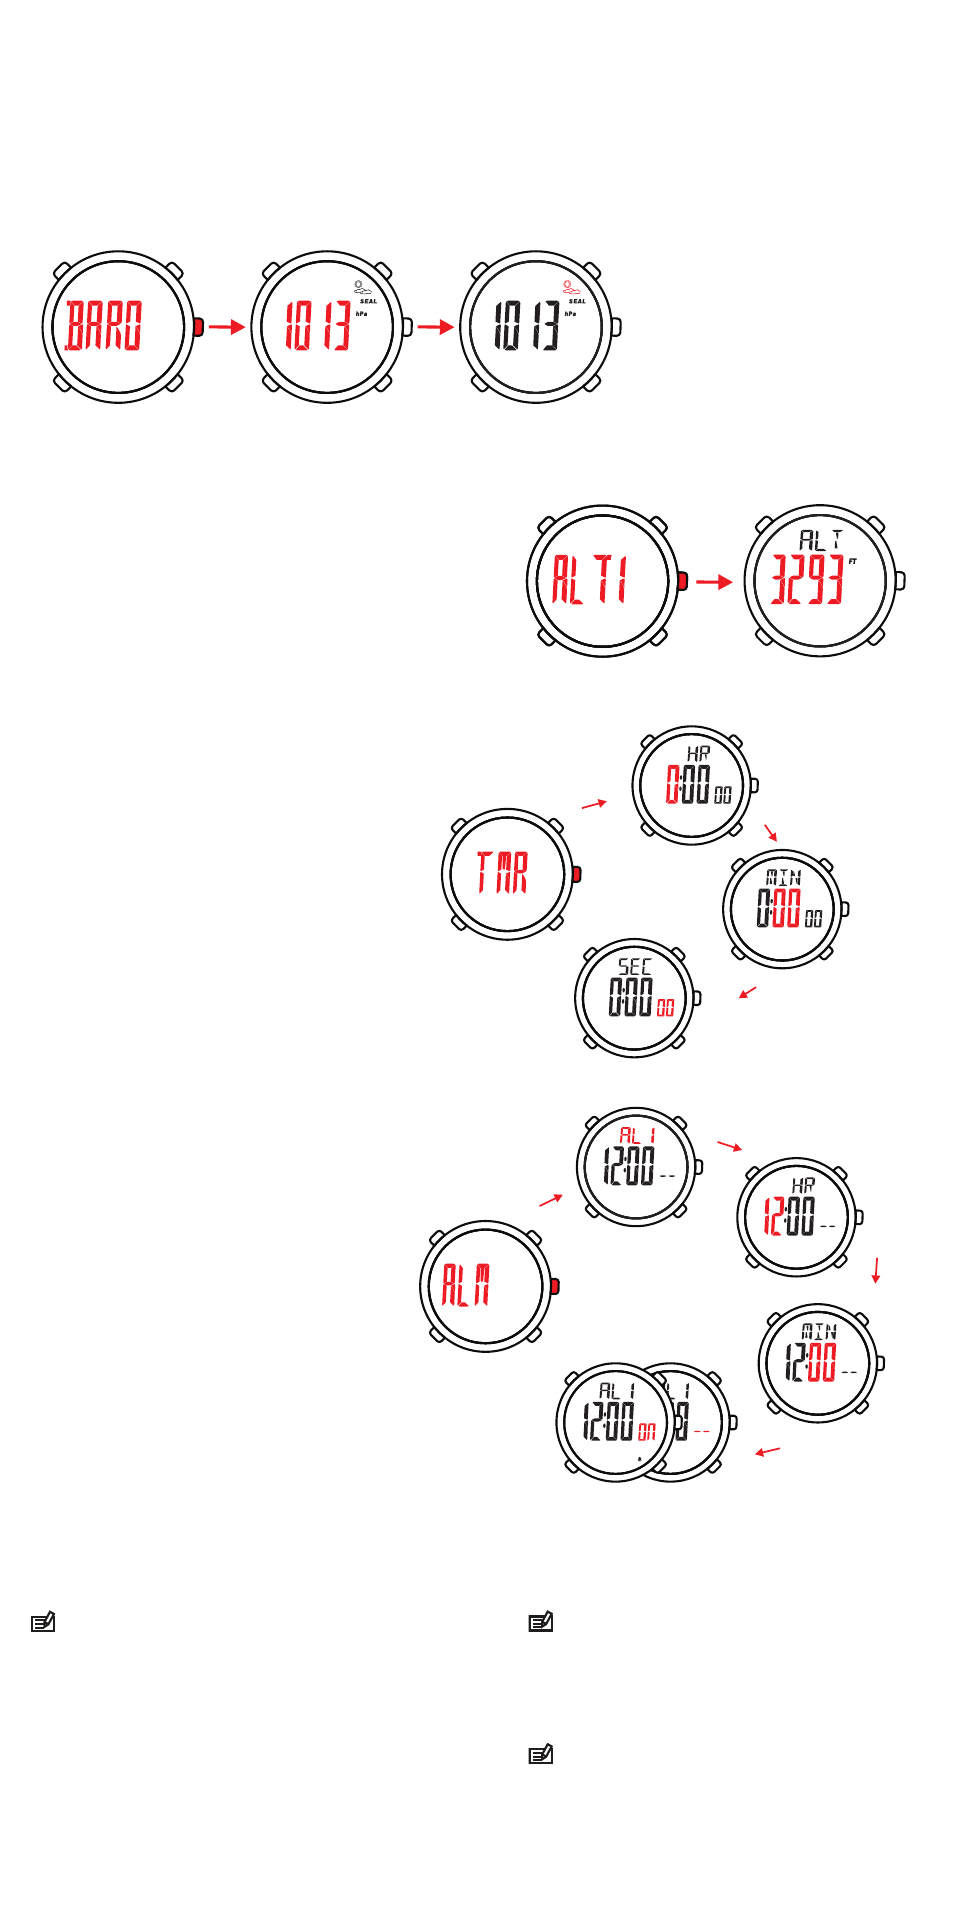
BAROMETER CALIBRATION
- From the Settings Sequence, with BARO flashing in the display,
PRESS COMP to enter the BAROMETRIC PRESSURE setting sequence.
The variable being programmed will flash in the display:
CURRENT BAROMETRIC PRESSURE (SEA-LEVEL) > WEATHER FORECAST ICON
- PRESS ALTI and / or BARO to make changes.
- PRESS COMP to move to the next value.
- When all variables are programmed, the watch will return to the SETTING SEQUENCE.
- PRESS ALTI to move to the next value in the setting sequence or PRESS MODE
to exit the setting sequence and return to TIME mode.
ALTIMETER CALIBRATION
- From the Settings Sequence, with ALTI flashing in the display,
PRESS COMP to enter the ALTIMETER setting sequence.
The variable being programmed will flash in the display:
CURRENT ALTITUDE
- PRESS ALTI and / or BARO to make changes.
- PRESS COMP to move to the next value.
- When all variables are programmed, the watch will return
to the SETTING SEQUENCE.
- PRESS ALTI to move to the next value in the setting
sequence or PRESS MODE to exit the setting sequence
and return to TIME mode.
COUNTDOWN TIMER
- From the Settings Sequence,
with TMR flashing in the display,
PRESS COMP to enter the
COUNTDOWN TIMER
setting sequence.
The variable being programmed
will flash in the display:
HOURS > MINUTES > SECONDS
- PRESS ALTI and / or BARO to make changes.
- PRESS COMP to move to the next value.
- When all variables are programmed, the watch
will return to the SETTING SEQUENCE.
- PRESS ALTI to move to the next value in the
setting sequence or PRESS MODE to exit the
setting sequence and return to TIME mode.
ALARMS
The watch has 2 independent alarms.
If the alarms are ON, they will sound an alert daily or
until the alarm is turned OFF (--).
- From the Settings Sequence,
with ALM flashing in the display,
PRESS COMP to enter the
ALARM setting sequence.
The variable being programmed
will flash in the display:
AL 1 / AL 2 > HOUR > MINUTES > ON / OFF (--)
- PRESS ALTI and / or BARO to make changes.
- PRESS COMP to move to the next value.
- When all variables are programmed, the
watch will return to the SETTING SEQUENCE.
- PRESS ALTI to move to the next value
in the setting sequence or PRESS MODE
to exit the setting sequence and return
to TIME mode.
TROUBLESHOOTING
HOURS
MINUTES
SECONDS
When reviewing a map, the NORTH indications point to TRUE NORTH.
Compasses, however, point to MAGNETIC NORTH. Because TRUE
NORTH and MAGNETIC NORTH are not positioned at the same location,
you must set the DECLINATION on your compass. The angle between
MAGNETIC & TRUE NORTH is your DECLINATION.
COMPASS
Most inaccurate ALTIMETER READINGS result from
incorrect BAROMETRIC calibrations. To avoid this
discrepancy, the BAROMETRIC PRESSUE is only
customizable from 900-1100hPa. However, the watch has
a working range from 300-1100hPa, so if the
BAROMETRIC PRESSURE drops, the watch will display
the correct pressure within the 300-1100hPa range.
The WEATHER FORECAST ICONS will display the
‘predicted’ weather (based on barometric pressure) for the
next 12 hours (i.e. If the watch displays the rain icon, this
means that rain is likely in the next 12 hours). This is only a
prediction, so please make sure to regularly check the local
weather for updated information.
ALTIMETER / BAROMETER
T1
T1
T1
T1
T1