Interactive Toy Concepts WiFli AC powered User Manual
Warning, Package contents, Quick-start instructions
The W--Fli is a delicate machine, before removing it from the packaging please read the instructions!
14
PACKAGE CONTENTS:
5.
Congratulations on the purchase of your Wi-Fli Helicopter. The Wi-Fli Helicopter brings advanced, hobby-level flying
technology to flyers who are looking for great outdoor flying performance from a mass-market helicopter. The Wi-Fli
Helicopter has built-in advanced gyroscope technology for providing an ultra-smooth flight and balance control
assistance. In addition, the Wi-Fli Helicopter uses state of the art Wi-Fi wireless technology. This technology allows
users to control the helicopter with a Smartphone such as an iPhone or Android Phone. In addition the Wi-Fli
Helicopter can also be operated by an iPod Touch or an iPad. (For the purposes of this manual these third-party
products are referred to as a “Wi-Fi Control Devices”). Up to 12 Wi-Fli Helicopters can be operated simultaneously in
the same general area. The Wi-Fi Control Devices allow for 2 different methods to control your Wi-Fli Helicopter.
There is a “Control Pad Mode” and the “Accelerometer Control Mode” for more advanced users. Do not throw away
this instruction manual as it contains valuable information for the operation of your helicopter as well as warranty
information. The helpful tips in this pilot’s manual will improve your skill and enhance your experience. Look for these
TIP! symbols for extra help.
UNPACKING YOUR BLADERUNNER INTERCEPTOR HELICOPTER:
To prevent damage during shipping, the Wi-Fli Helicopter is securely fastened in the package. Please ensure that all
of the fastening locations are unfastened before attempting to remove the Wi-Fli Helicopter from the package.
Be very careful when removing the Wi-Fli Helicopter to prevent damaging it.
AC ADAPTER -Standard Electrical Outlet Plug
-1 Circular Charging Plug
BALANCE BAR
TAIL ROTOR
REPLACEMENT TAIL ROTOR
REPLACEMENT CONNECTOR
CONNECTOR
TAIL MOTOR
TAIL BOOM
LANDING GEAR
DUAL COLOR
LED LIGHT
ON/OFF SWITCH
1. Wi-Fli Helicopter
2. AC Adapter
3. Instruction Manual
4. 1 Replacement Tail Rotor
5. 1 Replacement
Balance-Bar-to-Upper-Rotor
Connector
UPPER ROTOR
LOWER ROTOR
1. Download and install the Wi-Fli Control App onto your Wi-Fi Control Device. Just search for ”WIFLI CONTROL” wherever
you download your apps from. For a description of all current compatible Wi-Fi Control devices see section “WI-FI CONTROL
DEVICE SPECIFICATIONS”.
2. The Wi-Fli Helicopter needs to be charged once it is taken out of the box. It is necessary to charge the Wi-Fli Helicopter
before its first flight and before all subsequent flights where the Internal Battery has been depleted on the previous flight. Refer
to the section “CHARGING YOUR WI-FLI HELICOPTER” for this purpose.
3. If applicable, enable your Wi-Fi control device’s “airplane mode”. Otherwise, incoming calls will disable your Wi-Fli
Helicopter in mid flight!
4. Turn on the Wi-Fli Helicopter and wait 20 seconds for its on-board computer to fully boot-up.
5. Enable the Wi-Fi connection on the Wi-Fi Control Device and sync it with the Wi-Fli Helicopter by selecting the SSID “wifli
XXXXX”. The 5 characters represented by XXXXX are an alphanumeric code that corresponds to the unique ID of your
Helicopter. (An SSID or “Service Set Identifier” is a name or code used to identify a particular wireless LAN to which a user
wants to sync with or connect to.) Allow 3-5 seconds to complete Synchronization.
6. Launch the Wi-Fli Control App on your Wi-Fli Control Device and press the “Connect” Button.
7. Select the Control Pad Mode or the Accelerometer Control Mode on the Wi-Fi Control Device’s Screen. Please note,
Accelerometer Control Mode requires more skill and experience to use. It is intended as an advanced mode of control.
8. A) In Control Pad Mode, you can use the Throttle Slider on the left hand side to control the altitude of the Wi-Fli Helicopter.
You can also use the Control Pad on the right hand side to control the Forward, Reverse, and Left – Right turning of the Wi-Fli
Helicopter.
8. B) In Accelerometer Control Mode, advanced users can use the Throttle Slider on the left hand side to control the altitude of
the Wi-Fli Helicopter. To control the Forward, Reverse, and Left – Right turning of the Wi-Fli Helicopter it is necessary to tilt the
Wi-Fi Control Device.
9. Use the Trim Control near the upper middle of the Wi-Fi Control Device to eliminate any unwanted spinning of the Wi-Fli
Helicopter during flight.
10. Land your Wi-Fli Helicopter by gently sliding the Throttle Slider all the way down.
QUICK-START INSTRUCTIONS:
The Wi-Fli helicopter has a built-in, non-removable, non-replaceable, rechargeable Lithium-Polymer Battery. Do not tamper
with this Battery. Tampering with this Battery is dangerous and will void the warranty
There are no further Battery requirements as the Wi-Fli Helicopter can only be controlled by certain third party Wi-Fi Control
Devices. To ensure that your particular Wi-Fi Control Device has sufficient power during the operation of the Wi-Fli Helicopter,
consult the manufacturer's specifications for your specific model.
WI-FLI HELICOPTER BATTERY REQUIREMENTS:
The Wi-Fli Helicopter needs to be charged prior to the first flight. Please charge the Wi-Fli Helicopter before the first flight for
optimal performance using the following steps.
1. Ensure the Wi-Fli Helicopter's On / Off Switch is in the OFF position. The Dual Color LED at the bottom front of the Wi-Fli
Helicopter will turn off when the Helicopter is turned off.
2. Insert the AC Adapter into the Electrical Outlet.
CHARGING YOUR WI-FLI HELICOPTER:
WARNING:
Always insert the AC adapter into the power source before inserting the Circular
Charging Plug into the Wi-Fli Helicopter.
CHOOSING YOUR FLYING LOCATION:
Your Wi-Fli Helicopter is intended for outdoor operation. The outdoor space should be at least 50’ x 50’ (15 meters x 15 meters)
with a height allowance of about 33’ (10 M). The actual control range for most of the Wi-Fi Control Devices compatible with your
Wi-Fli Helicopter is about 60' (18 M). This range may vary from model to model and may also be affected by interference within
the operational environment. Avoid operating your Wi-Fli Helicopter near power-lines, trees, or roof-tops. Do not fly your Wi-Fli
Helicopter during windy conditions, rain or any other form of precipitation or harsh weather. Also make sure that your Wi-Fli
Helicopter does not have the opportunity to land in a wet or hazardous area such as snow, water, mud, or dangerous rocks.
The Wi-Fli Helicopter is not water resistant.
CHARGING YOUR WI-FLI HELICOPTER: -Continued
3. Once the AC Adapter is securely plugged into the power source, connect the Circular
Charging Plug into the Wi-Fli Helicopter's Charging port located at the right side
of the Helicopter.
4. Charging will start automatically. Note, the Dual Color LED at the bottom front of the
Wi-Fli Helicopter will light up Green during charging even though the Wi-Fli Helicopter
is turned off.
Charging will take 30 – 45 minutes for 4-6 minutes of flight.
5. Once the charging is complete, the Green LED on the bottom front of the Wi-Fli
Helicopter will turn off.
6. Make sure to unplug the AC Adapter from the Wi-Fli Helicopter’s Charging Port first.
Secondly, unplug the AC Adapter from the Electrical Outlet.
7. The Wi-Fli Helicopter is now ready to fly.
Wi-Fli Helicopter LED functions:
The Wi-Fli Helicopter has a dual color LED at the bottom front of the body.
Red LED is flashing after turn on: Wi-Fli Helicopter’s on-board computer is in the booting phase, it should
take around 20 to 25 seconds.
Green LED is On: Wi-Fli Helicopter is charging.
Red LED is On: The Wi-Fli Helicopter is turned on and ready to sync with the Wi-Fi Control Device. It is also
possible that the Wi-Fli Helicopter has already been synced with the Wi-Fli Control Device and is in operation.
Red LED is Off: Wi-Fli Helicopter is turned off and is not charging. It is also possible that the Wi-Fli
Helicopter is turned on but its Internal Battery is depleted.
Red LED flashes after flight: The Internal Battery voltage is low and needs to be recharged.
CHARGE TIME VARIES BASED ON THE WI-FLI HELICOPTER’S INTERNAL BATTERY CHARGE CONDITIONS. TYPICALLY
AFTER A 4 - 6 MINUTE FLIGHT THE WI-FLI HELICOPTER WILL NEED A 30 – 45 MINUTE CHARGE.
YOU DO NOT NEED TO WAIT FOR THE CHARGE TO BE COMPLETE TO FLY. SHORTER CHARGE TIMES = SHORTER
FLIGHT TIMES.
INTERRUPTING THE CHARGE BEFORE THE CHARGE CYCLE IS COMPLETED WILL NOT DAMAGE THE WI-FLI
HELICOPTER’S INTERNAL BATTERY, HOWEVER FOR THE LONGEST FLIGHT TIMES PLEASE LET THE WI-FLI HELICOPTER
FINISH ITS CHARGE CYCLE.
WARNING:
Spinning propellers can cause injury to people, animals and plants as well as damage to
furniture and other property. To avoid the risk of injury or damage, stay clear of spinning
propellers. Always keep a minimum distance of about 80 inches (2 meters) between the
spinning propellers and people, pets, or other objects.
There are a few select Wi-Fi Control Devices which are compatible with your Wi-Fli Helicopter. It is very likely that other Wi-Fi Control
Devices will be compatible with the Wi-Fli Helicopter in the future. For the latest updates on Device compatibility, it is recommended to
check the latest information at the following website: www.interactivetoy.com. In addition, it is recommended to download the latest
Wi-Fli Control App Update for your specific Wi-Fi Control Device. The Wi-Fli Control App Updates may contain information on Device
compatibility, troubleshooting tips, new features and replacement part availability.
Wi-Fi Control Device Compatibility:
The following is a list of Wi-Fi Control Devices that are compatible with the Wi-Fli Helicopter as of Spring 2011:
iPhone 3G, 3GS, 4 with iOS 4.0 or newer.
iPod Touch 2G, 3G & 4G with iOS 4.0 or newer.
iPad 1 & 2 with iOS 4.0 or newer.
Android Phone with Android OS 2.1, 2.2 or 2.3 with multi-touch display capability.
Downloading your Wi-Fli Control App:
The Wi-Fli Control App is available as a free download for all Wi-Fli compatible Wi-Fi Control Devices. There are some differences in
the methods for downloading the Wi-Fli Control App for your particular device. Follow the basic steps as described below:
Apple based Wi-Fi Control Devices:
1. Access the Apple App Store.
2. Use the Keywords "WiFli Control" to search for the latest version of the Wi-Fli Control App.
3. Download and install the Wi-Fli Control App on your specific Apple based Wi-Fi Control Device.
Android based Electronic Wi-Fi Control Devices:
1. Access the Android Market.
2. Use the Keywords "WiFli Control" to search for the appropriate version of the Wi-Fli Control App.
3. Download and install the Wi-Fli Control App on your specific Android** based Wi-Fi Control Device.
WI-FI CONTROL DEVICE SPECIFICATIONS:
Regardless of which Wi-Fi Control Device you are using, the basic operation of the Wi-Fli Helicopter is the same. Follow these easy
instructions to sync (connect) your Wi-Fli Helicopter to your Wi-Fi Control Device.
1. When your Wi-Fli Helicopter is charged and ready to sync with your Wi-Fi Control Device, slide the On-Off Switch located on the left
side of the chassis to the On position. The Dual Color LED located at the bottom front of the Wi-Fli Helicopter will light up Red. Wait for
20 seconds before proceeding to the next step. This will allow the Wi-Fli Helicopter’s Internal Computer to boot up.
IF APPLICABLE, ENABLE YOUR WI-FI CONTROL DEVICE’S AIRPLANE MODE WHENEVER YOU FLY THE WI-FLI
HELICOPTER. IF AIRPLANE MODE IS NOT ENABLED, INCOMING CALLS ON THE WI-FI CONTROL DEVICE WILL DISRUPT THE
OPERATION OF YOUR WI-FLI HELICOPTER AND MAY CAUSE IT TO CRASH!!
2. Enable the Wi-Fi connection on your Wi-Fi Control Device and sync (connect) it with the Wi-Fli Helicopter by selecting the SSID “wifli
XXXXX”. The 5 characters XXXXX are an alphanumeric code that represents the unique ID of your Helicopter. (An SSID or “Service
Set Identifier” is a name or code used to identify a particular wireless LAN to which a user wants to sync with or connect to.) Allow 3-5
seconds to complete Synchronization.
3. Launch the Wi-Fli Control App from your Wi-Fi Control Device.
4. When the first screen of the Wi-Fli Control App loads onto the Wi-Fi Control Device, press the “Connect” button on the screen. The
Wi-Fli Control App Interface Screen will show up on your Wi-Fi Control Device. You are now ready to fly the Wi-Fli Helicopter!
IT IS POSSIBLE TO OPERATE UP TO 12 WI-FLI HELICOPTERS IN THE SAME GENERAL VICINITY WITHOUT ANY
INTERFERENCE ISSUES. SIMPLY FOLLOW THE ABOVE STEPS TO SYNC EACH WI-FLI HELICOPTER WITH ITS INDIVIDUAL
WI-FI CONTROL DEVICE. EACH WI-FLI HELICOPTER MUST BE SYNCED INDIVIDUALLY AND ONE AT A TIME. DO NOT
ATTEMPT TO SYNC MORE THAN ONE WI-FLI HELICOPTER AT A TIME WITH A WI-FI CONTROL DEVICE.
SYNCING THE WI-FLI HELICOPTER WITH YOUR WI-FI CONTROL DEVICE:
The Wi-Fi Control Device of your choice will effectively operate your Wi-Fli Helicopter with full digital proportional control. Small
adjustments of the control features will produce precise control. There are 2 different Control Modes available for your Wi-Fi Control
Device. These are, Control Pad Mode, and Accelerometer Control Mode. Please note, Accelerometer Control Mode requires more skill
and experience to use. It is intended as an advanced mode of control. Below is a listing of features common to both Control Modes
followed by a description of the unique features of the 2 Control Modes.The Wi-Fi Control Device of your choice will effectively operate
your Wi-Fli Helicopter with full digital proportional control. Small adjustments of the control features will produce precise control. There
are 2 different Control Modes available for your Wi-Fi Control Device. These are, Control Pad Mode, and Accelerometer Control Mode.
Please note, Accelerometer Control Mode requires more skill and experience to use. It is intended as an advanced mode of control.
Below is a listing of features common to both Control Modes followed by a description of the unique features of the 2 Control Modes.
Features common to both Control Modes:
Trim Control – Allows you to compensate for unwanted turning of the Wi-Fli Helicopter from right to left. If the Wi-Fli Helicopter is
turning to the left when it shouldn’t, press the “+” button. If the Wi-Fli Helicopter is turning to the right when it shouldn’t, press the “-”
button.
Wi-Fi Signal Indicator – The Wi-Fli Helicopter emits a Wi-Fi signal to your Wi-Fi Control device during operation and vice versa. If the
Wi-Fli Helicopter encounters interference or goes out of range, you will lose control of the Wi-Fli Helicopter. The Wi-Fi Signal Indicator
provides information on the strength of the Wi-Fi Signal and allows you to avoid areas where the Wi-Fi Signal is poor.
Helicopter Battery Level – This Indicator shows the Wi-Fli Helicopter’s Internal Battery’s level of charge.
Control Mode Toggle – This Toggle allows you to switch between Control Pad Mode and Accelerometer Control Mode.
Throttle Slider – The Throttle Slider on the left side of the screen increases the thrust of the Helicopter by increasing the speed of the
Main Rotors. As you increase the level of the Throttle Slider, the Wi-Fli Helicopter will fly higher.
Direction Indicator – The Direction Indicator, located in the center of your Wi-Fli Control Device’s Screen rotates to show you the
direction that your Wi-Fli Helicopter is flying in, or turning in. The Direction Indicator is referenced as if it represented the pilot’s view.
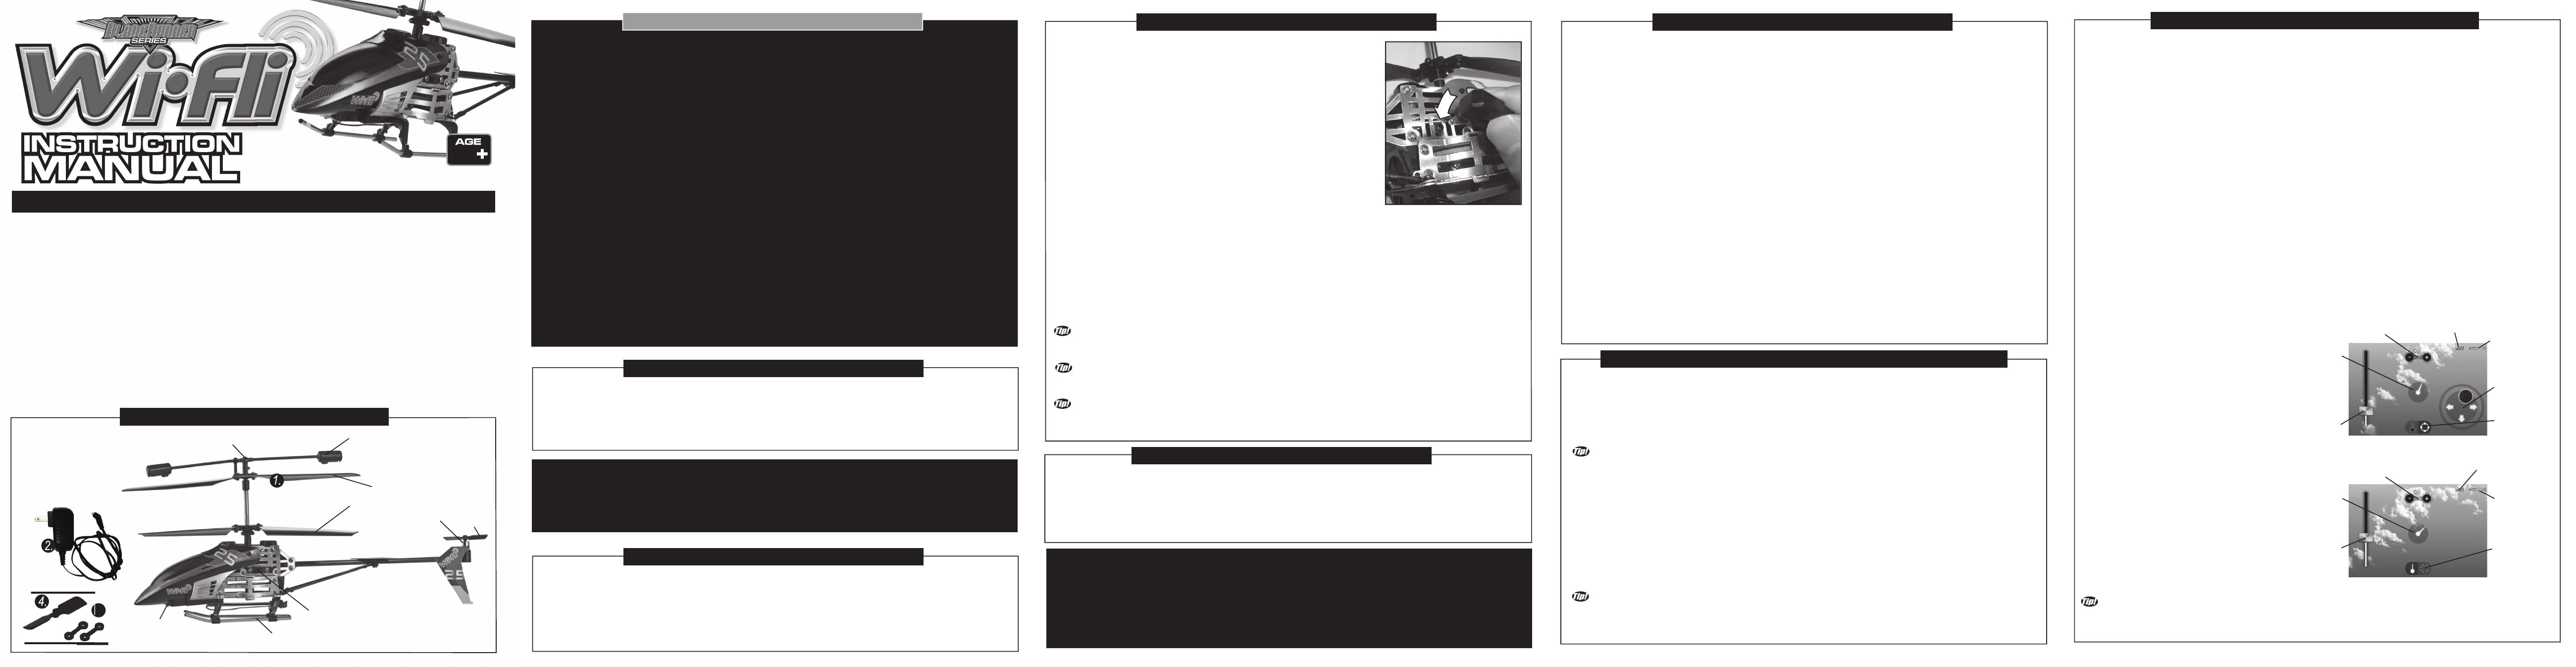
GETTING TO KNOW THE WI-FLI CONTROL APP INTERFACE:
Control Pad Mode:
The Control Pad Mode uses a Control Pad on the right hand
side of the Wi-Fi Control Device’s Screen to control the
Wi-Fli Helicopter’s direction of flight. It controls forward,
reverse, and left to right turning of the Wi-Fli Helicopter.
Control Pad – Use the right thumb to operate the Control
Pad. This will allow you to turn your Wi-Fli Helicopter left to
right and also to fly forward or in reverse.
Accelerometer Control Mode (For Advanced Users!):
The Accelerometer Control Mode uses the Wi-Fi Control
Device’s Internal Accelerometer to control the Wi-Fli
Helicopter’s direction of flight. It controls forward, reverse,
and left to right turning of the Wi-Fli Helicopter by tilting the
Wi-Fi Control Device in the desired direction of flight. Please
note, Accelerometer Control Mode requires more skill and
experience to use. It is intended as an advanced mode of
control.
Accelerometer Control – Tilt the Wi-Fi Control Device in the
desired flight direction. This will allow you to turn your Wi-Fli
Helicopter left to right and also to fly forward or in reverse.
As the Wi-Fli Helicopter is flying towards you, you will naturally experience a phenomenon called “Control Reversal”. Thus steering
inputs to the right will make the helicopter fly to your left side. Also, steering inputs to the left will make the helicopter fly to your right
side. This can be a bit tricky but it is normal and it just requires patience and practice to master the controls.
Trim
Control
Wi-Fi Signal
Indicator
Helicopter
Battery Level
Control
Pad
Control
Mode
Toggle
Throttle
Slider
Direction
Indicator
Accelerometer Control (Tilting of the Device)
Trim
Control
Wi-Fi Signal
Indicator
Helicopter
Battery Level
Control
Mode
Toggle
Throttle
Slider
Direction
Indicator
Control Pad Mode
Continued.
TM
TM