James Loudspeaker 53SA-7 User Manual
53sa-7
53SA-7
1
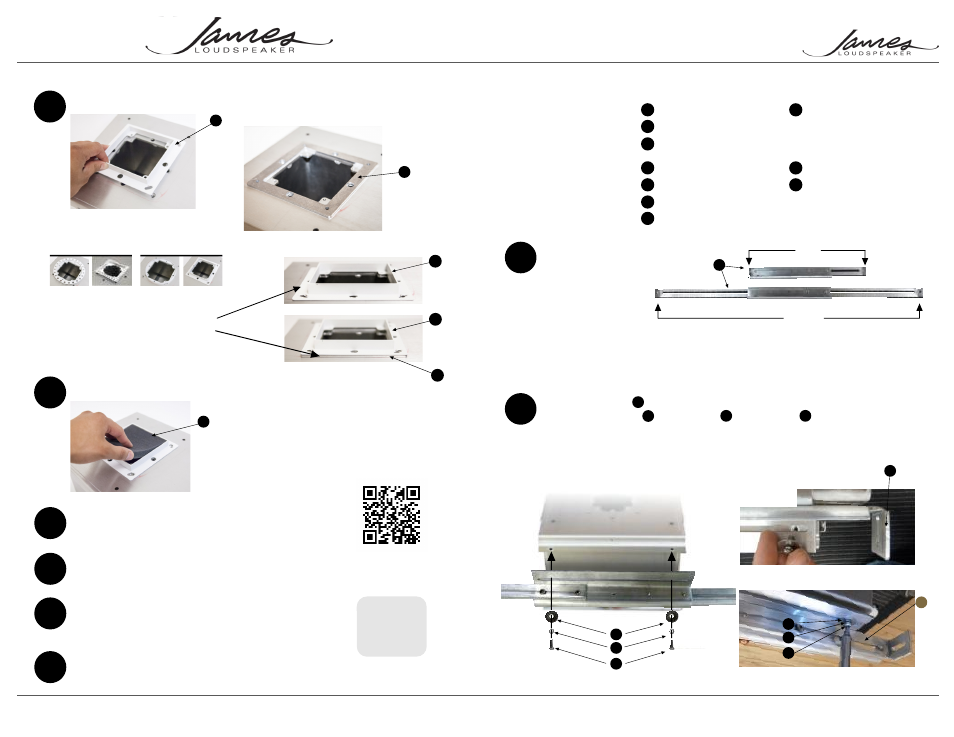
Assemble the parts
11”
22.5”
The brackets (Part No.
SA-BRKT-11-22) are
designed for 16” On-
center constructions,
however can be adjusted
to accomodate
construction from 11” to
22.5” joist spacing
(Fig. 1).
2
Attach the brackets to the speaker using the
supplied 8/32 screws , lock washers & flat washers .
Tighten these screws just enough to allow movement for
adjustment during installation.
Note: brackets can be mounted
to either the sides or the ends of the speaker for added
installation flexibility.
Tools Required:
1) #2 Phillips screwdriver
or drill with #2 Phillips
drill bit
2) Straight edge or level
3) Wood or drywall screws
1 - 53SA-7 or 53SAS-7
2 - Mounting Brackets
4 - 8-32 x 1/2 Pan Head
Machine Screws
4 - #8 Lock Washers
4 - #8 Flat Washers
4 - 6/32 Course Head Screws
1 - Foam Dust Guard
A
B
C
D
E
1 -Trim Ring
Spacer Ring(s)
H
I
J
B
E
D
Parts List: Supplied
Parts: Supplied by Installer
4 - 1.25” Wood or drywall
screws
Parts: Ordered Separately
F
G
C
E
D
C
Fig. 3
Fig. 1
C
Installation guide for the 53SA-7 In-Ceiling Speaker.
B
B
D
E
Use optional spacer to adjust height
P/N SA53-SP-S-0.125
10
Attach the finishing trim kit
There are four trim kits
available to choose from
Fig. 17
Fig. 16
J
I
For omit spacer (a)
1/2” Drywall
For use spacer (b)
5/8” Drywall
If the drywall is in excess of 5/8”
add additional 1/8” spacers
as needed.
Fig. 18
Fig. 19
I
I
J
535 Airpark Road, Napa, CA 94558 | Ph: 707.265.6343 Fx: 707.265.6334 | www.jamesloudspeaker.com
SA53-5R-SR
SA53-4S-SR
SA53-5R-W
SA53-4S-W
For Solid Surfaces
For Sheet Rock
Page 1
Page 4
B
Fig. 2
I
Products suitable for use in
outdoor dry environments
63SA-7
Installation
Video
FREQ. RESPONSE
IMPEDANCE
SENSITIVITY
AMP RANGE
RMS POWER
50-22kHz +/-3dB
4 Ohms
88dB @ 2.83V/1M
50-125 Watts
50 Watts
Fig. 4
Fig. 15
BACK
ORDER
53SA-7-INSTALL 140618
11
Install foam dust guard
13
Drywall, tape, mud, etc.
14
Safely store the supplied grille for the final
assembly. If you also received the 53SAM-7
module, store this as well.
Fig. 20
G
15
If you received a 53SAS-7
preconstruction assembly, be sure to order
the 53SAM-7 module when ready for
finishing.
12
Recommend testing sub to assure all components
are working.