Setup, English – Marantz SR4500N User Manual
Page 20
ENGLISH
16
1. INPUT
SIMPLE SETUP
2. SPEAKER
3. PREFERENCE
5. DOLBY PLII
6. CSII
4. SURROUND
CD
TAPE
CD-R
TV
DVD
VCR1
DSS
SUBW
L&R
CENT
SL&SR
SB
SB SIZE
LPF/HPF
BASS
(Subwoofer)
(Front Left & Right)
(Center)
(Surround Left & Right)
(Surround Back)
(Surround Back Size)
(Low/High Pass Filter)
(Bass Mix)
→
SMALL
→
LARGE
→
→
80
→
100
→
120
→
→
BOTH
→
MIX
→
SMALL
100Hz
BOTH
→
YES
→
NONE
→
YES
2CH
→
LARGE
→
SMALL
→
LARGE
→
SMALL
→
LARGE
→
NONE
→
SMALL
SMALL
→
SMALL
→
LARGE
→
NONE
→
→
LARGE
→
MEDIUM
→
SMALL
→
→
1CH
→
2CH
→
NONE
→
→
MANUAL
→
AUTO
→
MANUAL
→
NOMAL
→
ECONOMY
→
ECONOMY
→…→
AUTO
→…→
STEREO
→…
AUTO
L
R
(Front L)
(Front R)
(Center)
(Surround L)
(Surround R)
(Subwoofer)
(Surround back L)
(Surround back R)
C
SL
SR
T-MODE
L
CENT
R
SR
SBR
SBL
SL
SUBW
(Test Tone)
(Front L-ch Level)
(Center-ch Level)
(Front R-ch Level)
(Surround R-ch Level)
(Surround Back R-ch Level)
(Surround Back L-ch Level)
(Surround L-ch Level)
(Subwoofer Level)
STBY
(Standby Mode)
PARAM
PANORAMA
SR
HT-EQ
LFE
(Surround Mode)
(LFE Level)
TRUBASS
SRS DIALOG
7.1-V
(7.1ch Video Input)
D1 AUTO / D2 AUTO /D3 AUTO / D4 AUTO
(Digital AUTO mode)
DIG.1 / DIG.2 / DIG.3 / DIG.4 (Digital Fixed mode)
ANALOG
SPEAKERS
ROOM
2-1. SPEAKERS SIZE setup
2-2. SPEAKERS DISTANCE setup
2-3. SPEAKERS LEVEL setup
3.0m(10ft)
3.0m(10ft)
3.0m(10ft)
3.0m(10ft)
3.0m(10ft)
OFF
0db
→
2.0(2ch)
→
2.1(2.1ch)
→ … →
7.0(7ch)
→
7.1(7.1ch)
→
→
0.3m(1ft)
→…→
9.0m(30ft)
→
0.3m(1ft)
→…→
9.0m(30ft)
→
0.3m(1ft)
→…→
9.0m(30ft)
→
0.3m(1ft)
→…→
9.0m(30ft)
SW
SBL
SBR
3.0m(10ft)
3.0m(10ft)
3.0m(10ft)
→
0.3m(1ft)
→…→
9.0m(30ft)
→
0.3m(1ft)
→…→
9.0m(30ft)
→
0.3m(1ft)
→…→
9.0m(30ft)
→
-10
→…→
0
→…→
+10
0db
0db
0db
0db
0db
0db
0db
0
0
LAST
→
-10
→…→
0
→…→
+10
→
-10
→…→
0
→…→
+10
→
-10
→…→
0
→…→
+10
→
-10
→…→
0
→…→
+10
→
-10
→…→
0
→…→
+10
→
-10
→…→
0
→…→
+10
0db
→
-15
→…→
0
→…→
+10
→
0
→
1
→
2
→
3
→
4
→
5
→
6
→
→
LAST
→
TV
→
DVD
→…→
V–OFF
→
→
OFF
→
ON
→
(
∗
)
→
0
→
-10
→
OFF
→
(
∗
)
→
DEFAULT
→
CUSTOM
→
DEFAULT
OFF
→
OFF
→
ON
→
DIMENSION
3
→
0
→
1
→
2
→
3
→
4
→
5
→
6
→
C-WIDTH
(Parameter)
(Center Width)
3
→
0
→
1
→
2
→
3
→
4
→
5
→
6
→
7
→
D4-AUTO
D1-AUTO
D3-AUTO
ANALOG
ANALOG
ANALOG
D2-AUTO
SETUP MENU
→
0.3m(1ft)
→…→
9.0m(30ft)
→
0
→
1
→
2
→
3
→
4
→
5
→
6
→
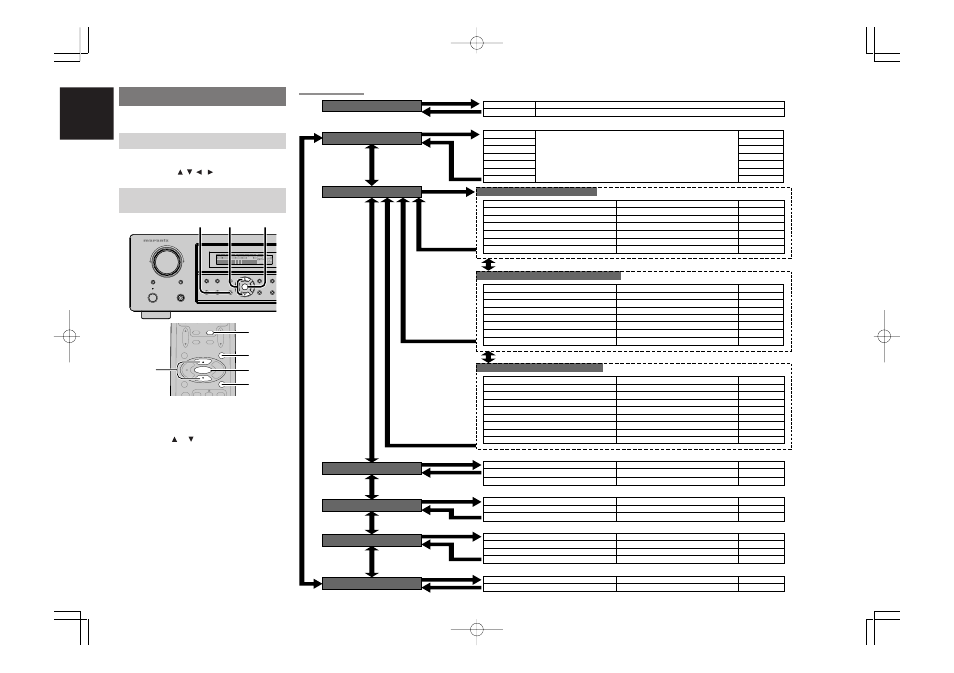
SETUP
After all components are connected, initial setup
must be performed.
SETUP MENU SYSTEM
The SR4500 incorporates an menu on the front
display, which makes various operations possible by
using the
cursor
( , , , ) and
ENTER
buttons.
ENTER THE DESIRED MENU ITEM
OF THE SETUP MENU
1.
Turn on the unit.
2.
Press the
AMP
button of the remote control.
3.
Press the
MENU
button or the
ENTER
button of
the remote control to enter the SETUP MENU.
4.
Press the or
cursor
button to select the
SETUP MENU item.
5.
Press the
ENTER
button or the
MENU
button
to enter the desired menu item.
After finishing all setup, press the
MENU OFF
button
to exit the SETUP MENU.
MENU STRUCTURE
Initial state
EXIT
DTS
PURE DIRECT
AUTO
3
2
1
T.TONE
MENU OFF
SET UP/
MENU
OSD
VOL.
TV
VOL.
MAIN
SLEEP
MUTE
AMP
ENTER
AUX1
MAIN
4.
2.
3. 5.
3. 5.
SURROUND
AV SURROUND RECEIVER SR4500
INPUT SELECTOR
PHONES
STANDBY
7.1CH INPUT
PURE
SETUP
DIRECT
SIMPLE
AUTO
HT-EQ
MENU
ENTER
DISPLAY
MEMORY
EXIT
BAND
MODE
DISP
MULTI
AUTO
TUNED
ST
V – OFF
NIGHT
PEAK
ANALOG
DIGITAL
ATT
SLEEP
SURR
AUTO
DIRECT
DISC 6.1
MT X 6.1
EQ
DIGITAL
SURROUND
AAC
PCM
L
C
R
SL
S
SR
LFE
POWER ON/OFF
S. SPEAKER B
3. 5.
4.
5.
SR4500N DFU_01_ENG 2_2
04.5.14, 4:20 PM
Page 16
Adobe PageMaker 6.5J/PPC