Marantz SR4500N User Manual
Page 24
ENGLISH
20
1.
When you select “MANUAL” in T-MODE menu
by pressing the or button, this unit will emit
a pink noise from the front left speaker. At this
time, adjust the desired level of the master
volume. Remember the level of this noise and
then press the button. This unit will emit the
pink noise from the center speaker.
2.
Using the and cursor buttons, adjust the
volume level of the noise from the center
speaker so that it is the same level as the front
left speaker (Note that this can be adjusted to
any level between –10 and +10 dB in 1dB
intervals).
3.
Press the cursor button again. This unit will
now emit the pink noise from the front right
speaker.
4.
Repeat steps 2 and 3 above for the front right
and other speakers until all speakers are
adjusted to the same volume level.
5.
Press the
ENTER
button, you can stop the
test tone mode. Or press the or cursor
button to select “EXIT” then press the
ENTER
button to exit the SETUP MENU.
Or press the or button to select “RETURN”
then press the
ENTER
button to return the
previous “2-2. Speakers Distance” setup.
2-3. SPEAKERS LEVEL
Here you will set the volume for each speaker so
that they are all heard by the listener at the same
level. Moreover, if the
T.TONE
button is pressed,
unit can enter into this menu directly.
Note:
• The speaker level settings is not available in 7.1
channel input mode and Pure Direct mode.
T(TEST) MODE :
Selects “
MANUAL
” or “
AUTO
” for generating
mode of test tone or cursor button.
If you select “
AUTO
”
by pressing the button, the
test tone will be cycled through in a circular pattern
which is L (Left)
→
C (Center)
→
R (Right)
→
SR
(Surround Right)
→
SBR (Surround Back Right)
→
SBL (Surround Back Left)
→
SL (Surround Left)
→
SW (Subwoofer)
→
L
→
.. increments of 2 seconds
for each channel.
Using the and cursor buttons, adjust the
volume level of the noise from the speaker so that
it is the same level for all speaker.
Press the
ENTER
button, you can stop the test
tone mode. Or press the or cursor button to
select “EXIT” then press the
ENTER
button to exit
the SETUP MENU.
Or press the or cursor button to select
“RETURN” then press the
ENTER
button to return
the previous “2-2. Speakers Distance” setup.
If you select “
MANUAL
”, adjust the output level of
each speaker as follow.
Notes:
• Speakers that you selected “None” for in the
Speaker Size Setup menu will not appear.
• The setup level for each channel is memorized for
reproduction in all surround mode.
• To adjust the speaker levels for 7.1-channel input
sources, you will need to use the 7.1CH Level
Input setup menu.
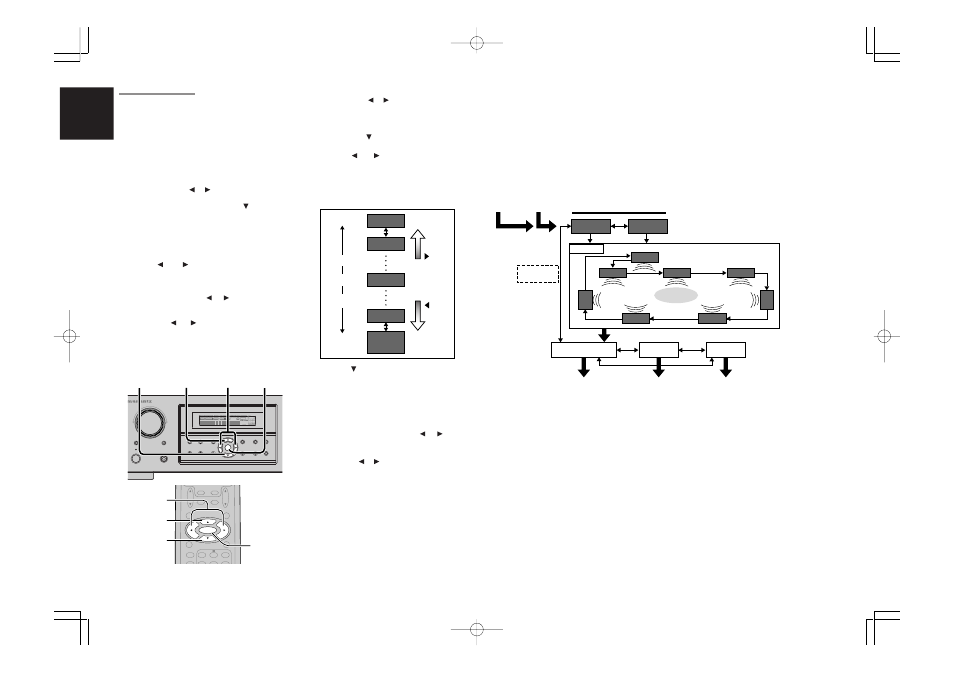
MENU STRUCTURE of Speakers Level setup
MANU
AUTO
SW
L
C
SBR
R
SL
SR
EXIT
RETURN
TO MAIN MENU
SBL
Speaker
(Auto)
Speakers
Distance setup
MAIN
MENU
exit SETUP
MENU
Test Tone mode
Speakers
Level setup
Speakers
Distance
setup
Direct selec
by remote
control
Listening
Positiom
SURROUND
AV SURROUND RECEIVER SR4500
INPUT SELECTOR
PHONES
STANDBY
7.1CH INPUT
PURE
SETUP
DIRECT
SIMPLE
AUTO
HT-EQ
MENU
ENTER
DISPLAY
MEMORY
CLEAR
T-MODE
EXIT
BAND
MODE
DISP
MULTI
AUTO
TUNED
ST
V – OFF
NIGHT
PEAK
ANALOG
DIGITAL
ATT
SLEEP
SURR
AUTO
DIRECT
DISC 6.1
MT X 6.1
EQ
DIGITAL
SURROUND
AAC
PCM
L
C
R
SL
S
SR
LFE
POWER ON/OFF
S. SPEAKER B
1. 5.
5.
1. 2. 5.
1. 3. 5.
1. 5.
5.
2. 5.
1. 3. 5.
NIGHT
CSII
EX/ES
VIRTUAL
DTS
PURE DIRECT
AUTO
3
2
1
6
5
4
T.TONE
MENU OFF
SET UP/
MENU
OSD
VOL.
TV
VOL.
MAIN
SLEEP
MUTE
AMP
ENTER
AUX1
MAIN
MENU STRUCTURE of Speaker Level setup
+10dB
+9dB
-9dB
Minimum
Maximum
1 dB interval
Reference
1 dB interval
-10dB
(SW -15 dB)
button
button
0dB
SR4500N DFU_01_ENG 2_2
04.5.14, 4:22 PM
Page 20
Adobe PageMaker 6.5J/PPC