Remote controller – Marantz SA7003 User Manual
Page 11
7
N
a
m
es
a
N
d
Fu
N
ct
IO
N
s
B
a
sI
c
cO
N
N
ec
tI
O
N
B
a
sI
c
O
pe
ra
tI
O
N
a
d
Va
N
ce
d
cO
N
N
ec
tI
O
N
s
tr
Ou
Bl
es
HO
Ot
IN
G
O
tH
er
s
N
a
m
es
a
N
d
Fu
N
ct
IO
N
s
ENGLISH
a
pp
lI
ca
tI
O
N
O
pe
ra
tI
O
N
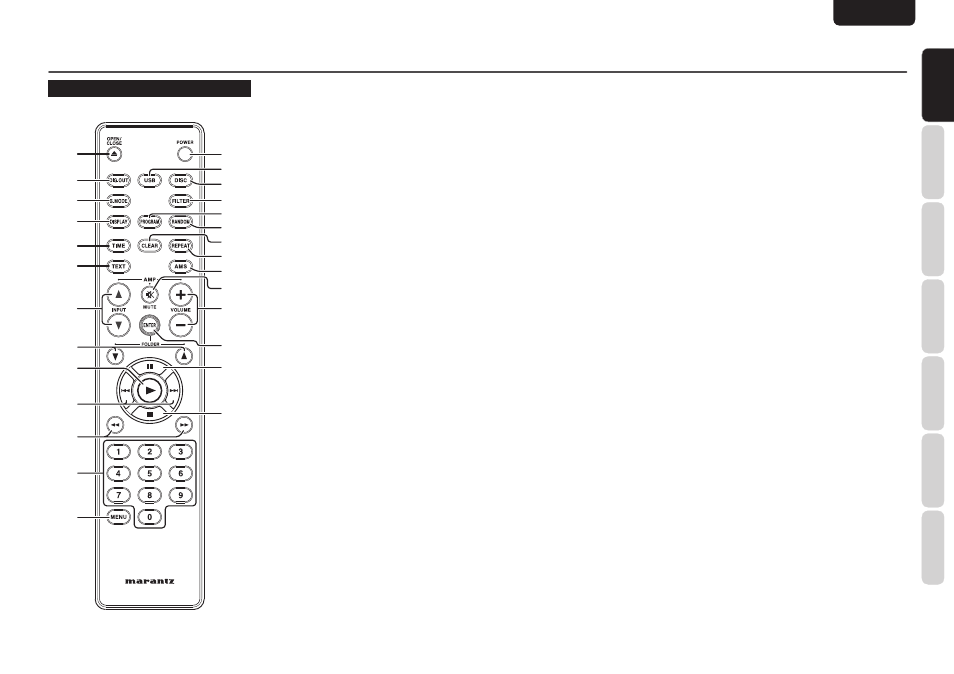
Names aNd FuNctIONs
z
POWER button
Switches the power of the unit ON and OFF (see
page 10).
x
USB button (SA8003 only)
Press this button when using a USB connection
(see page 17).
c
DISC button (SA8003 only)
Press this button when using a disc media.
v
FILTER button
This button cannot be used on this unit.
b
PROGRAM button
See page 14.
n
RANDOM button
See page 14.
m
CLEAR button
See page 15.
,
REPEAT button
See page 14.
.
AMS (Automatic Music Scan)
button
See page 15.
⁄0
MUTE button
This button can activate the mute function of devices
compatible with Marantz pre-main amplifiers.
⁄1
VOLUME button
This button can be used to adjust the volume of
devices compatible with Marantz amplifiers that
come with a remote controller.
⁄2
ENTER button
This button is used to enter settings done via MENU
or decide files for USB file search.
⁄3
8 (pause) button
See page 10.
⁄4
7 (stop) button
See page 10.
⁄5
MENU (menu setting) button
Press this button when conducting Timer Play, SA-
CD, USB setup or iPod setup.
⁄6
0-9 (numeric) buttons
See page 10.
⁄7
1, ¡ (search) buttons
See page 10.
⁄8
4, ¢ (track skip) buttons
See page 10.
⁄9
3 (play) button
See page 10.
¤0
FOLDER
5/∞ buttons
(SA8003 only)
These buttons are used for USB folder search and
iPod album selection.
¤1
INPUT
5/∞ buttons
These buttons are used to switch the input when
using one of the supported Marantz amplifiers.
However, this function may not work with some of
the older models.
¤2
TEXT button
Press this button when switching the main display
area from time display to text display when using a
data disc containing MP3, WMA files, etc., or during
USB/iPod use (see page 20).
However, this feature does not support the display
of Super Audio CD or Audio CD TEXT.
¤3
TIME button
Press this button when switching the main display
area from text display to time display (see page
14).
¤4
DISPLAY button
Press this button when switching the display ON
and OFF.
The display becomes dimmer each time the button
is pressed. When the button is pressed for the third
time, the display turns off and the DISPLAY OFF
indicator lights up. The last setting is retained even
if the power is turned off.
¤5
S.MODE (sound mode) button
See page 15.
¤6
DIG.OUT (digital out on/off) button
Press this button when switching the digital output
of an audio CD signal on/off (see page 16).
¤7
0 (OPEN/CLOSE) button
See page 10.
remOte cONtrOller
z
v
⁄3
⁄4
⁄5
⁄6
⁄7
⁄9
⁄8
¤0
⁄1
c
n
.
⁄2
,
x
b
m
⁄0
¤1
¤2
¤3
¤4
¤5
¤6
¤7