Take rename function, Hs-8 – Teac HS-8 Firmware V1.30 User Manual
Page 3
TASCAM HS-8
3
HS-8
VNC (virtual network computing)
By using a VNC viewer application, you can view and operate the contents of
this unit's LCD screen on a computer.
In the VNC viewer application, you can use a mouse to conduct the following
operations.
i
Mouse left click:
Same as touching the unit's LCD.
i
Mouse wheel click:
Same as pressing the unit's ENTER key.
i
Mouse wheel operation: Same as using the unit's DATA dial.
i
Mouse wheel push and turn: Same as using the unit's DATA dial while
pushing it to make large setting changes
(COARSE mode operation).
In addition, when the VNC viewer application is active, you can conduct the
following operations by using the computer keyboard.
i
F1 to F12 keys: These work the same as an external keyboard con-
nected to the unit. For details see the “List of keyboard
operations” in “Operation using a computer keyboard”
in “12 – Other functions” of this unit's manual.
i
Home key:
This works the same as this unit's HOME key and opens
the Home Screen.
Press the End key while pressing and holding the Home
key to open the
LOCK SETUP
screen.
i
End key:
This works the same as this unit's MENU key and opens
the MENU screen.
Press the End key while pressing and holding the Home
key to open the
LOCK SETUP
screen.
i
Page Down:
This works the same as this unit's PROJECT key and
opens the
PROJECT
screen.
i
Cursor 1 key:
This works the same as turning this unit's DATA dial
right.
i
Cursor z key:
This works the same as turning this unit's DATA dial left.
i
Character input keys: Use to input characters when a keyboard screen
appears on the unit.
Necessary setting for VNC connections
The following settings are necessary for connecting to this unit using a VNC
viewer application.
IP address:
This unit’s IP address is shown in the
IP Address
field of the
REMOTE SETUP
screen
ETHERNET
page.
Password:
HS-8 (default, case sensitive)
This setting can be changed by using the
Password
Change
button on the
REMOTE SETUP
screen
ETH-
ERNET
page.
NOTE
i2 or more simultaneous VNC connections are not possible.
iWhen
EXTERNAL Control
has been set to
LOCK
on the
Lock Setup
screen, display is possible but operation is not when using a VNC viewer
application.
iChanging any settings on the
REMOTE SETUP
screen of the
ETHERNET
page will also end any active VNC connection.
iFor information about VNC viewer application that have been confirmed to
work properly with this unit, please contact TASCAM customer support.
iWhen files are being transferred by FTP or when the system sampling fre-
quency is 88.2 or 96 kHz, VNC viewer application display and operation will not
be smooth.
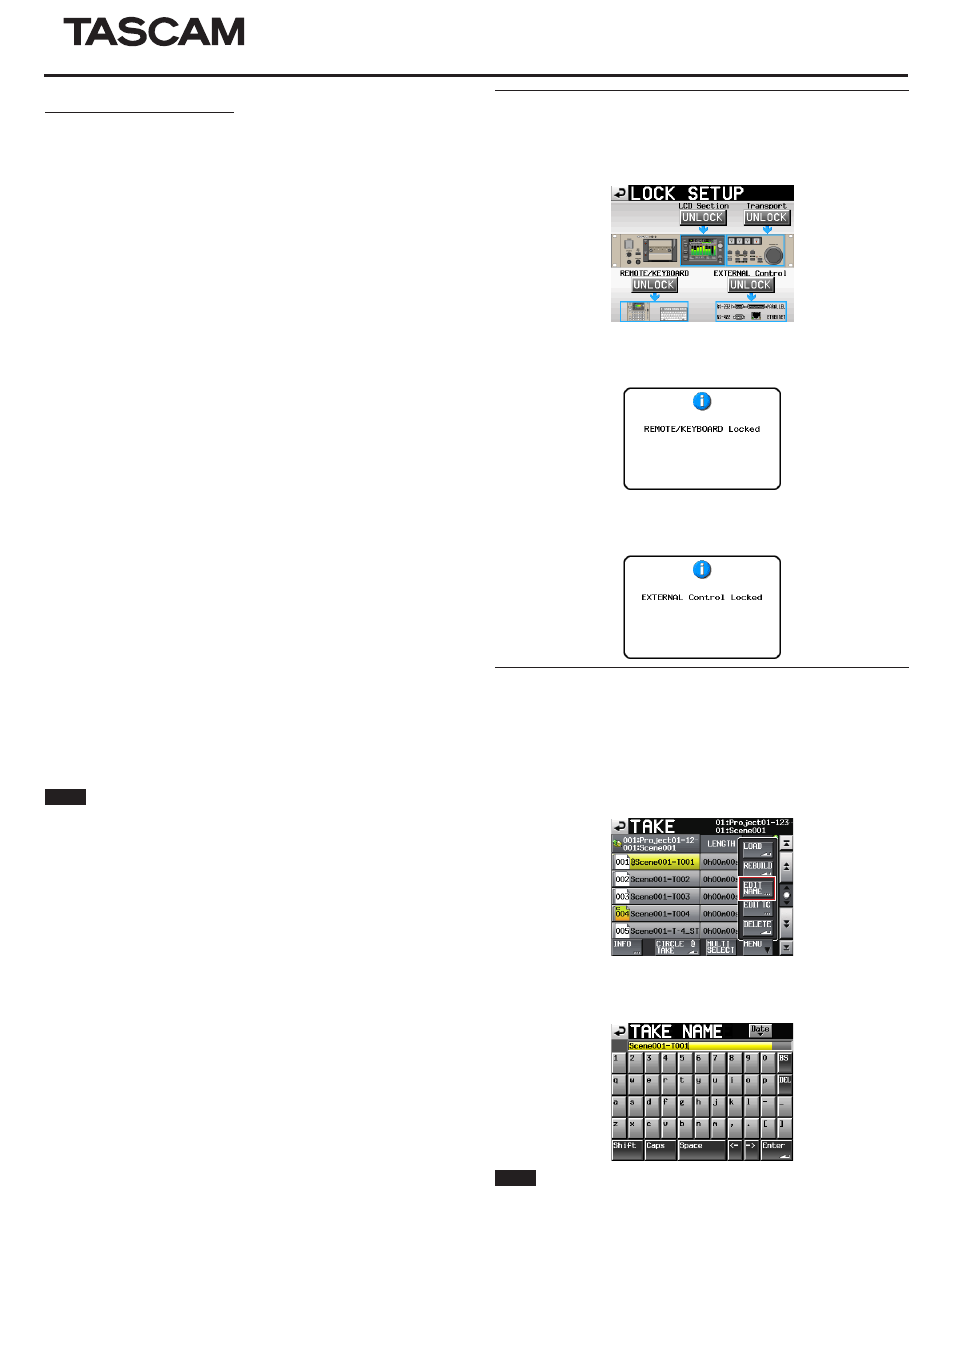
REMOTE/KEYBOARD and EXTERNAL Control Lock/Unlock
settings added
REMOTE/KEYBOARD
and
EXTERNAL Control
Lock/Unlock settings
have been added on the
LOCK SETUP
screen.
0
When
REMOTE/KEYBOARD
is set to
LOCK
, if a remote control or
keyboard connected to a remote connector is used, the following pop-up
message appears when remote/keyboard control is locked.
0
When
EXTERNAL CONTROL
is set to
LOCK
, if an operation is con-
ducted using RS–232C, RS–422, PARALLEL or ETHERNET, the following
pop-up message appears when external input is locked.
Take Rename function
A function has been added that allows you to change the names of takes.
Follow the procedures below to do so.
1.
On a take selection screen, select that take that you want to rename.
2.
Touch the
MENU
button on the take selection screen to open a pull-up
menu (An
EDIT NAME
button, which is shown framed in red below, has
been added to this pull-up menu).
3.
Touch the
EDIT NAME
button in the pull-up menu to open the
TAKE
NAME
screen. (On this
TAKE NAME
screen, you can change the input
take name.)
NOTE
When multiple takes are selected, you cannot use the
EDIT NAME
button in
the pull-up menu.
4.
Edit the take name.
5.
Touch the
Enter
button on the
TAKE NAME
screen or press the DATA
dial to confirm the changed take name and return to the take selection
screen.