5 – using the mixer panel, Effects” page – Teac US-366 User Manual
Page 22
22
TASCAM US-366
5 – Using the Mixer Panel
“EFFECTS” page
Click the “EFFECTS” tab to open the effects page where you can
adjust the built-in effect settings.
Limitations on the use of the built-in effects
The number of built-in effects that can be used depends on the
sampling frequency.
• At 44.1/48kHz, one dynamics and one send effect can each
be used.
• At 88.2/96kHz, either one dynamics effect or one send effect
can be used. (Turning on an effect will automatically turn off
the other effect if it has been on.)
• At 176.4/192kHz, the built-in effects cannot be used.
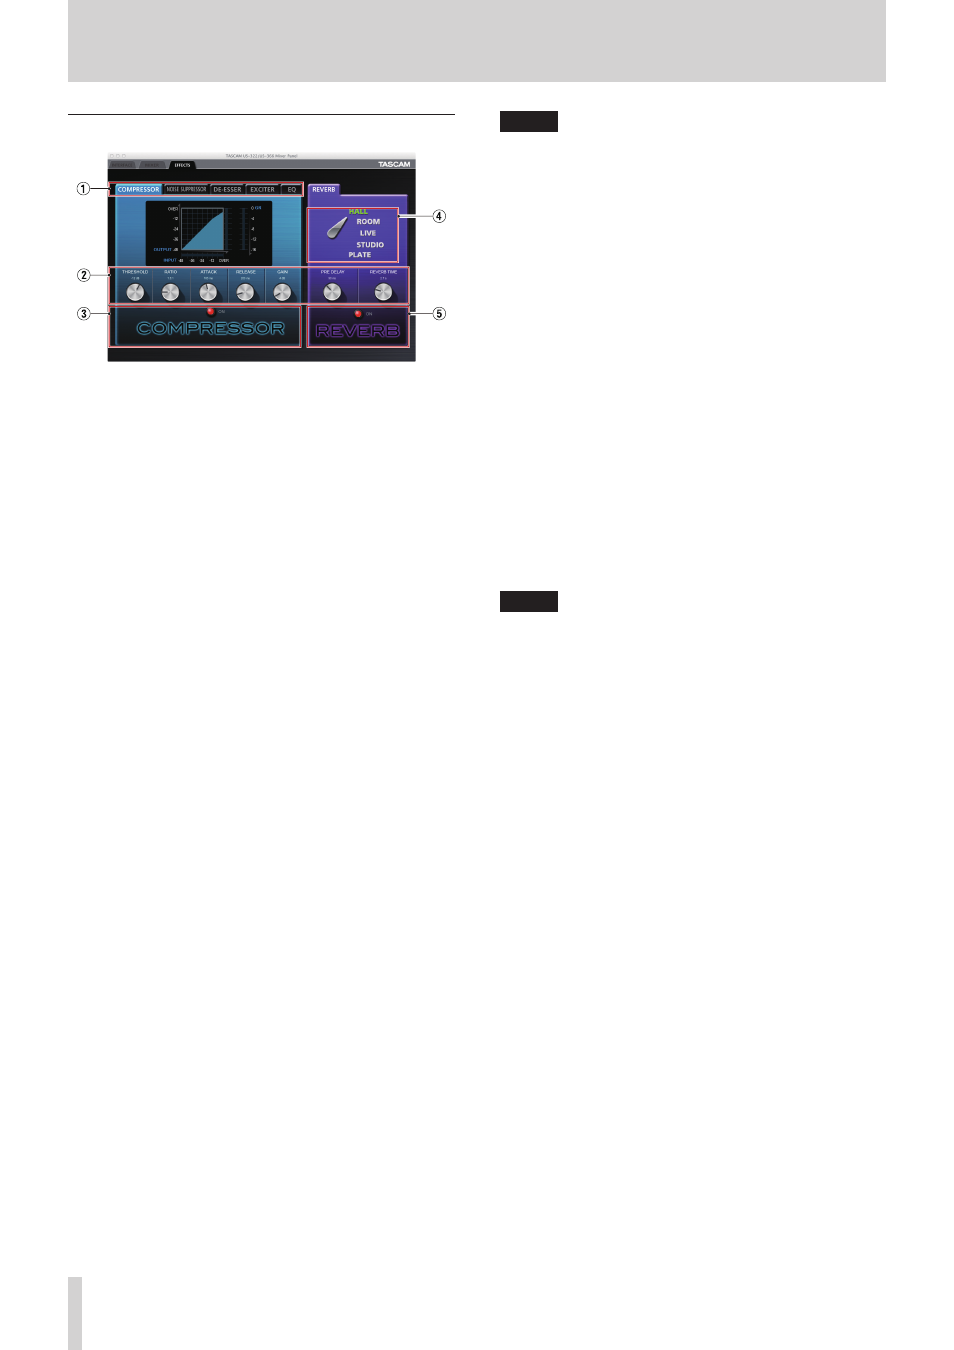
1
Dynamics effect tabs
Use to select the dynamics effect that is shown. Click a tab
to bring that effect to the front. The dynamics effects are
“COMPRESSOR” (default), “NOISE SUPPRESSOR”, “DE-ESSER”,
“EXCITER” and “EQ”.
This setting is retained even when the unit is turned off and
on again.
2
Parameter knobs
Use these to adjust the effect parameters.
Click and drag a knob up or down to adjust its setting value.
Drag up to increase the value and turn the knob clockwise.
Drag down to decrease the value and turn the knob counter-
clockwise.
The current value of each parameter is shown above its
knob.
For details about each parameter, see “Effect explanations”
on page 23.
These settings are retained even when the unit is turned off
and on again.
3
Dynamics effect ON/OFF button and indicator
Use this button to turn a dynamics effect on and off.
ON:
The button turns red and “ON” appears
next to it. The name of the effect appears
brighter.
OFF (default): The button dims and “OFF” appears next
to it. The name of the effect appears
dimmed.
When a dynamics effect is off, click its ON/OFF button or
name to turn it on. When on, click the button or name to
turn it off.
Moreover since only one dynamics effect can be used at a
time, when an effect is on, turning on another effect will
automatically turn that effect off.
This setting is retained even when the unit is turned off and
on again.
NOTE
• The dynamics effect ON/OFF setting on this page is linked to
its setting on the mixer panel, so turning it on or off here will
also change its setting there.
• Depending on the sampling frequency setting, it might not
be possible to turn an effect on.
4
Effect type selection switch
You can select the type of reverb used for the send effect.
Click the name of the type that you want to use to change
the selection. The switch will point to the new selection, and
the name of the selected type will appear green. The other
types will appear white. (The default setting is HALL.)
For details about each parameter, see “Effect explanations”
on page 23.
This setting is retained even when the unit is turned off and
on again.
5
Send effect ON/OFF button and indicator
Use this button to turn the send effect on and off.
ON:
The button turns red and “ON” appears
next to it.
OFF (default): The button dims and “OFF” appears next
to it.
When a send effect is off, click its ON/OFF button or name to
turn it on. When on, click the button or name to turn it off.
This setting is retained even when the unit is turned off and
on again.
NOTE
• The send effect ON/OFF setting on this page is linked to its
setting on the mixer panel, so turning it on or off here will
also change its setting there.
• Depending on the sampling frequency setting, it might not
be possible to turn an effect on.