10 advanced setup, Ch. 10, Advanced setup – ARAG Bravo 400S Crop sprayer User Manual
Page 20
20
10
ADVANCED SETUP
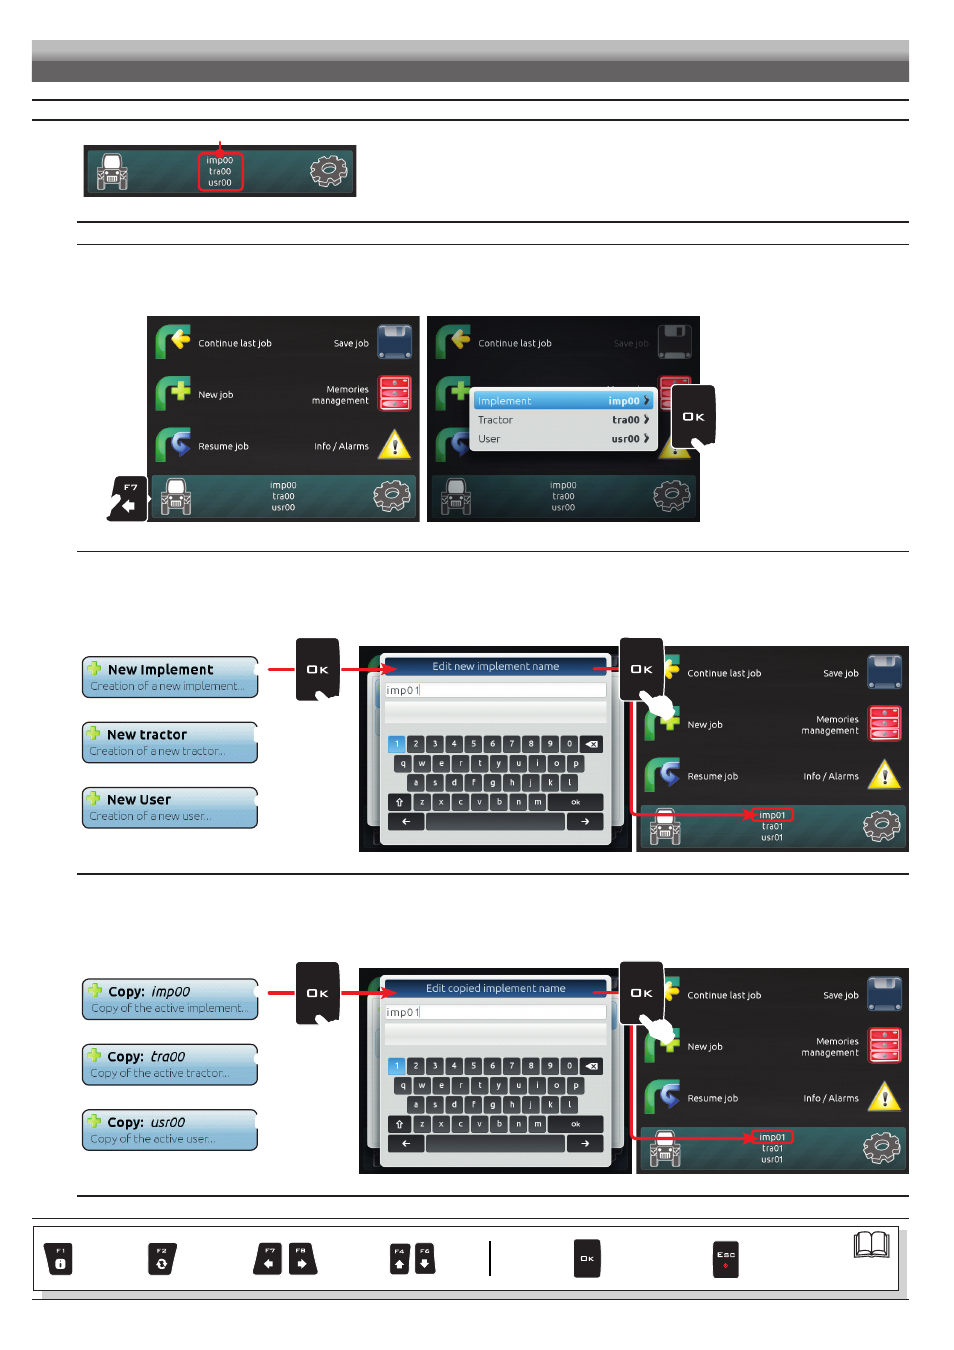
ACTIVE SETTINGS
Fig. 41
Before carrying out the advanced setup procedure, select the type of
Implement, Tractor and User you wish to use: all modifications made to the
advanced setup will be applied to the ACTIVE SETTINGS
(in the example here imp00, tra00, usr00).
IMPLEMENT, TRACTOR AND USER TYPE SELECTION
1 Press
F7
in the "HOME" screen (Fig. 42).
2 In the screen shown in Fig. 43 select the
Implement
(
Tractor
or
User
) and press
OK
.
Now it is possible to create a new setup (
3a or 3b), or select an existing one (3c):
in both cases the setup will be enabled and the name will be displayed in the "HOME" screen (Fig. 41).
1
Fig. 42
2
Fig. 43
3a NEW SETUP CREATION:
Select
New Implement
(
a
in Fig. 44) to create a new setup and press
OK
.
Type the name (in the example of Fig. 45:
imp01
) and press
OK
.
The new setup is now active on the computer (Fig. 46). Before moving on to the advanced setup procedure repeat the basic setup (ch. 9).
You can follow the same procedure for
Tractor
(
b
)
and
User
(
c
)
setup.
a
b
c
Fig. 44
Fig. 45
Fig. 46
3b NEW SETUP CREATION (BY COPYING DATA FROM AN EXISTING SETUP):
Select
Copy
(
d
in Fig. 47) to copy the active setup and save the data on a new one; press
OK
.
Type the name (in the example of Fig. 48:
imp01
) and press
OK
.
The saved setup is now active on the computer (Fig. 49). Proceed to advanced setup.
You can follow the same procedure for
Tractor
(
e
)
and
User
(
f
)
setup.
d
e
f
Fig. 47
Fig. 48
Fig. 49
ADVANCED SETUP
CONTINUES
Par.
Exits the function
or data change
Confirm access
or data change
Scroll
(LEFT /
RIGHT)
Delete
selected
character
Increase /
Decrease
of data
Scroll
(UP /
DOWN)
Enter
selected
character