Operation – HEIDENHAIN ND 1300 Quick Start User Manual
Page 7
5
2. Level the part
• Touch the MEASURE tab to display
the measure icons, and then touch
the blue SKEW/LEVEL icon to display
the SKEW and LEVEL icons.
• Touch the LEVEL icon,
probe a minimum of 3
points on the desired part
reference-plane surface
and then press the FINISH
key.
3. Perform a skew alignment
• Touch the MEASURE tab to display
the measure icons, and then touch
the SKEW/LEVEL icon
• Touch the SKEW icon, probe
a minimum of 2 points on
the reference edge and then
press the FINISH key.
Creating a zero datum
• Probe, construct or create a reference
point.
• Press the DRO button to
display the DRO screen.
• Press the ZERO buttons for each axis
on the DRO screen.
Presetting a datum
• Probe, construct or create a reference
point.
• Display the DRO screen, touch the
axis values shown and enter preset
values using the numeric keypad.
Measuring features
Features are measured by touching a
feature icon or the MEASURE MAGIC
icon in the MEASURE tab, probing
points and then pressing the ENTER and
FINISH keys.
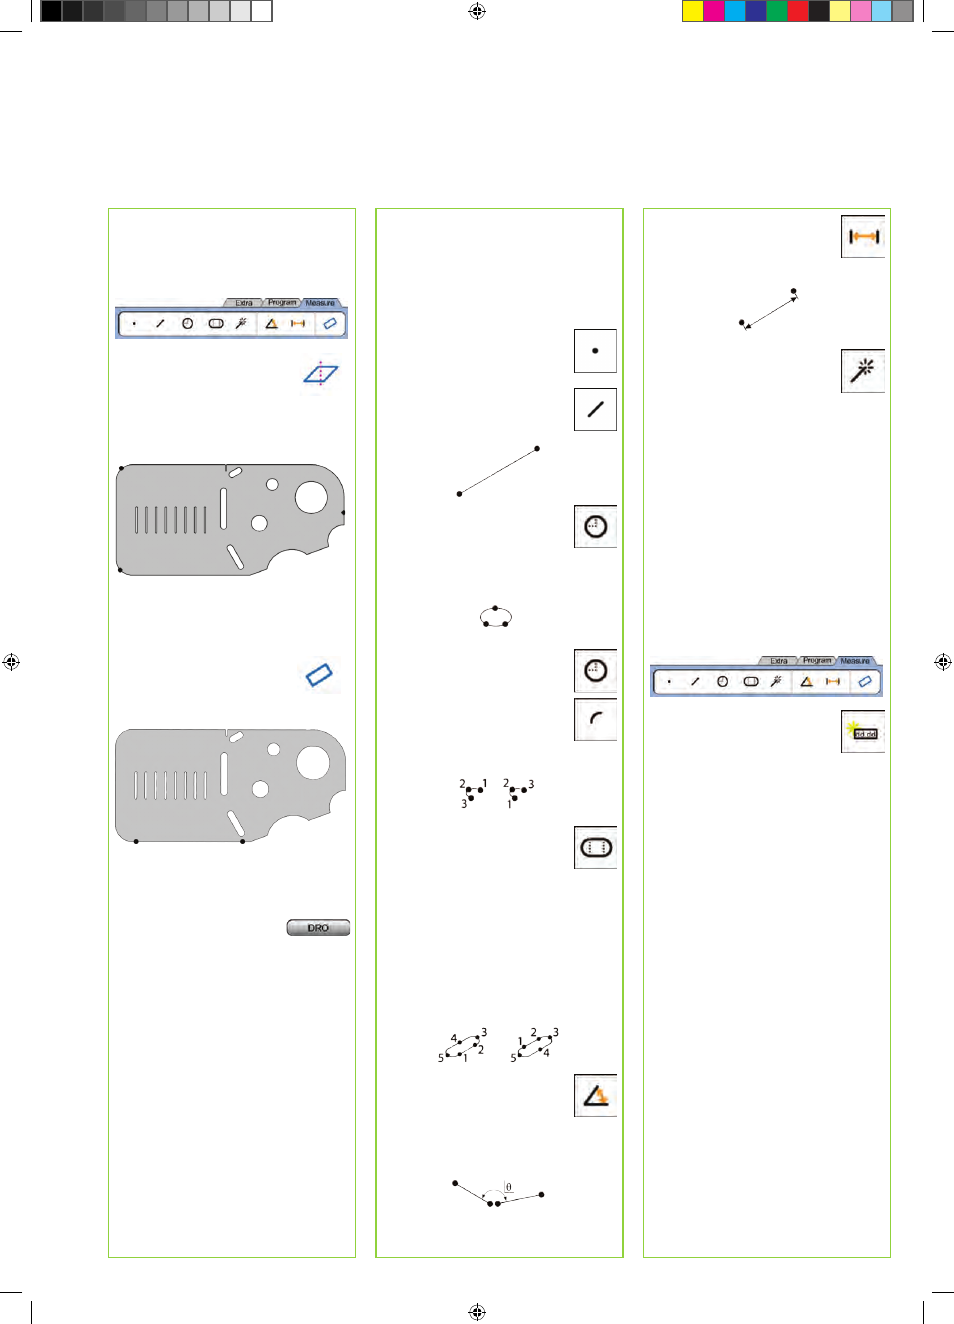
1. Measure a point
Touch the POINT icon and probe
a point.
2. Measure a line
Touch the LINE icon and probe a
minimum of 2 points.
3. Measure a circle
Touch the CIRCLE icon and
probe a minimum of 3 points
in any order around the
circumference.
4. Measure an arc
Touch the CIRCLE icon once
to display the ARC icon, then
touch the ARC icon and probe
a minimum of 3 points in
sequence from beginning to end
of the arc.
5. Measure a slot
Touch the SLOT icon and
probe 5 points in the following
sequence:
• Two points on a long side
• One point in the closest end
• One point in the center of the
second long side
• Last point on the remaining
end
Points can be probed in
sequence in either direction.
6. Measure an angle
Touch the ANGLE icon and
probe a minimum of 2 points on
each of the two legs. Press the
FINISH key after each leg.
7. Measure a distance
Touch the DISTANCE icon and
probe 1 point on each end of the
distance.
8. Use Measure Magic
Touch the MEASURE MAGIC
icon and probe points on a
feature. The feature type will
be determined based on the
pattern and sequence of point
probing.
Creating Features
Features are created by selecting the
feature type to be created, entering the
required feature data and then pressing
the FINISH key.
1. Specify the feature type
Touch the MEASURE tab and then touch
a measure icon to specify the type of
feature to be created.
2. Enter the feature data
Touch the ENTER DATA icon
and then enter data into fields
shown on the screen.
3. Complete the creation
Press the FINISH key to complete
the feature creation. The new created
feature will be shown in the feature list.
Constructing Features
Features are constructed by selecting
the feature type to be constructed,
selecting the parent features and then
pressing the FINISH key.
1. Specify the feature type
Touch the MEASURE tab and then touch
a measure icon to specify the type of
feature to be constructed.
2. Select the parent features
Touch the desired parent features in the
feature list. Check marks will be shown
near the parent features.
3. Complete the construction
Press the FINISH key to complete the
construction. The new constructed
feature will be shown in the feature list.
Operation