Elecom WRH-S583xx 設定手順書1 User Manual
Wrh-s583x, 连接无线lan路由器, Connection
-1-
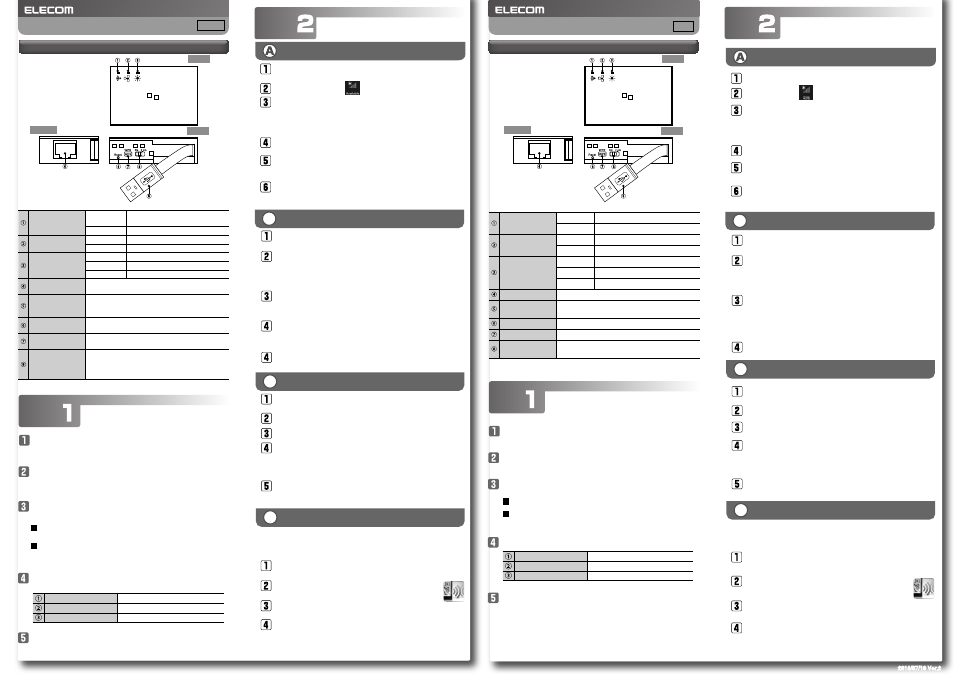
WLAN lamp
(green)
Lit or blinking The connection with the wireless side
is being established.
ETHERNET lamp
(green)
Lit or blinking The wired connection is connected.
The wired connection is not connected.
SYS lamp
(green)
Lit
The device is being restarted.
Blinking
The WPS function is in operation.
The product is operating normally.
ETHERNET port
Use a LAN cable to connect this product to the hotel's LAN
port. Connect this product with a PC using a LAN cable.
USB connector
(power supply)
This is a USB type-A connector for supplying power by
way of USB. Connect a PC or USB power supply adapter
(sold separately) to this connector.
Used frequency
band selector switch
This switch selects the used frequency band (2.4 GHz
or 5 GHz).
WPS button
Hold down this button for approximately 3 seconds
to start the WPS function.
Reset button
Hold down this button for 2 to 5 seconds to restart
this product.If you hold down this button for more
than 5 seconds, the settings will be returned to their
factory defaults.
Off
Off
Off
The wireless function is turned off.
WLAN 指示灯
(绿色)
亮灯・闪烁 与无线侧连接着
熄灭
无线切断状态
ETHERNET 指示灯
(绿色)
亮灯・闪烁 有线连接着
熄灭
有线未连接
SYS 指示灯(绿色)
亮灯
设备正在重启
闪烁
WPS 功能工作中
熄灭
通常时
ETHERNET 端口
用 LAN 电缆连接本产品和酒店的局域网端子。用
USB 连接器
(电源用)
是 USB 供电用 USB A 连接器。与电脑或另购的
USB 供电适配器连接。
使用频帯切换开关 切换使用频带(2.4GHz
<=> 5GHz)
WPS 按钮
按住约 3 秒钟后,WPS 功能启动
Reset 按钮
按住 2 ~ 5 秒钟后,本产品重启
按住 5 秒钟以上后设置返回到出厂时的状态
Names and Functions of Parts
Connect a LAN cable (either one that you have purchased sepa-
rately or one that is provided by the hotel) to the LAN terminal
in the hotel room and to this product's ETHERNET port.
Use the used frequency band selector switch to set the
frequency band to 2.4 GHz or 5 GHz to match the terminal
that you are connecting to.
Use one of the following methods to supply power to the
product.
WRH-S583x
Simple Manual
English
Connect the wireless LAN router
Procedure
各部分的名称和作用
WRH-S583x
简易版用户手册
中文
连接无线LAN路由器
步骤
2013/07/16 Ver.2
2013/07/16 Ver.2
Top
Left side
Front
顶部
左侧面
前面
Use a USB power supply adapter (sold separately) and the
USB connector of this product to supply power.
Use a PC USB port and the USB connector of this product to
supply power.
Check that the statuses of the product lamps match the sta-
tuses shown in the following table.
Connect to the network according to the instructions under
"Procedure 2, Connection."
WLAN lamp
Lit in green or blinking in green
ETHERNET lamp
Lit in green or blinking in green
SYS lamp
Off
将另购或酒店设置的 LAN 电缆连接至酒店客房里的局域网
端子和本产品的 ETHERNET 端口。
根据所连接的终端,用使用频带切换开关设置为 2.4GHz 或
5GHz。
用以下的任一方法接通电源。
确认本产品指示灯的状态如下表所示状态。
参考“ 步骤 2 连接 ”连接网络
Windows 8
Procedure
Connection
Point to the upper-right corner of the screen to display the
Charms bar, and then click [Settings].
From the list of networks, select the network that has the
same SSID as the network written on the included "Setup
Information Sheet," and then click [Connect].
Check that the message "You can also connect by pushing
the button on the router." is displayed.
Click the wireless icon .
Hold down the product's [WPS] button for approximately 3
seconds. When you release the button, the product's "SYS
lamp" will start to blink in green.
If a screen is displayed with the message "Do you want to turn
on sharing between PCs and connect to devices on this
network?," click "Yes, turn on sharing and connect to devices."
B
Windows 7/Vista/XP
Click the wireless LAN icon in the notification area in the
lower-right corner of the screen.
From the list of networks, select the network that has the
same SSID as the network written on the included "Setup
Information Sheet," and then click [Connect].
When the "Connect to a Network" dialog box is displayed,
enter the (13-digit) encryption key written on the "Setup
Information Sheet," and then click [OK].
If you are using the WPS function to establish the
connection, hold down the product's [WPS] button for
approximately 3 seconds. When you release the button,
the product's "SYS lamp" will start to blink in green.
Eventually, the "Connect to a Network" dialogue box will
disappear automatically.
C
Mac OS
Click the [Apple menu] in the upper left of the screen, and
then click [System Preferences].
Click [Network].
Check that "Status" for the AirMac (Wi-Fi) has changed to "On."
From the list of networks, select the network that has the
same SSID as the network written on the included "Setup
Information Sheet."
A password entry screen will be displayed, so enter the
(13-digit) encryption key written on the "Setup Information
Sheet," and then click [OK].
Depending on the hotel, the web browser (such as IE and Safari) may require you to
certify yourself. In this situation, check with the hotel regarding how to certify yourself.
From your terminal, open the AppStore (iOS) or Google Play
(Android), search for [QR link], and then install the software.
On your terminal's home screen, tap the [QR link]
icon.
Follow the instructions on the screen, and then tap [Close]
to finish the procedure.
Tap [Read QR Code] to read the QR code printed on the
included "Setup Information Sheet."
Install the simple setup application "QR link" (free of charge), and
then configure the settings.
D
Smartphones and tablet PCs
(iOS/Android)
* The SSID for either 2.4 GHz or 5 GHz (depending on the setting of the used frequency
band selector switch) is displayed (elecom-xxxxxx or elecom-xxxxxx-5g).
* The SSID for either 2.4 GHz or 5 GHz (depending on the setting of the used frequency
band selector switch) is displayed (elecom-xxxxxx or elecom-xxxxxx-5g).
* The SSID for either 2.4 GHz or 5 GHz (depending on the setting of the used frequency
band selector switch) is displayed (elecom-xxxxxx or elecom-xxxxxx-5g).
* If you are using this device with a terminal that does not support the 5 GHz frequency band,
set the used frequency band selector switch to the 2.4 GHz position.
* Use a USB power supply adapter that has an output of 5 V and 500 mA or more.
由另购的 USB 供电适配器+本产品的 USB 连接器供电
由电脑的 USB 端口+本产品的 USB 连接器供电
※请使用输出在 5V/500mA 以上的 USB 供电适配器。
WLAN 指示灯
绿色亮灯或绿色闪烁
ETHERNET 指示灯
绿色亮灯或绿色闪烁
SYS 指示灯
熄灭
步骤
Windows 8
连接
将鼠标器放到屏幕右上角,出现超级按钮栏,点击[设置]。
从网络列表中选择与附带的“ 设置信息表 ”上所记载的相
同的 SSID,并点击[连接]按钮。
确认“ 按下路由器的按钮也无法连接。”的消息。
点击无线的图标 。
长按本产品的[WPS 按钮]3 秒钟左右然后放开,本产品的
“SYS 指示灯 ”开始绿色闪烁。
弹出“ 启用电脑共享 ...”窗口后,点击“ 是,启用共享并连
接到设备 ”。
B
Windows 7/Vista/XP
点击屏幕右下方任务栏上的无线局域网的图标。
从网络列表中选择与附带的“ 设置信息表 ”上所记载的相
同的 SSID 并点击[连接]按钮。
弹出“ 连接网络 ”窗口后,输入“ 设置信息表 ”所记载的
密钥(13 位数)并点击[确定]。
如果用 WPS 功能连接,长按本产品的[WPS 按钮]3 秒钟左
右然后放开,本产品的“SYS 指示灯 ”开始绿色闪烁。
不久,
“ 连接网络 ”窗口自动关闭。
C
Mac OS
点击屏幕左上方的[苹果菜单],点击[系统环境设置]。
点击 [ 网络 ]。
确认 AirMac (Wi-Fi) 的“ 状况 ”为“ 启用 ”。
从“ 网络名称 ”列表中选择与附带的“ 设置信息表 ”上所
记载的相同的 SSID 。
弹出密码输入窗口,输入“ 设置信息表 ”所记载的密钥(13
位数)并点击[确定]。
有些酒店可能需要用Web浏览器(IE或Safari等)进行认证,如果需要认证,请向
您下榻的酒店确认认证方法。
从智能手机或平板电脑打开 AppStore(iOS)或 Google Play
(Android),搜索[QR link]并安装。
触摸智能手机或平板电脑的主屏上的[QR link]图
标。
按照屏幕上的指示,最后触摸 [关闭] 按钮。
触摸[QR 码读取],读取附带的“ 设置信息表 ”上打印的
QR 码。
安装简单设置应用程序“QR link”
(免费),进行设置。
D
智能手机/平板电脑
(iOS/Android)
※根据使用频带切换开关的设置, 显示 2.4GHz 或 5GHz 的 SSID。
(elecom-xxxxxx,elecom-xxxxxx-5g)
※根据使用频带切换开关的设置, 显示 2.4GHz 或 5GHz 的 SSID。
(elecom-xxxxxx,elecom-xxxxxx-5g)
※根据使用频带切换开关的设置, 显示 2.4GHz 或 5GHz 的 SSID。
(elecom-xxxxxx,elecom-xxxxxx-5g)
※用不支持 5GHz 频带的智能手机或平板电脑使用本机时,请将使用频带切换开关设
置到 2.4GHz。