Livarno 2312/031L User Manual
Safety safety advice, Under-cabinet led light, Proper use
GB
GB
GB
GB
GB
GB
GB
GB
LED class:
2
Q
Safety
Safety advice
The right to claim under the guarantee shall
be rendered invalid in respect of damage
caused by the non-observance of these oper-
ating instructions! No liability is accepted for
consequent damage! No liability is accepted
for damage to property or persons caused
by improper handling or non-observance of
the safety advice!
Warning!
Danger to life!
Batteries are not intended to be in the
hands of children. Do not leave batteries
around unattended. They could be swal-
lowed by children or pets. In the event of
swallowing a battery, contact a doctor
immediately!
m important! This device is not a toy!
J
Do not leave small children unattended
with the device!
Warning!
Do not short-circuit the
batteries. Overheating, fire or destruction
of the batteries might result.
Warning!
Danger of explo-
Sion! Never throw the batteries into
fire or water. Never recharge the batteries!
The batteries might explode.
J
Wear protective gloves!
Exhausted or damaged batteries
may irritate the skin on contact,
so always wear suitable protective gloves
Under-cabinet leD light
Q
proper use
This LED light is suitable exclusively for provid-
ing illumination in dry interior rooms in a private,
domestic environment. The LED light should be
positioned within reach so that the switch can
be operated conveniently. It must be operated
with batteries only.
Q
included items
1 x Under-cabinet LED light
6 x Batteries micro 1.5 V / AAA
2 x Screws
2 x pile and loop fastening strips, double-sided
1 x Operating instructions
Q
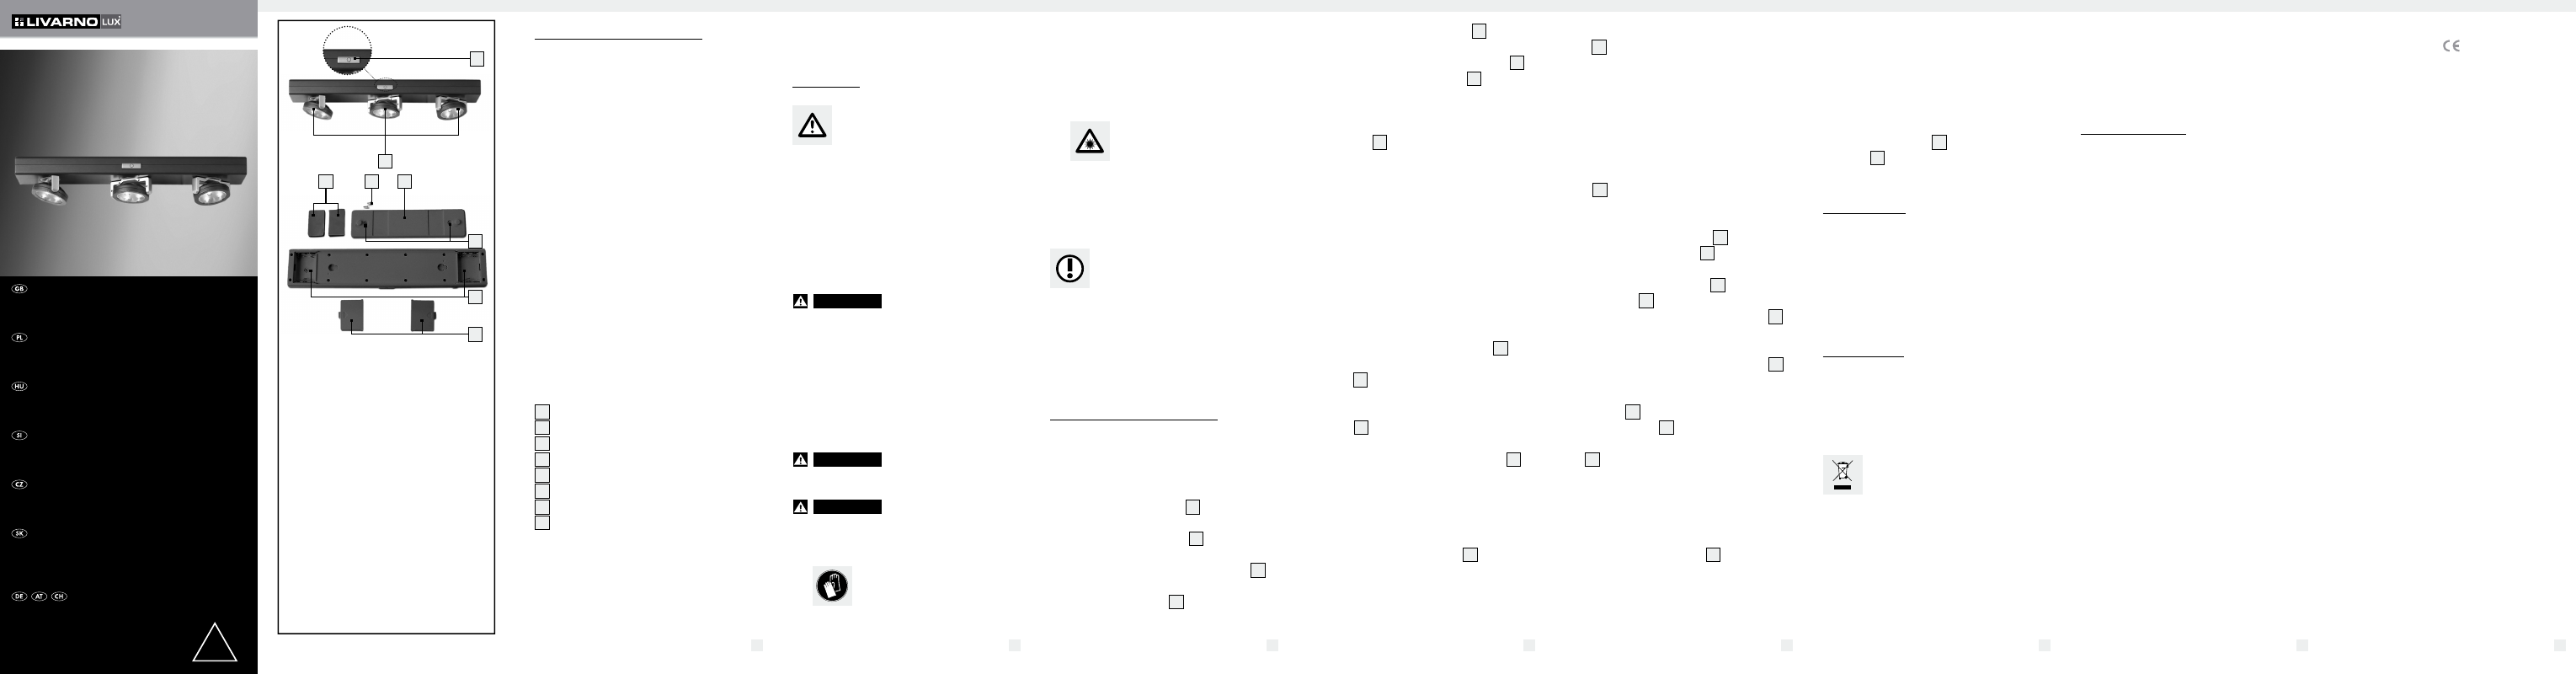
Description of parts
1
On/Off switch
2
LED spot
3
pile and loop fastening strip
4
Screws
5
Mounting plate
6
Fastening pin
7
Battery compartment
8
Battery compartment cover
Q
technical information
Article No.:
2312 / 031L
power supply:
6 x batteries micro
1.5 V / AAA
in these circumstances.
J
Never place the device in conditions of
high temperature or moisture, as this may
damage the device.
J
Never use the device in a potentially
explosive atmosphere.
J
leD radiation! Avoid the
risk of eye damage! Do not
look into the LED beam.
J
The LEDs cannot be replaced!
J
In the event of damage, repairs or other
problems with the light please contact the
Service Centre or an electrician.
Working safely!
J
Do not subject the light to mechanical
loads!
J
Operate the light using batteries type
AAA / 1.5 V only. Ensure that all the
batteries have the same state of charge!
Q
preparations for use
Q
inserting / replacing
the batteries
j
Hold the LED light with its back upwards
and the On / Off switch
1
facing for-
wards.
j
Slide the mounting plate
5
to the left
and remove it from the LED light.
j
Slide the battery compartment covers
8
to the side and remove one or both battery
compartment covers
8
.
j
Insert the 6 batteries type micro 1.5 V / AAA
into the battery compartments
7
, ob-
serving the correct polarity (+ and -).
j
Replace the battery compartment covers
8
on the battery compartments
7
, making
sure they engage properly.
note: Take the batteries out of the battery
compartment
7
if you intend not to use light
for an extended period. Batteries can leak.
note: As the battery voltages drops, the
light becomes weaker.
Q
fastening in place with
pile and loop strip
m important! Check that the substrate on
which you intend to fasten the device is
dry, smooth and free of dust and grease.
j
pull the protective film from one of the sides
of the pile and loop fastening strip
3
.
j
press the hook and eye self-adhesive
pads
3
using firm pressure into the areas
intended for this purpose to the right and
left on the underside of the mounting
plate
5
.
j
Now pull the protective film from the other
side of the pile and loop fastening strip
3
.
j
press the LED light on to the desired sub-
strate. press carefully but with firm pressure
for about 5 seconds.
j
To remove the LED light (e.g. to replace
the batteries), pull the LED light carefully
from the pile and loop strips
3
.
note: If you wish to remove the pile and loop
strips
3
from the substrate, pull them off care-
fully. paint could be detached or the substrate
could be damaged, depending on its condition.
Q
fastening in place
with screws
note: Remove the pile and loop fastening
strips
3
if you wish to use this form of
fastening.
j
Mark the positions of the screws using the
holes in the mounting plate
5
as a guide.
note: The supplied screws
4
are suitable
only for fastening into wood.
j
Fasten the mounting plate
5
with the
two screws
4
on to the desired substrate,
making sure that the two fastening pins
6
are facing forwards.
Tighten the screws well, but not too tight.
j
Hold the LED light so that the LED spots
2
point towards you.
j
Now place the LED light on to the fasten-
ing pins
6
of the fastened in place
mounting plate
5
.
j
Slide the LED light on the mounting plate
5
in such a way that it engages.
j
Check that it is correctly seated.
Q
Switching on / off
j
press the On / Off switch
1
to switch the
light on or off.
3
5
7
6
4
8
2
1
LED-UNTERBAULEUchTE
Bedienungs- und Sicherheitshinweise
2312/031L
UNDER-cABiNET LED LighT
4
OpRAwA OświETLENiOwA LED
Wskazówki dotyczące obsługi i bezpieczeństwa
LED LámpA
Kezelési és biztonsági utalások
LED vgRADNi REfLEkTOR
Navodila za upravljanje in varnostna opozorila
LED svěTLO
Pokyny pro obsluhu a bezpečnostní pokyny
ZABUDOvATEľNé
LED sviETiDLO
Pokyny pre obsluhu a bezpečnostné pokyny
UNDER-cABiNET LED LighT
Operation and Safety Notes
1 x press = full intensity
2 x presses = dimmed
3 x presses = switched off
Q
Directing the spots
j
Turn the LED spots
2
carefully. The LED
spots
2
can be swivelled.
Q
Cleaning
J
Use a slightly moist cloth to clean the
light - never use petrol, solvents or cleaners
that attack plastic.
j
Use a slightly moist cloth to remove any
stubborn dirt.
Q
Disposal
The packaging and ancillary packing consist
entirely of environmentally-friendly materials.
They can be disposed of at your local recy-
cling facility.
The symbol of the wheelie bin with
the line through it means that, in the
European Union, the product has to
be disposed of in a separate refuse collection.
This applies to the product and to all compo-
nents bearing this symbol. products marked in
this way may not be disposed of along with
normal domestic waste but have to be handed
in at a recycling collection point for electrical
and electronic appliances. Recycling helps to
reduce the consumption of raw materials and
to ease the burden on the environment.
GB
Batteries must not be disposed of as household
refuse! Advice is available from your local
council. Return the batteries and / or the device
through the appropriate collection facilities.
Q
information
Q
guarantee
You receive a 36 month warranty on this
product, valid from the date of purchase.
The device has been carefully produced under
strict quality control.
Within the warranty period we shall rectify
without charge all material and manufacturing
defects. In the event of a defect arising during
the warranty period, please send the device
to the listed Service Centre address, making
reference to the following article number:
2312 / 031L.
Wear parts (such as bulbs) and damage
caused by improper handling, non-observance
of the operating instructions or unauthorised
interference are excluded from the warranty.
The performance of services under the warranty
does not extend or renew the warranty period.
Q
Manufacturer / Service
Briloner Leuchten GmbH
Im Kissen 2, 59929 Brilon, Germany
Tel.: +49 (0) 29 61 / 97 12 - 0
Fax: +49 (0) 29 61 / 97 12 - 1 99
E-mail: [email protected]
GB
Q
Declaration of
Conformity
This product fulfils the requirements of the
applicable European and national directives
(Electromagnetic Compatibility
2004 / 108 / EC). Conformity has been
demonstrated. The relevant declarations and
documents are held by the manufacturer.
Last Information Update: 06/2011
Ident.-No.: 2312062011-4