Atlona AT HDVS RX V2 User Manual
Page 8
8
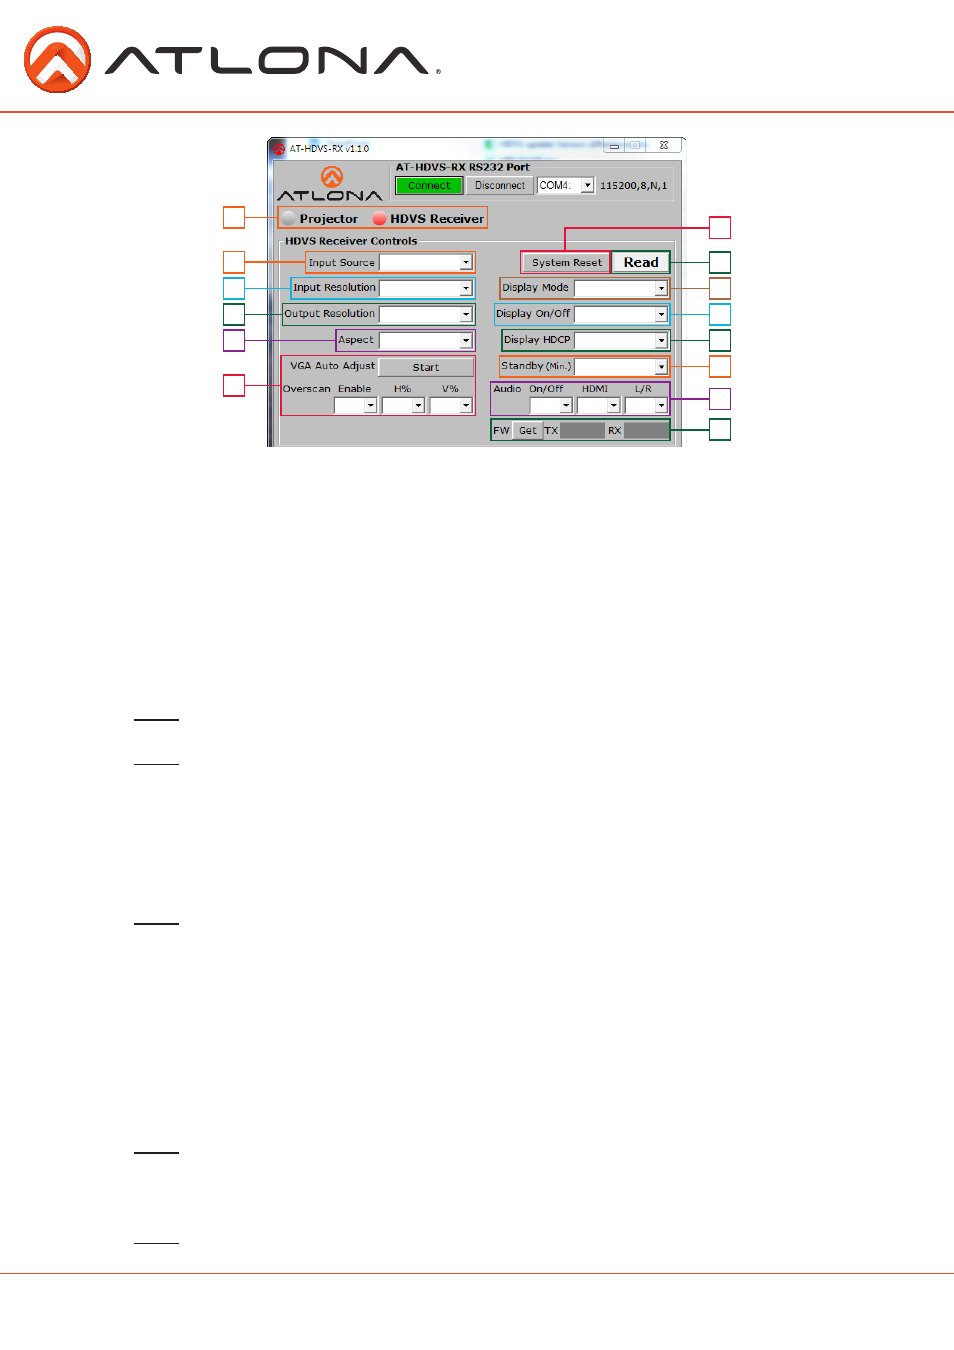
1. Control select - switch between projector on/off controls and the HDVS-RX controls
2. Input source selection - choose between the HDMI and VGA ports
3. Input resolution - switch between the preferred resolutions
800x600, 1024x768, 1280x720, 1280x800, 1366x768, 1920x1080, 1920x1200
4. Output resolution - switch between the output resolutions and native resolution
VESA: 1024x768, 1280x800, 1280x1024, 1366x768, 1400x1050, 1600x1200,
1680x1050,
1920x1200
Video: 720p@30/50/59.94/60, 1080i@50/59.95/60, 1080p@24/25/29.97/30/50/59.94/60
5. Aspect - changes the HDVS’s ratio to work with the connected display
6. VGA auto adjust and Overscan - Adjust the picture positioning on the display
Note: It is recommended to set the HDVS to 0% for PCs and Overscan for BluRay players
7. System reset - Sets the HDVS back to the default settings
Note: Saving is recommended before using the system reset
8. Read - Displays the current HDVS settings
9. Display mode - Display on/off button operation selection for the HDVS-TX/TX-WP
DispSW AVon - Display switches on/off, source audio/video signal always on (default)
DispSW AVSW - Display switches on/off, source audio/video signal switches on/off
AV SW - Display is always on, source audio/video signal switches on/off
Always On - No function
Note: Must be in DispSW AVon or DispSW AVSW for RS-232 display control to work
10. Display on/off - Video signal to display is turned on/off
11. Display HDCP - set HDCP reporting to Compliant, Noncompliant, or Auto
Compliant - Tells the source it is connected to an HDCP compliant device
Noncompliant - Tells the source it is connected to an HDCP noncompliant device
Auto - Will report compliant or noncompliant to the source depending on what the display
reports.
12. Standby (min.) - select how long it takes before the RX goes into standby
Standby (min): Adjusts period of time before the scaler goes into standby following loss of
signal. Default has standby mode off
Note: Standby must be active for Display Off to work - Standby time will set display off time
as
well.
13. Audio on/off - use to turn audio on and off
14. FW - Press the “GET” button to display the current firmware of the RX and TX units
Note: See the chart on page 3 to verify compatibility
8
2
1
7
4
3
10
6
9
5
13
14
12
11
atlona.com
Toll free: 1-877-536-3976
Local: 1-408-962-0515