Venus, 7000 controller track & field real time data – Daktronics Venus 7000 Controller Track User Manual
Page 8
Venus
®
7000 Controller Track & Field Real Time Data
Daktronics, Inc.
PO Box 5128, 331 32
nd
Ave. Brooking, SD 57006
ED-12636 REV 1
www.daktronics.com
tel (605) 697-4036 or (877) 697-1115 fax (605) 697-4444
e-mail:
Page 8 of 10
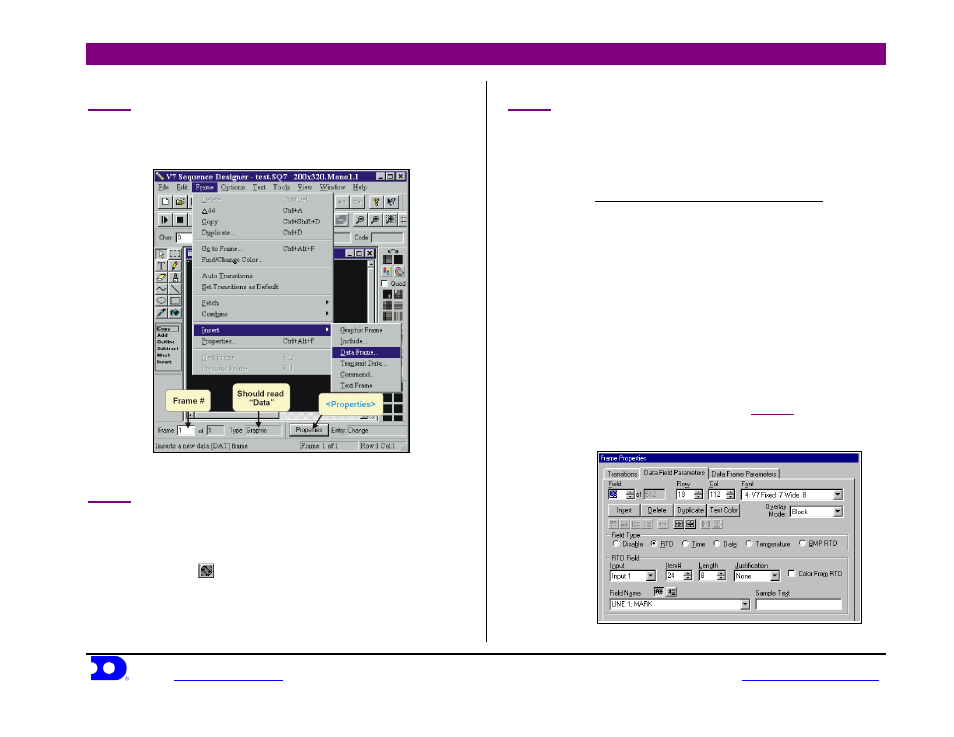
STEP 1
Create Data Frame
When creating a new RTD sequence, a Data Frame must
be added. To do this, open the Frame menu, then select
Insert and then Data Frame. Refer to Figure 16 below
STEP 2
Delete Graphic Frame
After adding a data frame, there will be two frames.
Frame 1 must be deleted. On the bottom of the window,
the frame must be Frame 1 of 1 Type: Data and not
Type: Graphic. Refer to Figure 16. To delete a frame,
click on
, or right-click on the frame to be deleted.
Highlight Frame option, and then select Delete. Click on
<
D
ELETE
C
URRENT
>
.
STEP 3
Hy-Tek
sequences
Rename your file “
Hy-Tek
”. From there, build a
frame similar to Figure 19. Frame #1 will be for Start
Lists. To start the RTD Template, click
<
P
ROPERTIES
>
on the bottom of the window. A Frame Properties
window will appear.
Frame Properties Data Box Description:
(Refer to Figure 17)
Field: applies box number
Row &Col: Horizontal & Vertical position
Font: Size of letters and numbers
Overlay: Outline used for video background
Important
Field Type: select RTD
RTD Field: Individual field properties
Input: COM Port Source
Item #: Serial bit on data stream
Length: Number of characters after selected item
number
Justification: Centering or spacing left or right
Field Name: Automatically sets item number length
for selected choice. (Refer to
STEP 4
)
Sample Text: Text that will be seen on Sequence
Designer but not on the Scoreboard
Figure 16: Insert Data Frame
Figure 17: Frame Properties