Ba a, Connecting tap to tank mounting the tank – InSinkErator HC3300 User Manual
Page 4
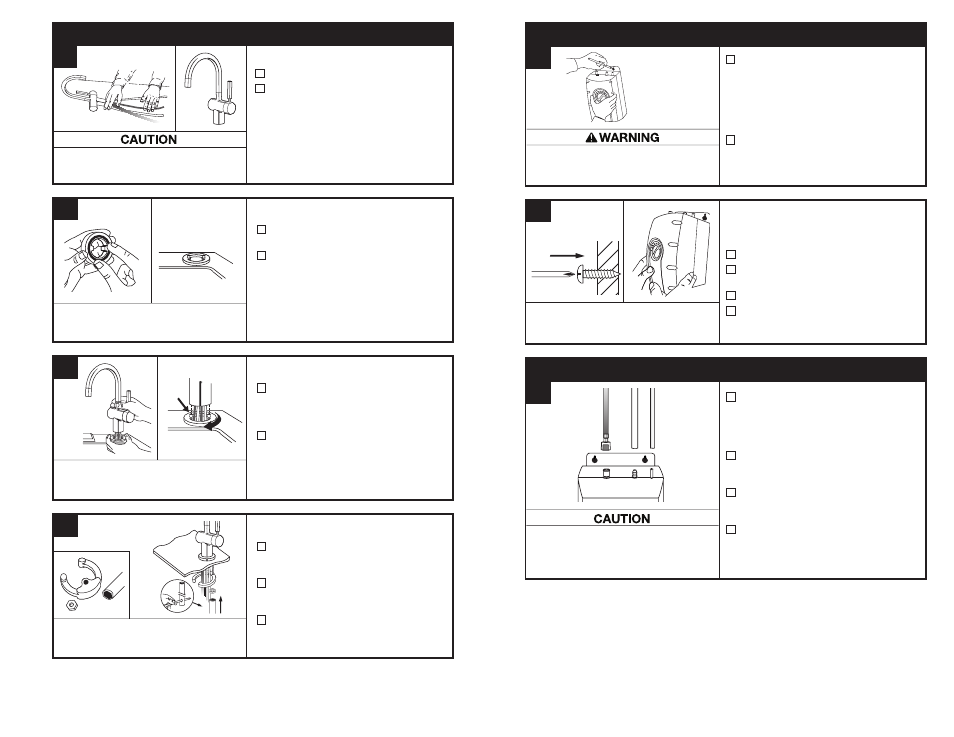
Property Damage: Do not pinch or break copper tubing.
Do not distort the last 25mm of tubing.
HC3300/H3300
■
Unpack hot water tap components.
■
The recommended installation for this
tap is the tap handle on the right.
The unique design allows the handle
to be fully functional when placed to
the right or left of the hot water tap.
Determine preferred handle placement
before installing.
A
INSTALLING THE TAP - HC3300/H3300
2
HC3300/H3300
■
Insert rubber O-ring into groove on
brass seat.
■
Place brass seat, O-ring side down,
over hole in sink or worktop.
HC3300/H3300
■
Holding brass seat in place, feed
tubes down through the hole in sink
or worktop until base touches
brass seat.
■
Rotate brass seat until the two retaining
studs fit into the holes on the tap base
and base sits firmly on brass seat.
HC3300/H3300
■
From under the sink, place the
semicircular mounting plate onto
the threaded stud.
■
Place hex nut onto the threaded stud.
Ensure tap handle is on preferred side
and that tap head is at desired angle.
■
Insert screwdriver into hole on side of
hex tool (creating a “T”), and use tool
to tighten nut and secure tap.
B
C
D
Wetting O-ring with water prior to
inserting into brass seat helps hold
ring in place during installation.
To ease feeding of tubes through hole, first
insert blue tube with quick-connect attachment
and then insert the remaining tubes.
Semi-circular mounting plate should
encircle all descending tubes and
extend beyond sink hole when tight.
4
Mount tank vertically in an area that allows clearance
on the underside of the tank for drainage, if
necessary. DO NOT over-tighten screws.
■
Pre-drill 3mm pilot holes at marks.
■
Turn screws into pre-drilled holes,
leaving 6.4mm exposed.
■
Hang the tank on the screws.
■
Tighten the screws with only 1/2
turn clockwise.
Screws provided are for use in wood studs or
cabinets only. Use wall anchors (not supplied)
for installation into plasterboard.
CONNECTING TAP TO TANK
MOUNTING THE TANK
■
Select a spot under the sink to mount
tank vertically within reach of both
plumbing and electrical connections.
The tank should be within 400mm or
less of tap water lines and within
760mm or less of a standard earth
(grounded) outlet.
■
While holding tank in place on the spot
selected for installation, use a pencil to
mark locations for 2 hanging screws.
Personal Injury/Property Damage: Tank must be
located within 400mm of tap and within 760mm or
less of a standard earth (grounded) outlet. DO NOT
extend plumbing or electrical lines.
■
Without depressing the grey button,
place the snap-connect fitting at the
end of the
blue tube onto the left
plastic fitting on the tank, pushing until
it clicks into place. (1)
■
Slip the flexible
white tube over
barbed middle fitting and slide down
approximately 12mm. (2)
■
Slip the
small white tube over the
far right smooth fitting and slide down
approximately 12mm. (3)
■
Visually check for pinched or
crimped tubes.
Hose clamps are not needed for any of the connections.
Tank must be
mounted level
to ensure
proper operation.
Leave 12mm for
hanging tank.
Property Damage: Pinched or blocked water lines
may cause damage to the water tank. Check to
make sure tubes are connected properly and are
pushed in as mentioned.
3
4
B
A
A
(1)
(2)
(3)