MacroSystem Smart Edit 8 Manual extension User Manual
Page 5
5
Smart Edit 8 Manual extension
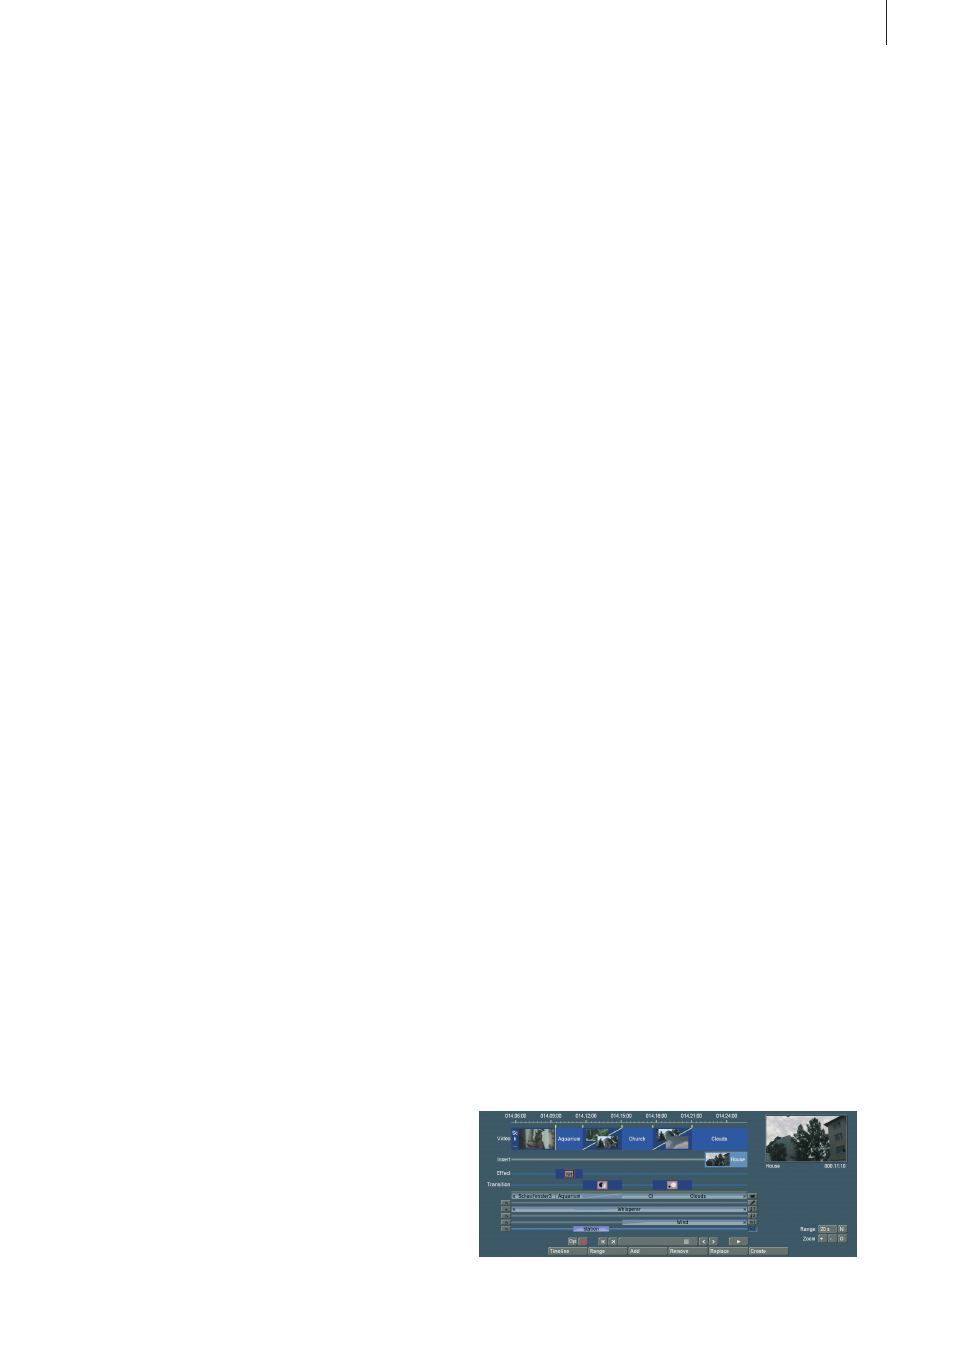
bars – or tracks as we‘ll call them . Apart from the video track,
there‘s a track for the insert, image processing effects, titles
and transitions . Above the tracks, there is a time scale to help
you keep track of the time position for the scenes and effects .
The Timeline is the central element for your video editing work .
You can activate the Timeline via System Settings > Story-
board options > Mode . Depending on the settings you make,
the system switches between the Storyboard and Timeline
display mode . The Timeline is shown in the same way in the
Edit, as well as the effect menus . The audio menu additionally
shows the audio tracks .
The top part of the screen shows the Timline, which is divided
into different parts . The view depends on the settings you have
made for the Timeline . The top of the screens holds the time
scale for reading the time and position of scenes in the project .
You can change the time display type via System Settings >
Additional Settings > Timecode display .
Beneath the time scale, you‘ll find the video track . All scenes
are shown as a sequence of bars or tracks, which can be
zoomed at varying factors . One option is to zoom so that the
first and last frame of a scene is seen on the ends of the bar .
The scene name is shown in the middle . If the bar is too short
to show all elements, only the start frame is shown . If you
zoom out even further, only the scene name will be displayed .
Each scene is separated by a vertical line, representing the
beginning of a new scene . The active scene is highlighted by a
different color – and is not, unlike the Storyboard mode, posi-
tioned in the middle of the screen . In addition, the active scene
(or the active insert part) sports a bright line at the bottom .
If you position an insert over a scene, you‘ll find the insert
scene in the insert track, just below the video track . It is posi-
tioned correctly beneath the background scene . The elements
found in this track can also display frame pictures or just text,
depending on your settings . You‘ll also find that the effects are
positioned exactly at the right time position . Effects are shown,
just like the scenes, as bars with the respective effect icon .
The lowest track is used to position transitions . The display
method is the same as used for image processing effects .
As soon as you insert a transition, the video track display will
change . Two consecutive scenes will be placed `over each
other´ . The overlapping area will be shown as having its own
field, at the same length as the transition . The field contains a
a diagonal yellow line . In addition, depending on the setup, two
smaller images representing the first and last frame of the area
may be shown .
To the right of the Timeline, you can see a larger version of first
frame of the currently used scene . Directly beneath the image,
the scene name and the scene length . Underneath, there are
various settings for `Range´and `Zoom´ to help you define the
best possible overview for the Timeline part you are working
on .
`Zoom +´: Zoom into the Timeline display to improve visibility of
short clips and effects . Each click doubles the zoom area . The
time scale carries information about the currently displayed
area in seconds (s) or minutes (m) .
`Zoom -´: Zoom out of the Timeline to improve the overall
overview of the project . If you are suing long scenes, a smaller
Timeline view may be more appropriate . Each click makes the
view half as small .
`O´: This button switches the view to 20 scenes wide, but at
a maximum of 10 minutes length of your project . The current
scene is shown in the middle .
`N´: This normalizes the view and the current scene uses up
about 25% of the video track space .
`Range´: This function is used to set an area length for display-
ing the Timeline in seconds or minutes . The time scale then
switches to the value you are using . To set the value, click into
the number field for `Range´ and use the keyboard to enter a
number .
• s for an area in seconds (1-60)
• m for an area in minutes (only complete minutes).
If you enter a number without a letter, the number will be set
up in seconds per default .
The effect menus are also shown in the same fashion using
the Timeline . The audio mix screen allows you to see the audio
tracks in addition to the video tracks at the bottom .
The Timeline offers a very fast method for switching over to
an effect menu . If you want to change or delete an effect in
the Timeline, click onto it directly in the Timeline itself . You
will then be transported to the respective effect menu with the
options for the effect you have selected . Activating an effect in
the Timeline also activates the corresponding scene . It will be
highlighted – and in addition, marked using a bright line, point-
ing out the connection between effect and scene . This is par-
ticularly useful when working with inserts . If you are working
with an insert in the Storyboard and wish to apply a transition
to it, the line will help you to see if the effect will be positioned
at the beginning of the insert (Storyboard scene during insert
sports a low line) or at the end (the scene has a line) . If this
part of the scene shows a bright low line, the transition will be
placed between the marked and subsequent scene .
Using the timeline to edit audio