V - assembling the swimming pool, You can now begin to assemble the pool, V l’assemblage de la piscine – Swim'n Play International Concord Round User Manual
Page 11: Vous pouvez maintenant commercer le montage, V - der zusammenbau des schwimmbeckens, Jetzt können sie mit dem aufstellen beginnen, V - montaje de la piscina, Ahora puede comenzar el montaje, Gb f d e
10
V - ASSEMBLING THE
SWIMMING POOL
Before beginning with the assembly of the
pool, we have some important recommenda-
tions to make:
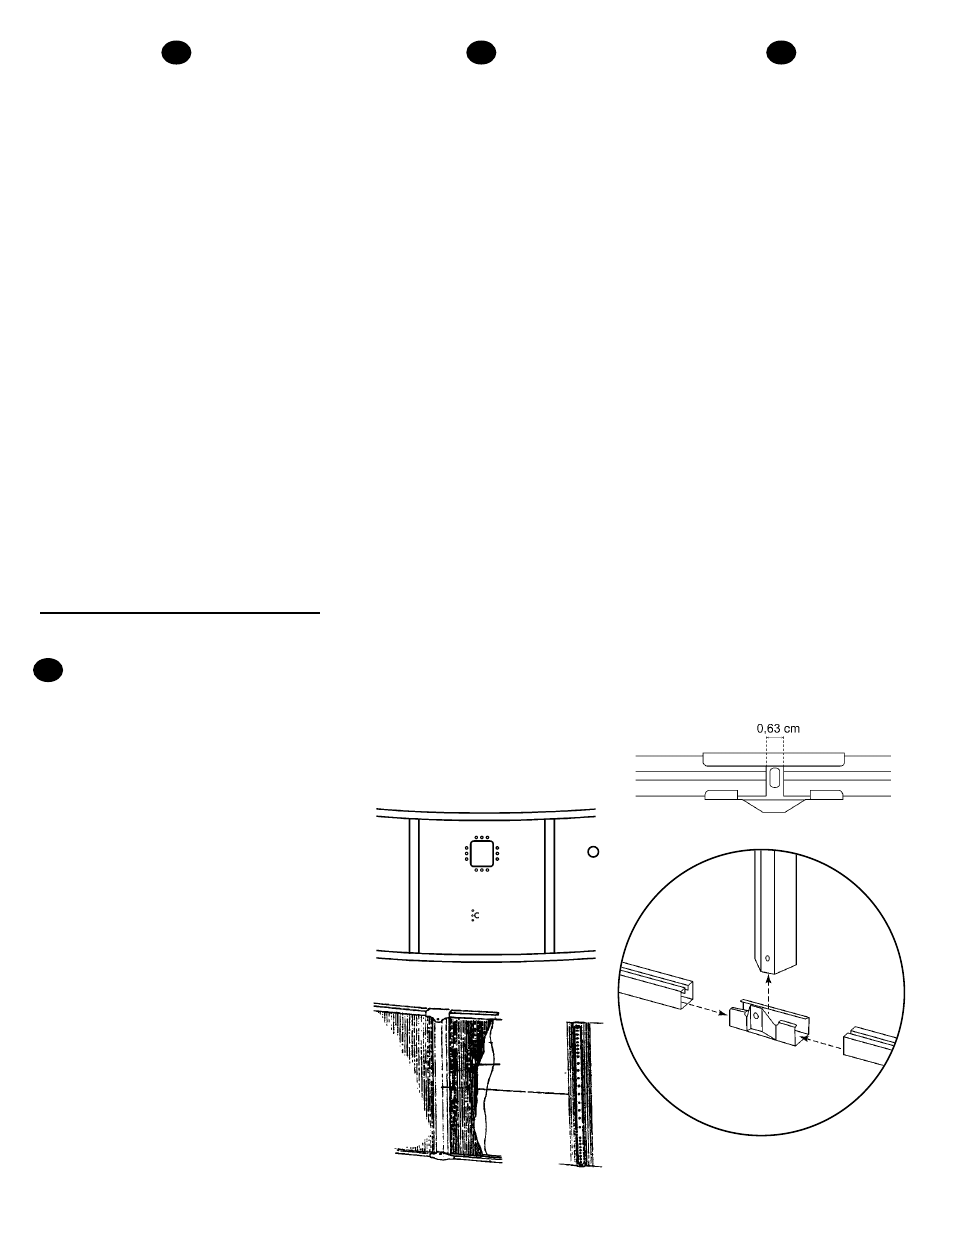
1 -If you intend to install a filter, position the
cut-out for the skimmer accordingly (Fig. 1).
2 -Press the rails firmly into the joining part until
they touch the middle snug of the part(Fig.3).
3 -Begin fitting the wall in the middle of a joining
part. In this way, you can be sure that the vertical
jamb, which will be added here, will cover the
closing joint of the wall(Fig. 2).
YOU CAN NOW BEGIN TO
ASSEMBLE THE POOL
1-Assembling the bottom rails:
Lay the bottom rails out on the ground to
shape the circle of the pool. Push the rails firm-
ly into the joining parts from either side as far
as they will go (Fig.3). Check that the bottom
framework of your pool is perfectly round by
measuring the distance between the central
stake and the rails at various points (Fig.4).
Bring the required amount of sifted earth or
pre-washed sand into the pool area at this
time. Refer to chart for the required amount.
V L’ASSEMBLAGE DE LA PISCINE :
Avant de procéder au montage de la piscine,
quelques recommandations importantes
s’imposent :
1-Prévoir dans le cas d’un filter l’emplace-
ment de l’ouverture du skimmer au bon
endroit. (Fig. 1)
2-Bien enfoncer les rails dans les con-
necteurs jusqu’à ce qu’ils touchent l’ergot
central du connecteur (Fig.3).
3-Démarrer la mise en place du mur au
milieu d’un connecteur; le montant vertical
quy sera fixé viendra cacher la fermeture de
la paroi de la piscine (Fig. 2).
VOUS POUVEZ MAINTENANT
COMMERCER LE MONTAGE
1-Assemblage du rail inférieur :
Déposer les rails sur le sol et ajustez les en
les emboîtant 2 à 2 dans les connecteurs de
jonction en les enforcant le plus possible de
chaque côté. (Fig.3). Vérifiez que le cercle
ainsi formé est rond et du diamètre corre-
spondant à celui de votre piscine (Fig.4).
Amener alors la quantité de terre tamisée ou
de sable prélavé à proximité de la piscine. Se
reporter au tableau pour la quantité nécessaire.
V - DER ZUSAMMENBAU DES
SCHWIMMBECKENS
Bevor Sie mit dem Aufstellen des
Schwimmbeckens beginnen, sollten Sie
folgende Hinweise beachten:
1-Platzieren Sie die Öffnung für den
Skimmer an eine geeignete Stelle wenn Sie
einen Filter verwenden möchten (Abb. 1).
2-Schieben Sie die Schienen in die
Anschlußstücke bis sie die Nocken der
Anschlußstücke berühren (Abb. 3).
3- Beginnen Sie mit dem Einziehen der
Wand in der Mitte eines
Anschlußstückes. Der senkrechte
Pfosten, der später an dieser Stelle
eingesetzt wird, verdeckt dann die
Nahtstelle (Abb. 2).
JETZT KÖNNEN SIE MIT DEM
AUFSTELLEN BEGINNEN
1-Die unteren Schienen
zusammensetzen:
Legen Sie die Schienen auf den Boden
und schieben Sie jeweils zwei von beiden
Seiten so weit wie möglich in die
Verbindungsstücke (Abb. 3). Stellen Sie
sicher, daß der so gebildete Kreis wirk-
lich rund ist und der Durchmesser mit
dem des Schwimmbeckens übereinstimmt
(Abb. 4).
Bringen Sie nun die jeweils erforderliche
Menge an Sieberde bzw. vorgewaschen-
em Sand zum Pool. Die nachstehende
Tabelle gibt Ihnen die notwendigen
Mengen-hinweise.
V - MONTAJE DE LA PISCINA:
Antes de efectuar el montaje de la pisci-
na, se recomienda lo siguiente:
1-Prever en caso de un filtro, el emplaza-
miento de la abertura del skimmer en el
lugal adecuado. (fig. 1)
2-Hundir bien los railes en los conec-
tores hasta que toquen el espárrago cen-
tral del conector (fig.3).
3-Inciar la instalación de la pared al
medio de un conector; el montante verti-
cal que estará fijado ahi esconderá el
cierre de la pared de la piscina (fig. 2).
AHORA PUEDE COMENZAR EL
MONTAJE
1-Ensamblaje del rail inferior:
Colocar los raíles en el suelo y ajustarlos
encajando 2x2 en los conectores de
unión, hundiéndoles lo más posible de
cada lado (fig.3). Verificar que el circulo
formado sea redondo y del diámetro cor-
respondiente al de su piscina (fig.4).
En este punto, lleve la cantidad requerida
de tierra tamizada o arena prelavada al
área de la piscina. Véase el cuadro para
la cantidad requerida.
Fig. 2
Fig. 1
Fig. 3
GB
F
D
E