Vda-5, Quick start guide, Vda series dvi splitter – Thinklogical VDA Manual User Manual
Page 19: 4x single-link 1:2
V
D
A
S
e
r
i
e
s
D
V
I
S
p
l
i
t
t
e
r
s
,
R
e
v
.
C
,
M
a
y
,
2
0
1
4
P
a
g
e
1
6
DVI OUT
DDC-3
DVI OUT-3
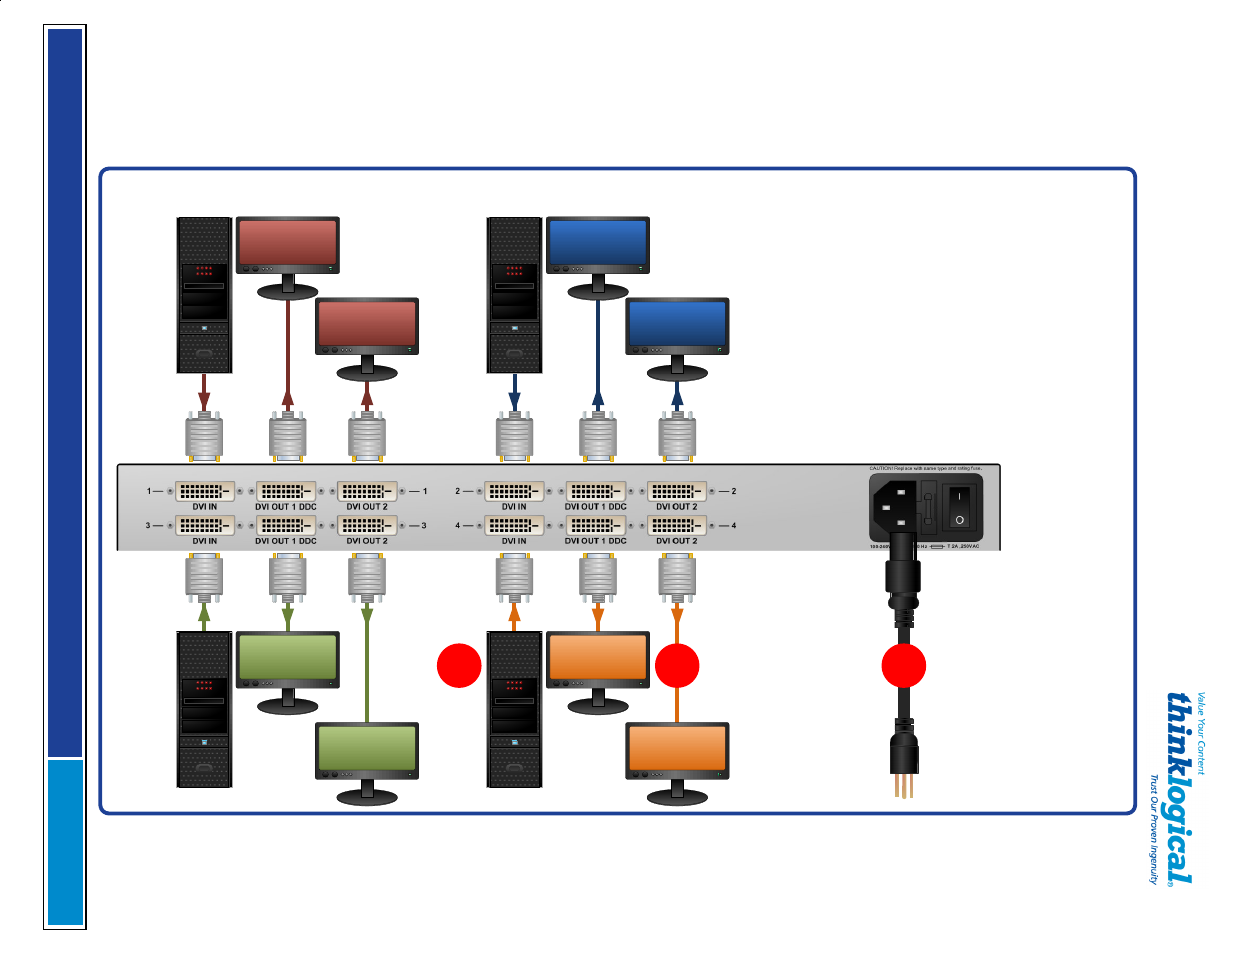
STEP 2:
Connect one end of the
supplied Single-Link DVI-D male to
male cables to the video sources
(DVI-D video cards) and the other
end to the DVI IN connectors on
each of the VDA Splitters.
STEP 3:
Ensure the ON/OFF swtch
on the rear panel is in the OFF (0)
position. Connect the supplied AC
line cord (PWR-000006-R) to the
VAC input located on the rear panel
of the VDA Splitter’s chassis and
plug it into a standard AC source.
Turn the switch ON ( l ). Ensure all
video output DVI displays are
functioning properly.
STEP 1:
Connect one end of a
Single-Link DVI-D cable from
each primary DVI Output
Monitor to the DVI OUT DDC
connector on the VDA Splitter’s
rear panel. Connect one end of
a Single-Link DVI-D cable from
each secondary DVI Output
Monitor to the DVI OUT 2
connector on the VDA Splitter’s
rear panel.
Copyright © 2013. All rights reserved. Printed in the U.S.A.
All trademarks and service marks are the property of their respective owners.
VDA Series DVI Splitter
VDA-5
4x Single-Link 1:2
QUICK START GUIDE
The Logical Solution
Each of the four
VDA-5 Single-Link 1:2 Splitters
sends
a Single-Link DVI video source to two displays without
signal loss. Installation is plug-and-play with no
adjustments required. Each model of the VDA Series
is compatible with most Thinklogical
®
DVI Extenders.
VDA-5_4xSplitter_SL_1x2_QSG_Manual
DVI OUT
DDC-4
DVI OUT-4
DVI OUT
DDC-1
DVI OUT-1
DVI OUT
DDC-2
DVI OUT-2
D
V
I S
o
u
rc
e
1
D
V
I S
o
u
rc
e
2
D
V
I S
o
u
rc
e
3
D
V
I S
o
u
rc
e
4
1
3
2
VDA-000005
Rack Mount Video Distribution Amp, 4 DVI Splitters