Front panel – Sony X85K 55" 4K HDR Smart LED TV User Manual
Page 7
Functions of Parts and Controls
7
a
Plug
Connect to the VF connector on the camera.
b
Stopper
Prevents the viewfinder from coming off the camera
when it is slid from side to side.
c
Tally indicator (front)
Lights up when the camera receives the red tally signal.
The brightness can be adjusted with the TALLY switch
on the front panel. Set the TALLY switch to OFF when
not in use.
d
MENU control
Turn the control to select a menu item, and then press the
control to confirm the selection. Use with the MENU
switch to set various functions.
When the menu is not displayed, pressing this control
shows the status information of the viewfinder on the
screen.
For details on operations, see “Using the Menu” on page
17.
e
Tally indicator (rear)
Lights up when the camera receives the red tally signal.
This indicator can be covered when not in use.
f
Eyecup
Blocks external light while you are shooting.
Over time the eyecup may become cracked. If this occurs,
it should be exchanged.
g
Eye sensor
Controls the anti-burn-in function for the OLED panel.
• Do not cover or block the eye sensor.
• To prevent screen burn-in on the OLED panel, the
video signal level in the display may be inverted or the
image may not be displayed when your eye is not in
contact with the eyecup.
h
Diopter adjustment ring
Turn this until the image is sharpest for your eyesight.
i
ASSIGN (assignable) 1/2 switches
Can be used to store frequently used functions.
Storing a function is performed using “ASSIGN 1” or
“ASSIGN 2” in the FUNCTION menu (page 19).
j
MENU switch
Displays the menu. Use with the MENU control to set
various functions.
When the menu is not displayed and this switch is pressed
and held for three seconds or more, “VR LOCK” appears.
This locks the BRIGHT, CONTRAST, and PEAKING
controls at their current settings, preventing accidental
operation. To unlock the controls, press this switch for
three seconds or more again so that “VR UNLOCK”
appears.
For details on operations, see “Using the Menu” on page
17.
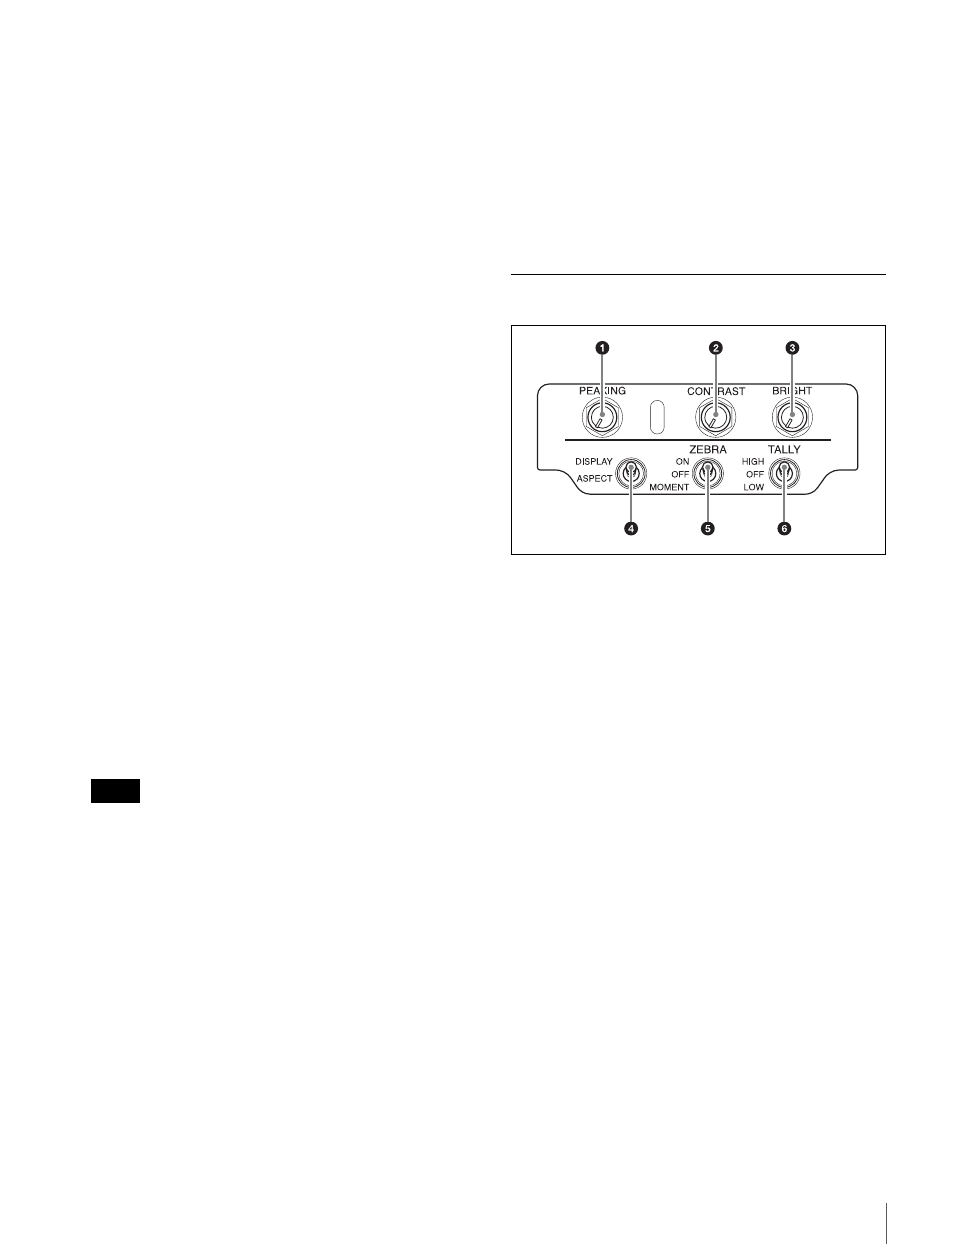
Front panel
a
PEAKING control
Sharpens the edges in the picture. This control has no
effect on the camera’s video output signals. Turning the
control clockwise increases the sharpness.
b
CONTRAST control
Adjusts the picture contrast. This control has no effect on
the camera’s video output signals. Turning the control
clockwise increases the contrast.
HDVF-EL20
This control is disabled when “PRESET” in the PRESET
menu (page 21) is set to “ON.”
HDVF-EL30
This control is disable when “PRESET” is set to “ON”
and “PRESET SELECT” is set to “BOTH” in the
PRESET menu (page 21).
c
BRIGHT (brightness) control
Adjusts the picture brightness. This control has no effect
on the camera’s video output signals. Turning the control
clockwise increases the brightness.
HDVF-EL20
This control is disabled when “PRESET” in the PRESET
menu (page 21) is set to “ON.”
HDVF-EL30
This control is disable when “PRESET” is set to “ON”
and “PRESET SELECT” is set to “BOTH” in the
PRESET menu (page 21).
Notes