Indicators on the screen – Sony X85K 55" 4K HDR Smart LED TV User Manual
Page 8
Functions of Parts and Controls
8
d
ASPECT/DISPLAY switch
Switches the image display ratio and DISPLAY
indication/marker indication ON/OFF.
ASPECT:
Each push of the switch to this position
toggles the mask display on and off.
DISPLAY:
Switches the DISPLAY indication ON/OFF
and switches the marker indication ON/OFF when
the camera's marker indication is set to “ON.”
The motion differs while operating the DISPLAY switch
depending on the connecting camera.
e
ZEBRA (zebra pattern) switch
Controls the zebra pattern display on the viewfinder
screen as follows:
ON:
A zebra pattern appears and stays.
OFF:
The zebra pattern disappears.
MOMENT:
A zebra pattern appears and stays for about
5 seconds.
f
TALLY switch
Controls the TALLY indicator (page 7) located on the
front of the viewfinder.
HIGH:
The tally indicator brightness is set to high.
OFF:
The tally indicator is disabled.
LOW:
The tally indicator brightness is set to low.
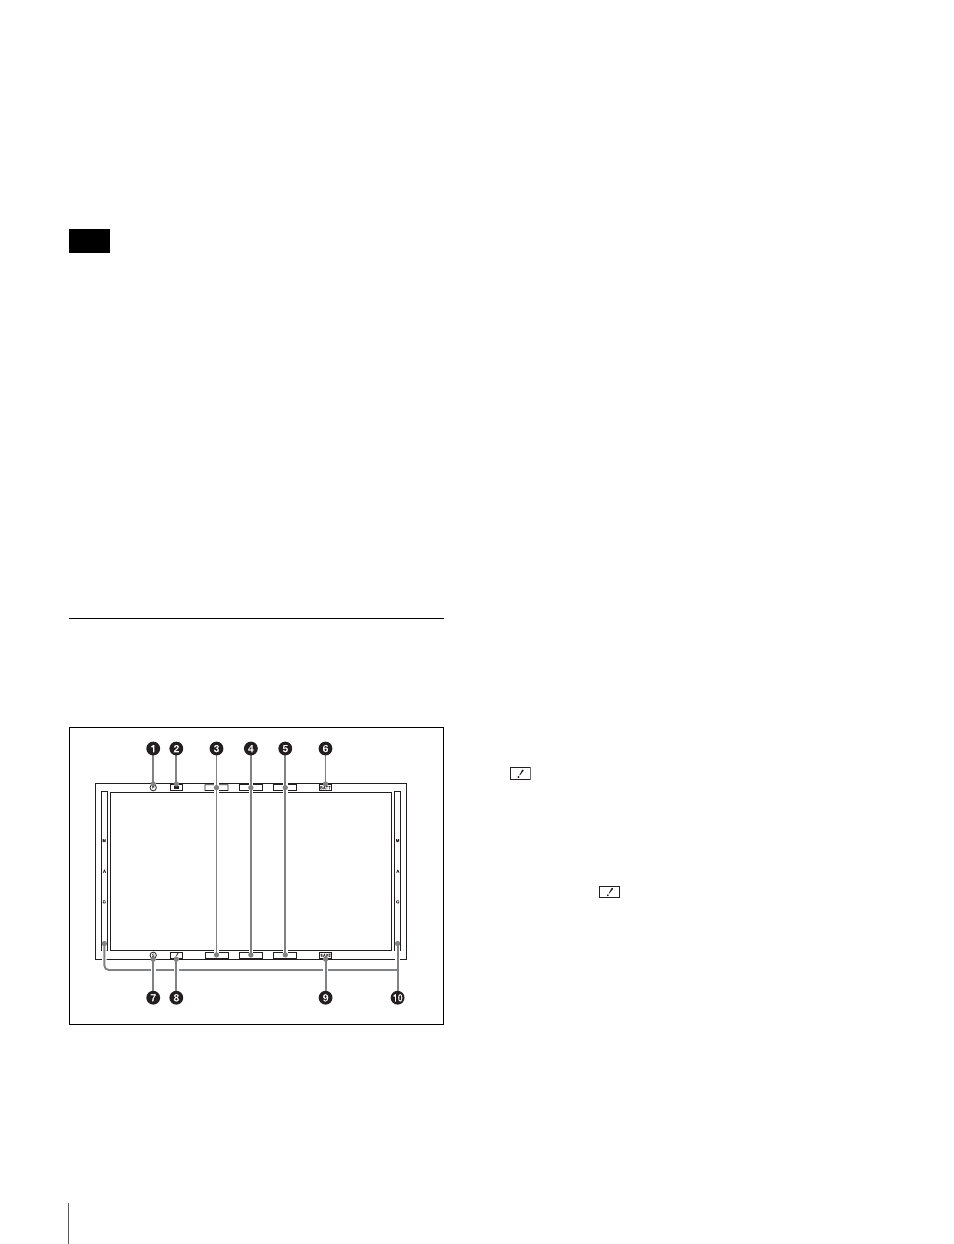
Indicators on the screen
Indicators are located on the upper and lower and left and
right parts of the OLED and LCD screen (HDVF-EL30
only) to indicate the status of the camera or this unit.
a
PEAKING PLUS indicator (blue)
Operates the ASSIGN switch assigned with the
PEAKING PLUS function or lights up when “PEAKING
MODE” in the PEAKING PLUS menu (page 20) is set to
“PLUS.”
b
MAG (magnification) position indicator
Shows the expanded display among the center / upper /
right / lower / left parts of the screen.
c
G TALLY indicator (green)
Lights up when the green tally signal is input.
d
R TALLY indicator (red)
Lights up when the red tally signal is input.
e
Y TALLY indicator (yellow)
Lights up when the yellow tally signal is input.
f
BATT (battery) indicator (red)
Lights up or flashes, to indicate the status of the battery
attached to the camera as follows.
Lit:
The battery is drained.
Flashing:
The voltage of the battery has dropped below
the threshold value.
To prevent camera from shutting down, change the
battery as soon as possible after this indicator begins
flashing.
The threshold battery voltage value at which this
indicator begins lighting up or flashing can be set by the
camera. For details, refer to the manual for the camera.
g
STATUS indicator (amber)
Shows the current status of the viewfinder.
Blinking in intervals of 0.5 seconds:
A problem is
detected during self-diagnosis. An error message
(see page 23) may be displayed at the same time.
Turn off the power and contact your Sony service
representative.
h
(attention) indicator (amber)
Lights up when the camera detects certain conditions. The
conditions under which the indicator lights up are
specified on the camera.
For details on how to set up and verify the conditions
under which the
indicator lights up, refer to the
manual of the camera in use.
i
SAVE indicator (amber)
Lights when the recorder attached to the camera is in
power save mode.
j
MAG (magnification) indicator (amber)
Lights up when the displayed image is magnified (when
the ASSIGN switch of the MAGNIFICATION function
is set to “ON,” or “MAGNIFICATION” in the
MAGNIFICATION menu (page 21) is set to “ON”).
Note