Act single channel wireless receiver, Switchable channels functions, Cautions 7. act button – MIPRO act707se_ii(2ce158)c User Manual
Page 6: Change channel when, Caution while changing channels, Functions: 2. how to select a frequency
8
9
ACT SINGLE CHANNEL WIRELESS RECEIVER
ACT SINGLE CHANNEL WIRELESS RECEIVER
6. SWITCHABLE CHANNELS FUNCTIONS
1.
Since the installation of antenna influences the operating efficiency of the
receiver, the most important rule is to minimized the distance between
receiving antenna and microphone as short as possible for better
reception and performance.
2.
The external DC power supply should not be below 12V, otherwise it
would not work properly. If it is over 15V, some components of the
receiver will be damaged due to higher current. Use minimum 1A power
supply.
3.
Antenna socket as 8-volt DC power supply ; please do not short the
circuit of this part!
8. CAUTIONS
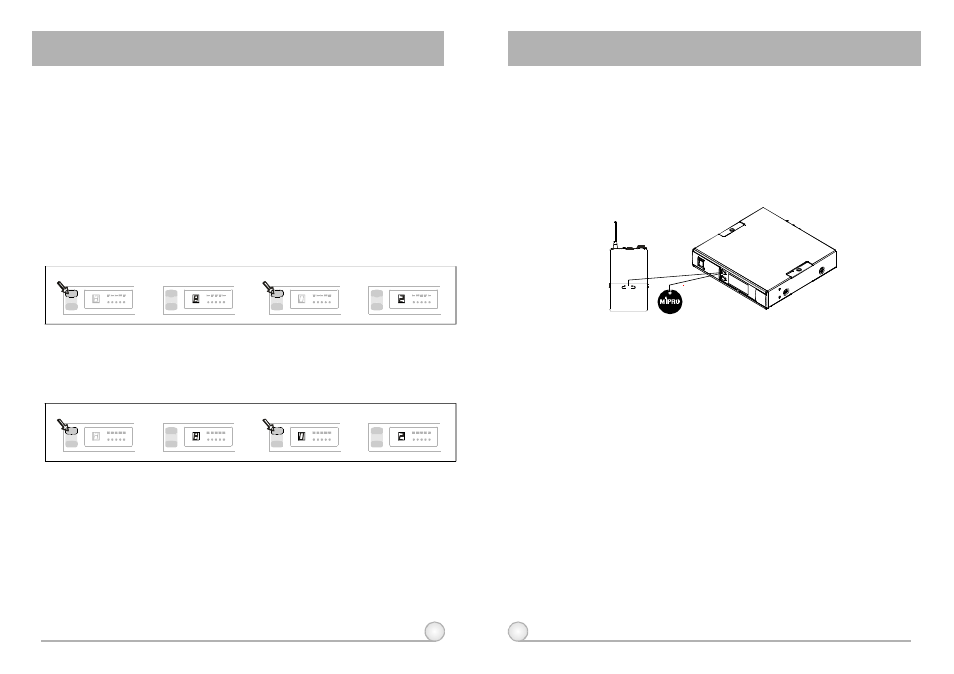
7. ACT BUTTON
1.
Press "ACT" button (3) on the front panel of receiver once and the
system is ready for "ACT" function.
2.
Position the "ACT" marking of the transmitter about 30cm. Towards the
"ACT" button (3) on the receiver as illustrated in below figure.
3.
ACT function will be deactivated automatically once the transmitter
frequency is locked on.
A C T
3. Change channel when:
(a)
When multiple channels are utilized do not change channel to avoid exiting
channel interference.
(b)
When numeric knob reaches "_" it indicates an empty channel. Proceed until
a numeric number appears.
4. Caution while changing channels:
(a)
Existing c hannel is being interfered or channel is malfunction.
(b)
Select channel for multiple non-interference usage.
(a)
This system incorporates advanced PLL synthesized oscillator design.
Preprogrammed with 16 switchable frequencies. Allow the user to freely
select any of thepreprogrammed frequencies.
1. Functions:
2.
How To Select a Frequency:
(a)
Holding down the SCAN button (4) for 1
second. Release the button when numeric LED (5) flashes. It will flash a total
of 6 times. To activate the AutoScan function, press the SCAN button once
within these 6 times. An open frequency will automatically be scanned and
saved/locked. *Note AutoScan function works only during numeric LED
flashing and within 6 times.
Auto Scanning Frequency Set-up:
(b)
Holding down the SCAN button (4) for 1 second.
Release the button whennumeric LED (5) flashes. It will flash a total of 6
times. To select any of the 16 frequencies in orderly format, press the SCAN
button and hold until the desired frequency is selected. This frequency will
automatically be saved/locked.
Manual Frequency Set-up:
a)
b)
c)
d)
AF
RF
CHANNEL
N o .
SCAN
ACT
A F
R F
CHANNEL
N o .
SCAN
ACT
A F
R F
CHANNEL
N o .
S C A N
ACT
A F
RF
CHANNEL
N o .
S C A N
ACT
Whendoneitwillautosaved/locked.
LEDdisplayflashes.
Pressandhold"SCAN"button
for1second.
Press"SCAN" buttonagainand release
willautoscanforanopenfrequency.
a)
b)
c)
d)
AF
RF
CHANNEL
N o .
SCAN
ACT
A F
R F
CHANNEL
N o .
SCAN
ACT
A F
R F
CHANNEL
N o .
S C A N
ACT
A F
RF
CHANNEL
N o .
S C A N
ACT
Press"SCAN"buttonandhold,
frequencywillchangeeverytwoflashes.
Whendoneitwillautosaved/locked.
LEDdisplayflashes.
Pressandhold"SCAN"button
for1second.