Belt pack transmitter, Af 4-pin input connection methods, Battery installation – MIPRO act707se_ii(2ce158)c User Manual
Page 9: Cautions, Fig.4) (fig.3)
1 4
15
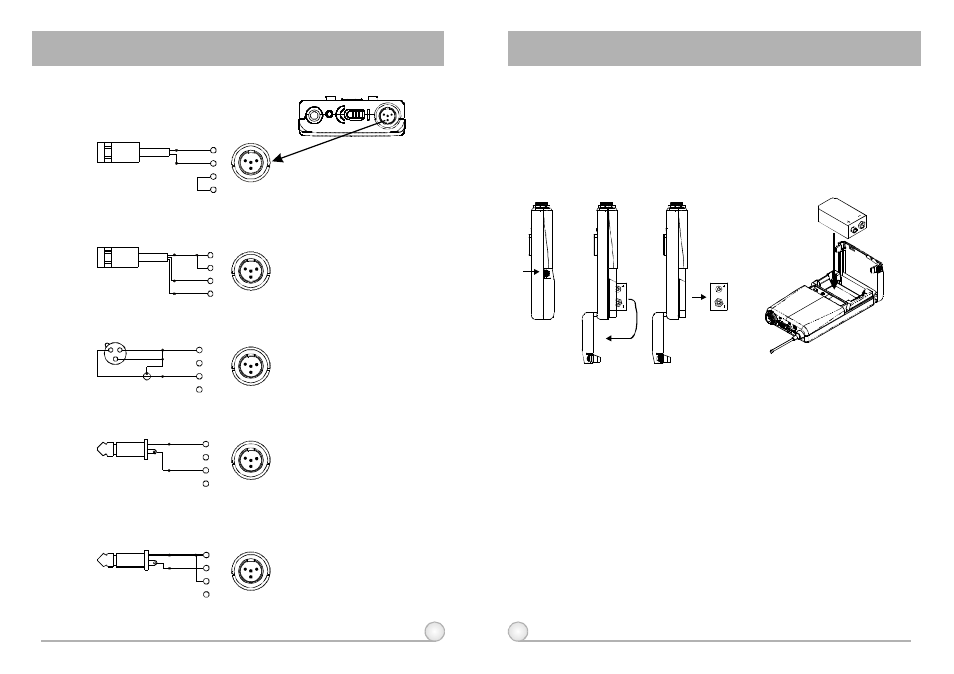
3. AF 4-PIN INPUT CONNECTION METHODS
(1) 2-Wire Electret Condenser Microphone Capsule
(2) 3-Wire Electret Condenser Microphone Capsule
(3) Dynamic Microphone
(4) Electric Guitar
(5) Line-in (Impedance 8K
ATT. 10dB)
Ω
AUDIO
SHIELD
4
3
2
1
PIN
SHIELD
AUDIO
BIAS
3
4
PIN
1
2
AUDIO
SHIELD
1
4
3
2
PIN
SHIELD
AUDIO
3
2
1
PIN
4
3
2
1
SHIELD
AUDIO
1
3
4
2
PIN
1
3
4
2
1
3
4
2
1
3
4
2
1
3
4
2
1
3
4
2
1
3
4
2
OFF
ON
BATT.
LOW
BELT PACK TRANSMITTER
BELT PACK TRANSMITTER
4. BATTERY INSTALLATION
1.
Pushing down both snap locks on the sides of battery cover to open
battery cover. Take out the batteries. Fig.3).
2.
Insert a 9V battery into the battery compartment according to the correct
polarity as shown in (Fig. 4). Then push up to close the battery
compartment as shown in (Fig. 4).
(Fig.4)
(Fig.3)
Under normal operation, when receiver and transmitter are paired together
to set frequency, microphone indicator (3) will remain off after ACT setup the
frequency. However, if indicator (3) is flashing, it means receiver and
transmitter are not in the same frequency band. Please check the stickers on
transmitter and receiver to observe if they are sharing the same frequency
bands.
5. CAUTIONS
PS: When the microphone is not in use:
Make sure the power of the microphone is off. If the microphone will not
be used for some time, please remove the batteries from the battery
compartment to avoid battery leakage and result in damaged battery
springs and circuit.