Aavara EF2020 User Manual
Page 6
㆗文
ENG
日本語
日本語
㆗文
ENG
日本語
日本語
8
7
安裝步驟及方式
安裝步驟及方式
Installation Process
取付けステップ及び方式
取付けステップ及び方式
1
將壁掛架本體固定於牆㆖
Fix the Wall mount bracket to the wall
壁掛けブラケット本体を壁に固定します
壁掛けブラケット本体を壁に固定します
安裝前請先了解您要安裝位置的牆壁種類: 磚塊牆、㈬泥牆或㈭頭牆。
㊟意:如果安裝在磚塊牆時,不可將螺絲(C)鎖固於磚堆與磚堆之間的間隙。
如果安裝在㈭頭牆時,不可將螺絲(C)鎖固於裝飾的柱子或石膏板㆖。
決定您要在牆壁㆖的安裝位置,將壁掛架本體(A)靠著牆壁,使用㈬平儀校正
㈬平,然後使用鉛筆在壁掛架本體㆖的橢圓孔作記號。
Identify the wall type before installation: masonry wall, cement wall or stud
wall.
Note: For installation onto a masonry wall, avoid applying the lag bolt (C) at the gap
between bricks.
For installation on a stud wall, avoid applying the lag bolt (C) to a decorative
column or a gypsum board.
Identify the installation position, lean the Wall mount bracket (A) to the wall
and level it with a leveling device; mark, with a pencil, the oval holes of the
Wall mount bracket to the wall.
取付け前に取付け位置の壁の種類をチェックしてください:レンガ壁・セメント壁或
は木板壁。
注意:
注意:レンガ壁に取付ける時は、ネジ
(C)をレンガとレンガの間の間隙に固定しないでください。
木板壁に取付ける時は、ネジ
(C)を飾りのある柱或は石膏板上に固定しないでください。
壁の取付け位置を決定した時は、壁掛けブラケット本体
(A)を壁に寄り掛け、水平
儀を使用して水平を校正した後、鉛筆を使用して壁掛けブラケット本体上の楕円孔
に記号を付します。
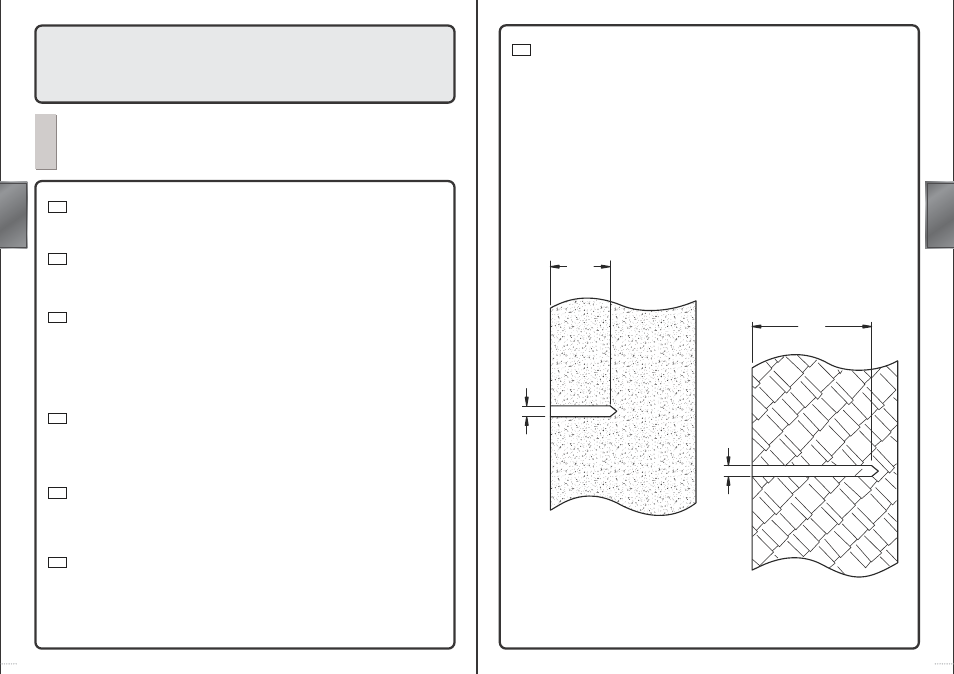
使用電鑽及鑽頭在作記號的牆壁鑽孔。
㊟意:如果是磚塊牆或㈬泥牆,鑽孔的孔徑為10mm深55mm。
如果是㈭頭牆,鑽孔的孔徑為4.5mm深55mm。
Drill a hole at the marked position with an electric drill and drilling bit.
Note: For a brick-piled masonry wall or cement wall, holes of 10mm diameter and
55mm depth shall be made.
For a stud wall, holes of 4.5mm diameter and 55mm depth shall be made.
電気ドリルとドリルを使用して記号を付した壁に孔をあけます。
注意:
注意:レンガ壁或はセメント壁の時は、あける孔は直径
10mm深55mm。
木板壁の時は、あける孔は直径
4.5mm深さ55mm。
1-1
1-2
1-1
1-2
1-1
1-2
1-3
Ø4.5
55
Stud walls
Ø10
55
Masonry walls or Cement walls