CRU ToughTech Secure 128 mini-Q with WriteLock User Manual
Page 10
CRU
U s e r M a n u a l f o r T o u g h T e c h m i n i Q m o d e l s ( A 9 - 0 0 0 - 0 0 0 1 r e v 1 . 5 )
- 10 -
5.2 Usage with Windows Operating Systems
5.2.1 Compatibility
ToughTech mini uses 2.5-inch, 9.5mm height SATA (Serial-ATA) hard drives only. ToughTech is fully
plug-and-play under Windows XP, Vista, or 7 when using FireWire or USB. No drivers are needed. The
USB2 port is USB 1.1 compatible. ToughTech does not require drivers for eSATA operation, but eSATA
host cards do. If installing an eSATA host card into your computer, use the card manufacturer’s drivers
and instructions.
5.2.2 Formatting a drive
If you purchased your ToughTech pre-populated with a hard drive, this step should not be necessary
unless you wish to change the format or erase the drive. To format, use the Disk Management utility.
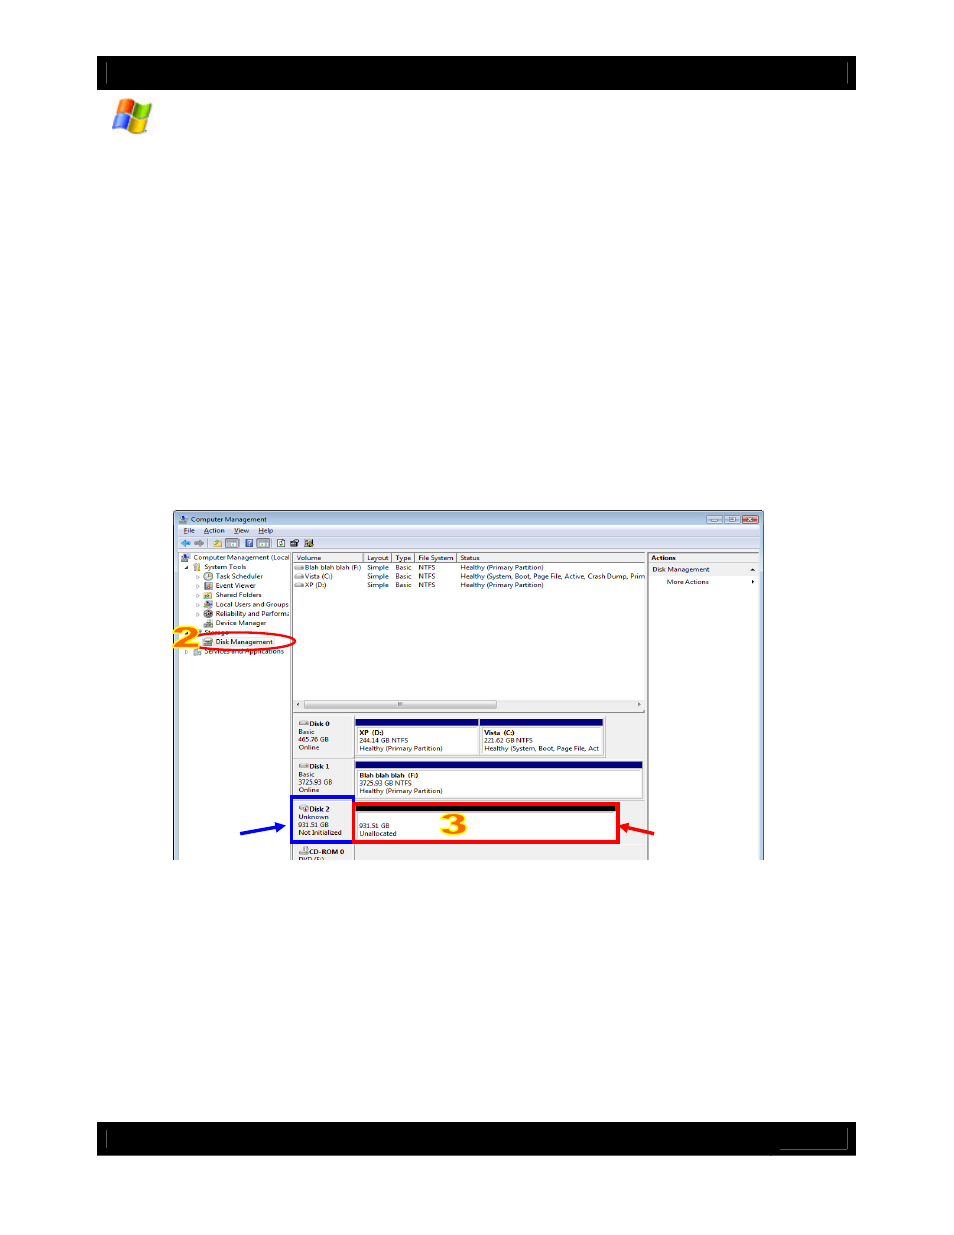
1. Right-click on My Computer, then select Manage. The Computer Management window will open.
2. In the left pane of this window, left-click on Disk Management.
3. The drive should appear in the list of Disks in the lower middle/right pane (see picture below). You
may need to scroll down to see it. If the drive is already formatted, you can identify it easily by its volume
name. If it’s unformatted, the Drive Properties Box will say “Unallocated” and you’ll need to initialize the
disk before formatting it. Initialize the disk by right-clicking the Device Properties Box and selecting
Initialize Disk.
4. To format the drive, right-click the Drive Properties Box and select Format.
5. If you are prompted to select a partition type, select MBR for volumes 2TB or smaller, or GPT for
volumes larger than 2TB. Note: Windows XP does not support GPT or volumes larger than 2TB.
6. Click through several more windows, leaving the default settings, until you see a window that allows
selection of a file system. Choose NTFS and enter a name for the new volume. Be sure to check the box
labeled “Perform a quick format” unless you want to completely erase any data on the drive and have
time to wait. A quick format should take less than a minute, while standard formatting may take several
hours.
7. Click “Next” and then “Finish” to start the format process. When the format is complete, the Drive
Properties Box will update to show the new volume name. The new volume can now be found in My
Computer.
Drive
Properties
Box
Device
Properties
Box