Specifications, Adjusting the dr trimmer/mower handlebar – DR Power Premier 6.5fpt Kohler User Manual
Page 7
CONTACT US AT www.DRpower.com 7
Specifications
Premier Premier
Plus
Pro
Pro-XL
Engine
Kohler XT6.5 OHV
Manual or Electric Start
See Engine Owners
Manual for details
Briggs and Stratton 675
Quantum
Manual or Electric Start
See Engine Owners
Manual for details
Subaru EA175 OHC
Manual or Electric Start
See Engine Owners
Manual for details
Subaru EA190 OHC
Electric Start
See Engine Owners
Manual for details
Engine Speed
3500 rpm
3500 rpm
3500 rpm
3500 rpm
Cutting Width
22" 22" 22" 22"
Cutting Height
5 Heights, 1.5" to 3.5"
5 Heights, 1.5" to 3.5"
5 Heights, 1.5" to 3.5"
5 Heights, 1.5" to 3.5"
Cutting Speed
3800 RPM
3800 RPM
3800 RPM
3800 RPM
Cord Size
Green .155" Round,
Blue .175" Spiral, 25"
Long
Green .155" Round,
Blue .175" Spiral, 25"
Long
Green .155" Round,
Blue .175" Spiral, 25"
Long
Green .155" Round,
Blue .175" Spiral, 25"
Long
Wheels
14" x 1.75" Wide, Resin
14" x 1.75" Wide, Resin
16" x 1.75" Wide, Resin
16" x 1.75" Wide, Resin
Frame
14 Gage Steel
14 Gage Steel
14 Gage Steel
14 Gage Steel
Mow-Ball
4" Diameter,
Super-Tough Nylon
4" Diameter,
Super-Tough Nylon
4" Diameter,
Super-Tough Nylon
4" Diameter,
Super-Tough Nylon
Drive Belt
V-Belt, 3L, Gates
PoweRated 6744, No
Substitutions
V-Belt, 3L, Gates
PoweRated 6744, No
Substitutions
V-Belt, 3L, Gates
PoweRated 6744, No
Substitutions
V-Belt, 3L, Gates
PoweRated 6744, No
Substitutions
Machine
Dimensions
50.4" L x 21.5" W
x 38.3" H
50.4" L x 21.5" W
x 39" H
50.4" L x 21.5" W
x 39" H
50.4" L x 21.5" W
x 39" H
Machine Weight
57 Lbs Manual Start,
65 Lbs Electric Start
55 Lbs Manual Start,
63 Lbs Electric Start
62 Lbs Manual Start,
70 Lbs Electric Start
71 Lbs Electric Start
Accessories
12" Beaver Blade, DR
DuraBlade, TreeSafe
Guard, and Weather
Cover
12" Beaver Blade, DR
DuraBlade, TreeSafe
Guard, and Weather
Cover
12" Beaver Blade, DR
DuraBlade, TreeSafe
Guard, and Weather
Cover
12" Beaver Blade, DR
DuraBlade, TreeSafe
Guard, and Weather
Cover
FOR PROPER SETUP OF YOUR NEW DR TRIMMER/MOWER PERFORM ALL THE FOLLOWING STEPS IN THIS CHAPTER.
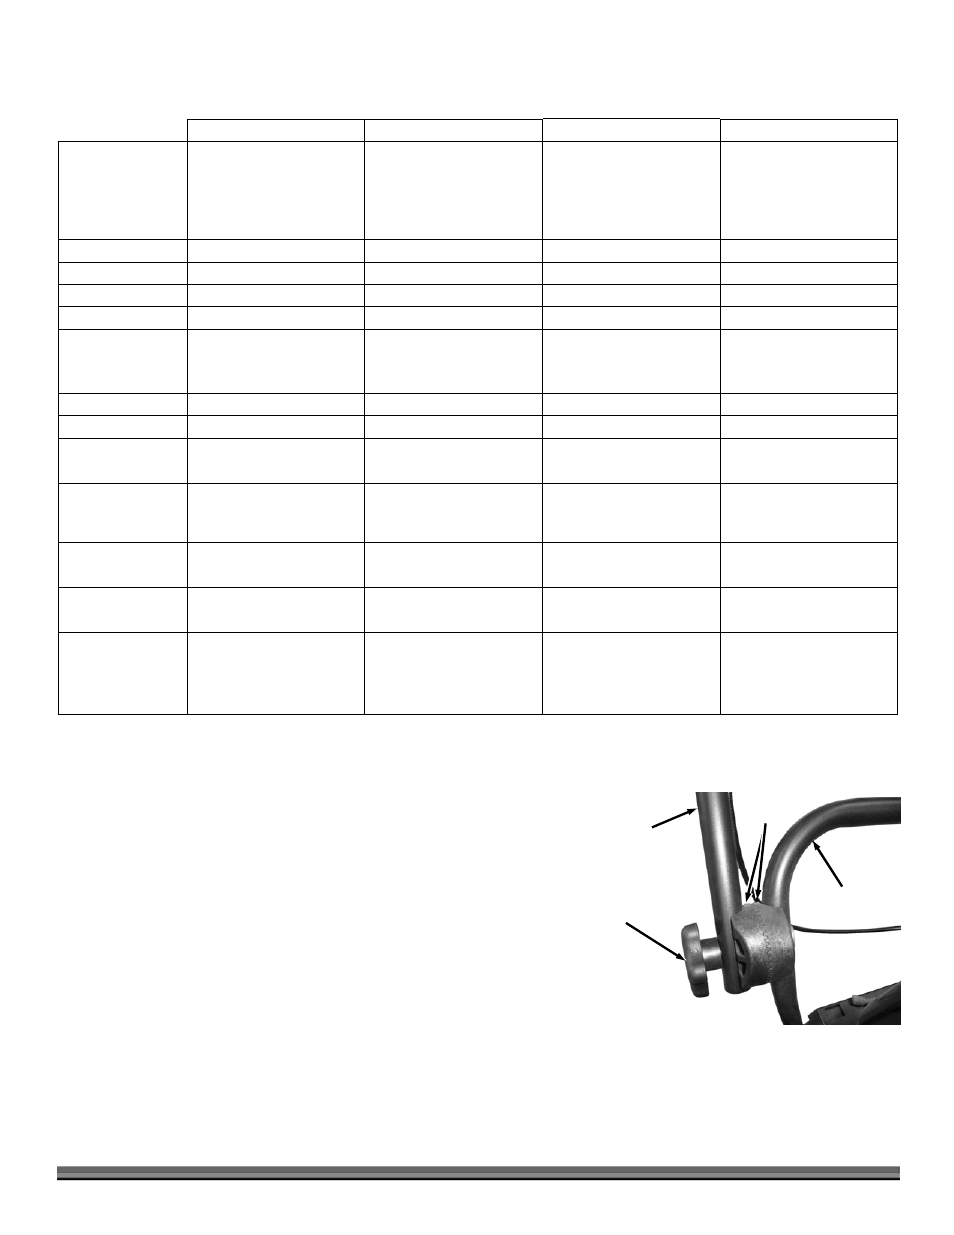
Adjusting the DR TRIMMER/MOWER Handlebar
The Handlebar folds down for easy storage and the DR Trimmer/Mower is
shipped to you with them folded.
NOTE: Ensure that the teeth of the Handlebar Adjusters mesh correctly as you
tighten the Knobs.
1. Loosen both the Adjustment Knobs and move the Handlebar up or down
until the Notches on the Adjusters are aligned on both sides. This puts the
Handlebar at a comfortable operating position for many people. Move the
Handlebar up or down until you are comfortable, and then tighten the
Adjustment Knobs securely. Take note of how many teeth you have moved
away from the aligned notches to align both sides.
It is important to find a Handlebar height that allows the Mow-Ball
®
to hover
just above the ground and remain balanced so you do not have to push down or
pull up on the Handlebar. When in use, proper adjustment is critical to best
performance. You may find you like different Handlebar heights for different
mowing conditions.
Figure 2
Notches
Lined Up
Adjustment
Knob
Lower
Handlebar
Upper
Handlebar