General information, Unpacking, Installation – Flowserve Valtek VL Spring Cylinder Linear Actuators User Manual
Page 2: Maintenance
Valtek Spring Cylinder Linear Actuators FCD VLENIM002-00-AQ 10/14
2
GENERAL INFORMATION
The following instructions are designed to assist in installing,
troubleshooting and servicing Valtek spring cylinder actuators. Product
users and maintenance personnel should thoroughly review this
bulletin prior to installing, operating or disassembling the actuator.
Separate installation, operation and maintenance instructions cover
additional features (such as hand-wheels, limit stops, fail-safe systems
or limit switches).
This publication does not contain information on Flowserve positioners.
Refer to the appropriate installation operation and maintenance
instructions for installing, maintaining, troubleshooting, calibrating and
operating Flowserve positioners.
To avoid possible injury to personnel or dam-age to valve parts,
WARNING and CAUTION notes must be strictly followed. Modifying
this product, substituting non-factory or inferior parts or using
maintenance procedures other than outlined could drastically affect
performance, void product warranties and be hazardous to personnel
and equipment.
a
WARNING: Standard industry safety practices must be
followed when working on this or any process control product.
Specifically, personal protection and lifting devices must be
used as warranted.
Unpacking
While unpacking the actuator, check packing list against materials
received. Lists describing the actuator and accessories are included in
each shipping container.
1. Position the lifting straps and hoist to avoid damage to the tubing
and mounted accessories when lifting the actuator from the
shipping container.
a
WARNING: When lifting an actuator with lifting straps through
the yoke legs, be aware the center of gravity may be above the
lifting point. Therefore, support must be given to prevent the
actuator from rotating or causing serious injury to personnel or
damage to nearby equipment.
2. Contact your shipper immediately in the event of shipping damage.
3. Contact your Flowserve representative for any problems.
Installation
Prior to installation, make sure adequate overhead clearance for the
actuator is provided to allow for proper removal from the valve body
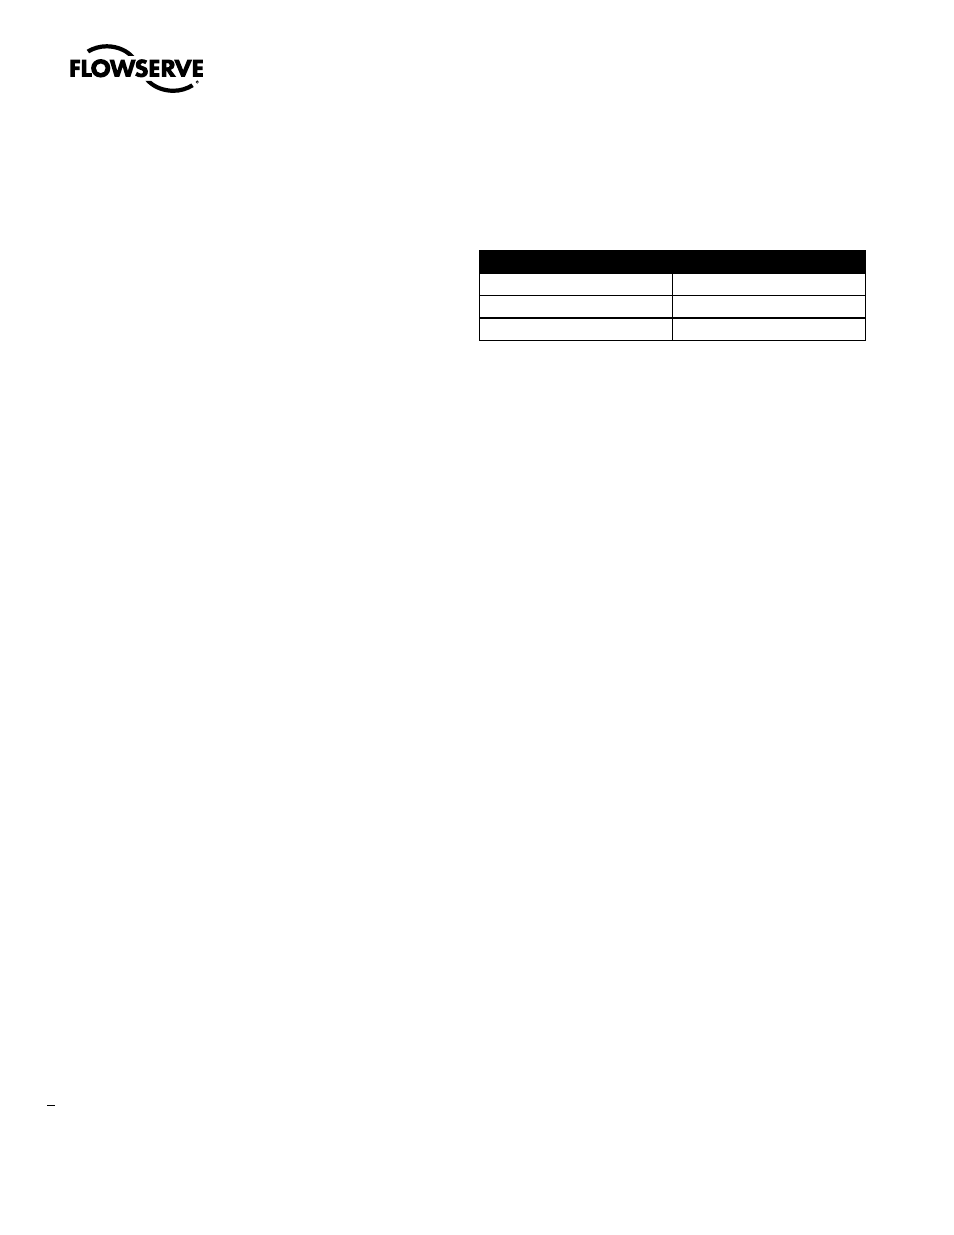
and for proper maintenance. Refer to Table 1.
NOTE: If the actuator is attached to a valve body assembly,
see Installation, Operation, Maintenance Instructions 1 for
overhead clearances.
Table 1: Overhead Clearance for Disassembly
1. Connect the air supply and instrument signal air lines to the two
appropriately marked connections on the positioner. Since both
the cylinder and positioner are suitable for 150 psi air supply, an air
regulator should not be used unless the supply exceeds 150 psi.
NOTE: In some cases, air supply must be limited to 100 psi
rather than 150 psi; this will be indicated by a sticker found
near the upper air port on the cylinder.
a
WARNING: To avoid personal injury or equipment damage, do
not exceed recommended supply pressure.
2. Installation of an air filter on the supply line is recommended.
3. Use a soap solution to make sure all air connections are leak free.
MAINTENANCE
At least once every six months, check for proper operation by following
the preventative maintenance steps outlined below. These steps can be
performed while the actuator is in service and, in some cases, without
interrupting service. If an internal problem is suspected with the actua-
tor, refer to the “Disassembly and Reassembly” section.
1. Examine the actuator for damage caused by corrosive fumes and
process drippings.
2. Clean the actuator and repaint any areas of severe oxidation.
3. If possible, stroke the actuator and check for smooth, full-stroke
operation.
a
WARNING: To avoid serious injury, keep hands, hair and
clothing away from all moving parts while operating the
actuator.
4. Make sure positioner mounting bolts, linkage and stem clamp are
securely fastened.
5. Ensure all accessories, brackets and associated bolting are securely
fastened.
6. If possible, remove air supply and observe actuator for correct
fail-safe action.
7. Check rubber bellows for wear.
Actuator Size
Minimum Clearance
25
6 inches
50
8 inches
100,200,300 400,500,600
9 inches