La Crosse Technology WS-1910 User Manual
Page 4
13
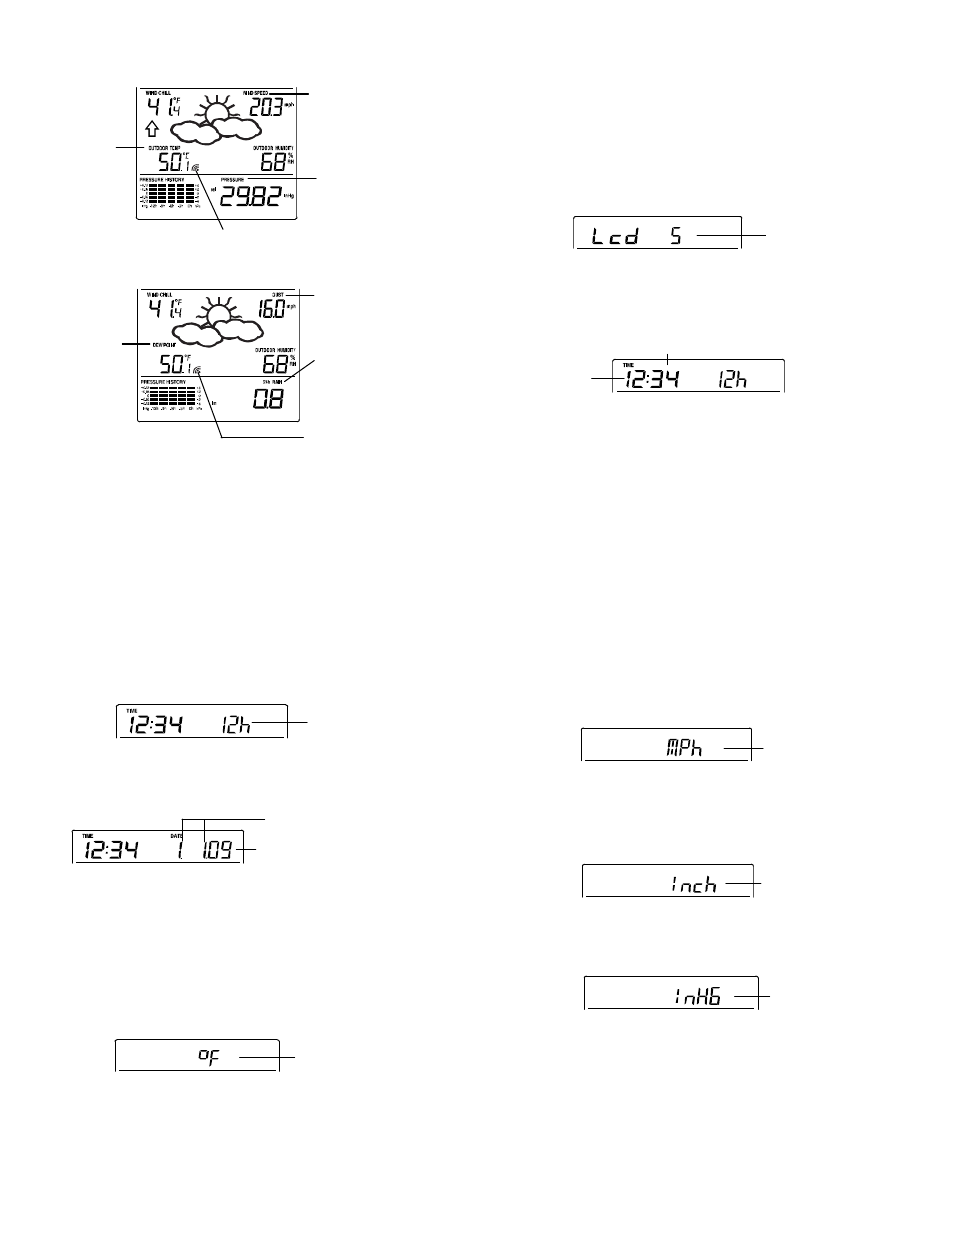
* In normal display mode, user may press the SET key shortly to toggle between Mode1
and Mode 2 display:
Mode 1 : Wind speed, outdoor temperature, relative air pressure are shown.
Mode 2 : Wind gust, dew point, and rainfall (optional) reading are shown.
Note: To view the rainfall data, press the + key after entering Mode 2 display.
Wind speed icon
Outdoor temp
icon
Rel. Air Pressure icon
Wind gust icon
Dew point icon
In Mode 1, this reception icon is showing the condition of the
reception of the signal from Thermo-hygro transmitter
In Mode 2, this reception icon
is showing the condition of the
reception of the signal from
Rain sensor (only if a rain
sensor is being used).
Note: if no rain sensor is used,
the reception icon will always
be displayed in Mode 2.
Rain icon
14
MANUAL SETTINGS:
The following manual settings can be changed once the SET key is pressed and hold for
about 3 seconds:
LCD contrast setting
Manual time setting
12/24 hour time display
Calendar setting
°C/ °F temperature unit setting
Wind speed unit
Rainfall unit setting
Air pressure unit setting
Relative pressure reference value setting
Weather tendency threshold value
Storm warning threshold value
LCD CONTRAST SETTING
The LCD contrast can be set within 8 levels, from "LCD 1" to "LCD8" (default setting is
LCD 5):
1.
Press the SET key, the contrast level digit will start flashing.
2.
Use the + or MIN/MAX key to adjust the level of contrast.
3.
Confirm with the SET key and enter the MANUAL TIME SETTING.
MANUAL TIME SETTING:
You then may manually set the time of the clock by following the steps below:
1.
The hour digit will start flashing.
2.
Use the + or MIN/MAX key to set the hour.
3.
Press the SET key to switch to the minutes. The minute digit will start flashing.
4.
Use the + or MIN/MAX key to set the minutes (holding of the key will forward the
digit by 5).
Digit flashing
Minutes flashing
Hour
flashing
15
Year
"Month. Date." (for 12h time display)
"Date. Month." (for 24h time display)
5.
Confirm the time with the SET key and enter the 12/24 HOUR TIME DISPLAY
SETTING.
12/24 HOUR TIME DISPLAY SETTING:
The time can be set to view as 12-hour or 24-hour format. The default time display mode
is “12h”. To set to “24h” time display:
1.
Use the + or MIN/MAX key to toggle the value.
2.
Confirm with the SET key and enter the CALENDAR SETTING.
CALENDAR SETTING:
The date default of the Weather Station is 1. 1. of year 2009. The date can be set
manually by proceeding as follows.
1.
The year digit starts flashing.
2.
Use the + or MIN/MAX key to set the year (pressing and holding the key will forward
the digit by 5). The range runs from "00" (2000) to "99" (2099).
3.
Press the SET key to confirm the year and enter the month setting. The month digit
will start flashing.
4.
Use the + or MIN/MAX key to set the month.
5.
Press the SET key to confirm the month and enter the date setting mode. The date
digit will start flashing.
6.
Use the + or MIN/MAX key to set the date.
7.
Confirm all calendar settings with the SET key and enter the °C/°F TEMPERATURE
UNIT SETTING.
°C/°F TEMPERATURE UNIT SETTING
Digit flashing
Flashing
16
The temperature display can be selected to show temperature data in °F or °C. (default °F)
1.
The temperature unit is flashing
2.
Use the + or MIN/MAX key to toggle between “°F” or “°C”.
3.
Confirm with the SET key and enter the WIND SPEED UNIT SETTING
WIND SPEED UNIT SETTING
The wind speed unit can be set as mph (mile per hour), km/h (kilometer per hour), or m/s
(meter per second). The default unit is mph.
1.
Use the + or MIN/MAX key to toggle between the unit “mph”, “km/h”, or “m/s”
2.
Confirm with the SET key and enter the RAINFALL UNIT SETTING.
RAINFALL UNIT SETTING (OPTIONAL)
Note: the rain unit setting is only available if there is a rain sensor. Skip this setting
by pressing the SET key again to enter the Relative Air Pressure Unit Setting.
The total rainfall unit can be set as inch or mm. The default unit is inch.
1.
Use the + or MIN/MAX key to toggle between the unit “mm” or “Inch”
2.
Confirm the unit with the SET key and enter the RELATIVE AIR PRESSURE UNIT
SETTING
RELATIVE AIR PRESSURE UNIT SETTING
The relative air pressure can be set as hPa of inHg. The default unit is inHg.
1.
Use the + or MIN/MAX key to toggle between the unit “hPa" or “inHg”
2.
Confirm the unit with the SET key and enter the RELATIVE PRESSURE
REFERENCE VALUE SETTING.
Flashing
Flashing
Flashing