Playback in zone2 (separate room), Qzone2 playback by speaker output, Wzone2 playback by audio output – Marantz SR5005 User Manual
Page 44: Connecting and setting the speakers, Connection (zone2), Panel lock function
41
Basic version
Simple version
Information
ENGLISH
DEUTSCH
FRANÇAIS
ITALIANO
ESPAÑOL
NEDERLANDS
SVENSKA
Advanced version
ENGLISH
DEUTSCH
FRANÇAIS
ITALIANO
ESPAÑOL
NEDERLANDS
SVENSKA
Playback in ZONE2 (Separate room)
• You can operate this unit so as to enjoy audio in a room (ZONE2)
other than the MAIN ZONE (room where the unit is located).
• You can simultaneously play back the same source in both the MAIN
ZONE and ZONE2. You can also play back separate sources in the
MAIN ZONE and ZONE2.
• There are two methods to do this, as described below. Choose one
of the methods.
q
ZONE2 playback by speaker output
w
ZONE2 playback by audio output (PRE OUT)
(using an external amplifier)
q
ZONE2 playback by speaker
output
The ZONE2 audio signals are output from this unit’s SURR.BACK/AMP
ASSIGN speaker terminals using the amplifier assignment function.
Connecting and setting the speakers
“Amp Assign” setting
(vpage 56) and audio
signals output
Connecting the speakers
ZONE2
Output signal :
Stereo (L / R)
MAIN ZONE
ZONE2
This unit
w
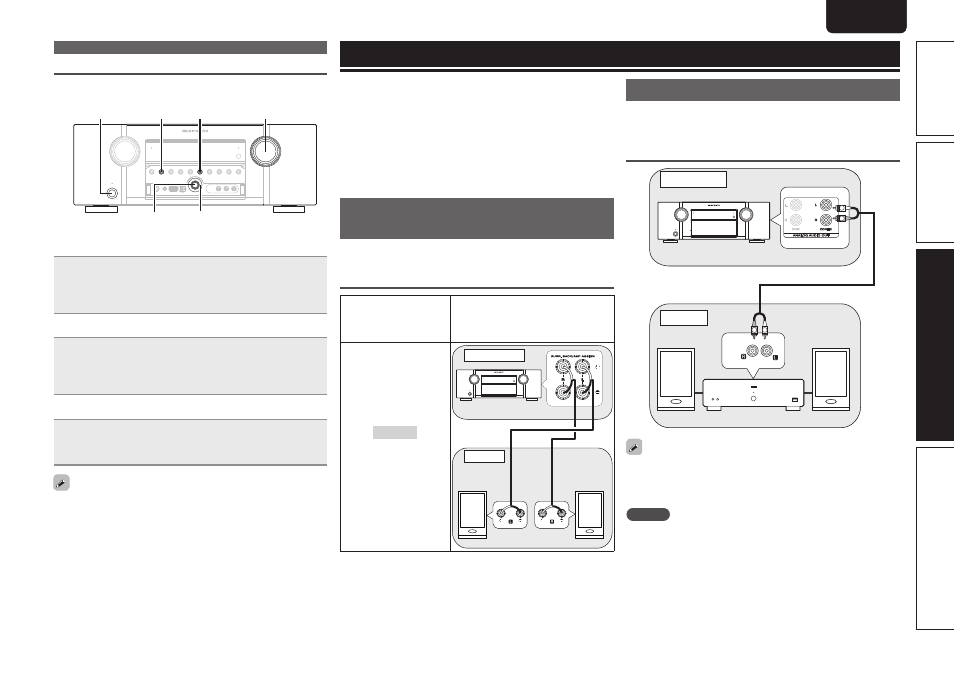
ZONE2 playback by audio output
The audio signals connected to this unit’s ZONE2 output terminals
(ZONE2 OUT) are output to the ZONE2’s amplifier and played with
that amplifier.
Connection (ZONE2)
R
L
AUX
IN
R
L
This unit
MAIN ZONE
ZONE2
• We recommend using high quality pin-plug cables for audio
connections in order to prevent noise.
• Also be sure to read the operating instructions of the connected
devices.
NOTE
It is not possible to play the digital audio signals input from the
HDMI, COAXIAL or OPTICAL terminals in ZONE2. Play using analog
connections (in stereo).
Convenient functions
Panel lock function
To prevent accidental operation of this unit, you can disable operation
of the buttons on the front panel.
p
RETURN
ENTER
AUTO
VOLUME
ON/STANDBY
n
Disabling all key button operations
Press
ON/STANDBY
while you press and hold
AUTO
and
ENTER
with the unit in standby mode.
“Panel Lock:ON” appears on the display and all button operations
except
ON/STANDBY
are disabled.
n
Disabling all button operations except VOLUME
Press
ON/STANDBY
while you press and hold
AUTO
and
p
with the unit in standby mode.
“Panel Lock:ON” appears on the display and all button operations
except
ON/STANDBY
and
VOLUME
are disabled.
n
Canceling the Panel lock function
Press
ON/STANDBY
while you press and hold
AUTO
and
RETURN
with the unit in standby mode.
The Panel lock function is canceled.
Even when the Panel lock function is set, you can operate the unit
using the remote control unit.