Antenna aiming, Preset name, Input assign – Marantz SR6005 User Manual
Page 56: Examples of input assign menu screen displays, Input assignments menu operations
52
ENGLISH
DEUTSCH
FRANÇAIS
ITALIANO
ESPAÑOL
NEDERLANDS
SVENSKA
Input Setup
Setting items
Setting details
Edit Lock Code
Change the password.
SIRIUS
1. Press
ui
to select “Edit Lock Code”, and then press
p
or
ENTER
.
2. Input current lock code (4 digits) using
uio
p
, and press
ENTER
.
3. Input new lock code (4 digits) using
uio
p
, and press
ENTER
.
4. Input new lock code (4 digits) again using
uio
p
, and press
ENTER
.
5. Press
ui
to select “Execute”, and then press
ENTER
.
If the correct password is input, “Completed” is displayed, and the new
password is modified.
• If the old password is incorrectly input, “Current Lock Code is incorrect”
is displayed, and proceed again from step 1.
• If the password input is 3 digits or less, “Enter 4 digits number” is
displayed, and input again with a 4 digit password.
• If the new password is not correctly input, “New Lock Codes do not
Match” is displayed and the password does not change.
Antenna Aiming
Install the antenna with radio reception sensitivity set to maximum.
Setting items
Setting details
Satellite
Indicate satellite signal
strength.
SIRIUS
Display
Condition
¡¡¡
Signal strength is excellent
¡¡
Signal strength is good
¡
Signal strength is weak
No signal
Terrestrial
Indicate terrestrial signal
strength.
SIRIUS
Preset Name
Assign name to a preset memory.
Setting items
Setting details
A1 – G8
Select the preset channel.
HD Radio
• Up to eight characters can be input.
• For character input, see page 49.
Default
The changed preset name
is returned to the default
setting.
Yes : Reset to the defaults.
No : Do not reset to the defaults.
Input Assign
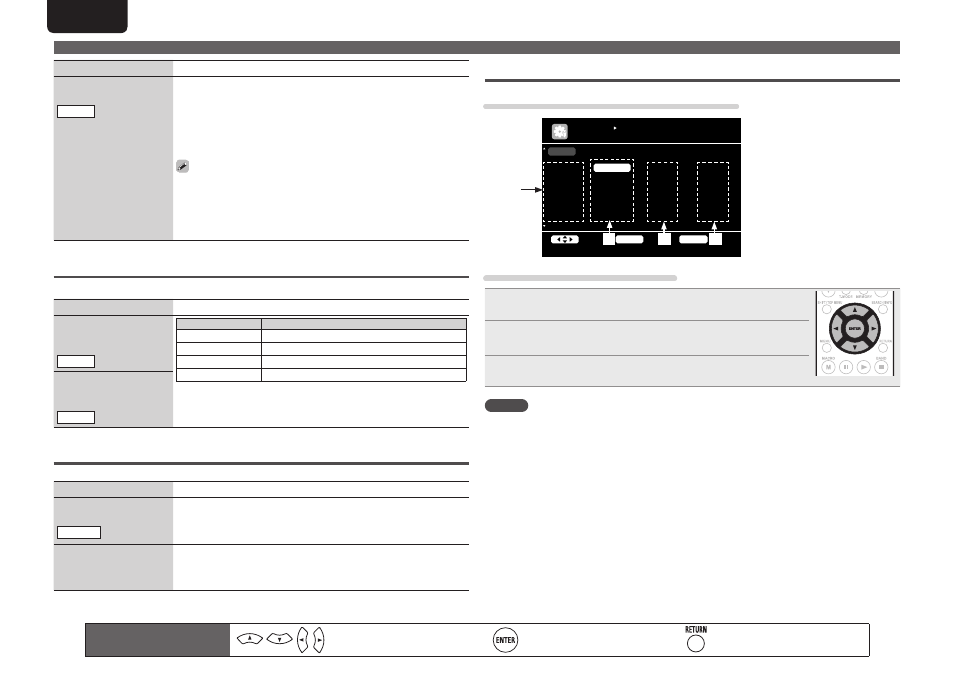
Examples of input assign menu screen displays
BD
DVD
VCR
SAT
GAME
AUX1
TV
Change HDMI input connector assignment
INPUT SETUP
INPUT ASSIGN
ENTER
Enter
Select
RETURN
Return
Default
HDMI1
HDMI2
HDMI4
HDMI3
HDMI5
HDMI6
None
[ HDMI ]
None
Coax1
None
Coax2
None
Opt3
Opt1
[ DIGITAL ]
1-RCA
2-RCA
None
3-RCA
None
None
None
[ COMP ]
q
e
w
r
q
Input Source
w
HDMI input
e
Digital audio input
r
Component video input
Input assignments menu operations
1
Use uio p to move the highlight to the item you want to set.
2
Press
ENTER
, then use o p to select the input connector to be
assigned.
3
Press
ENTER
to register the setting.
NOTE
If all “HDMI”, “Digital” and “Component” assignment of the Game source are set to “None”, Game
source cannot be selected with the input source selection.
Remote control operation
buttons
Move the cursor
(Up/Down/Left/Right)
Confirm the setting
Return to previous menu