Step 2, Step 3, Step 4 – Maytag MAV7580EWW Installation User Manual
Page 5: Step 1, Step 5, Step 6
Remove parts and literature from inside of washer
Start here…
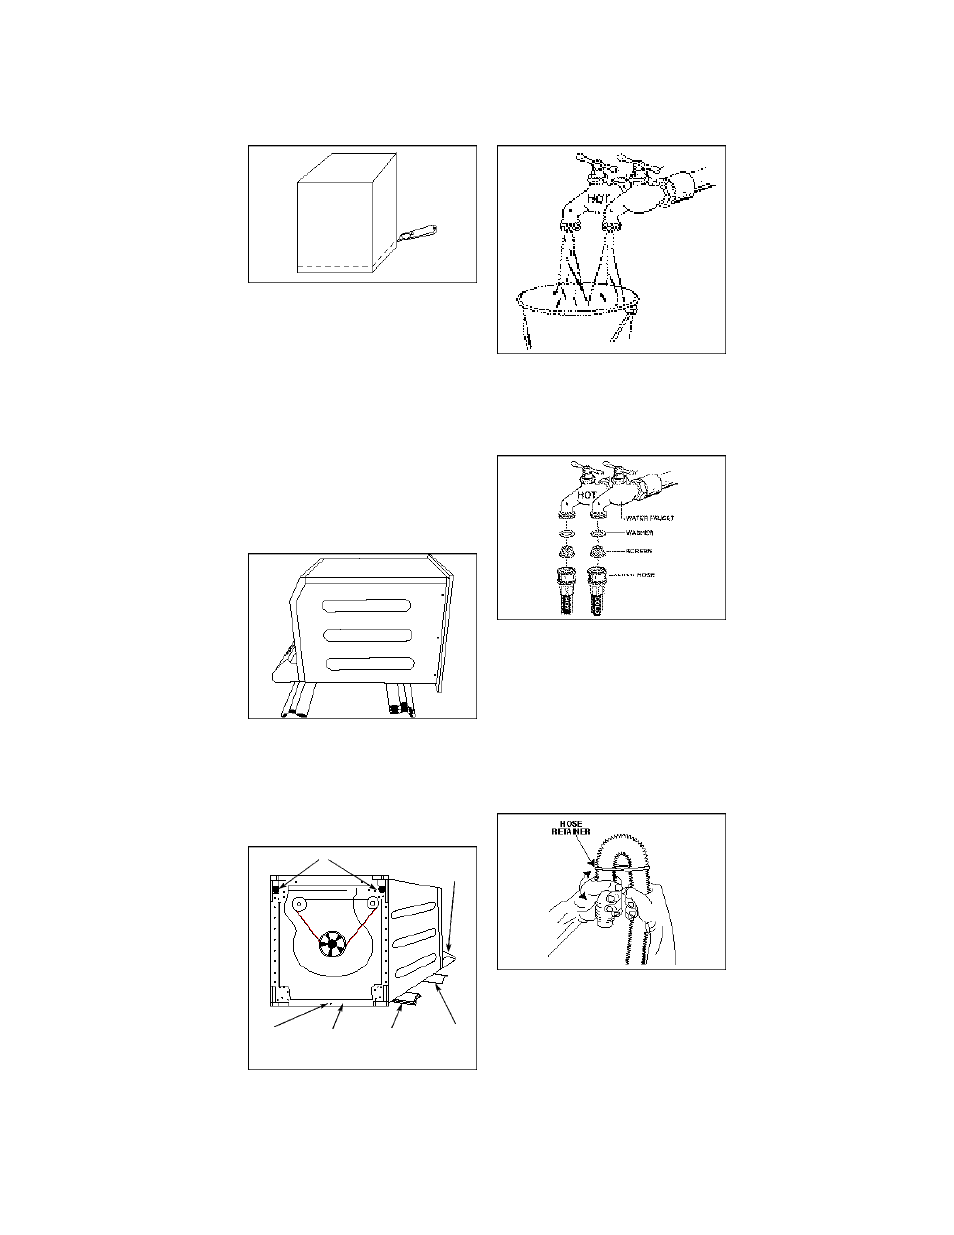
Step 2
With the tub bl o ck in place and the lid taped
shut, lay corner posts on the floor, as show n .
Use one corner post to support the top, and
three posts for the bottom. Gently tip the
washer on its back, laying it across the corn e r
p o s t s.
Step 3
Pop the plastic shipping base away from the
metal baseframe, or remove the hex head
screw at the rear. Pull plastic base away from
rear feet, and pull downward to disengage
from front feet. Recycle or discard the plastic
base. Return washer to upright position.
Step 4
Run water through faucets to remove particles
that might clog the water hoses. Determine
which of the faucets is hot and place an
identifying mark on it.
Step 1
• Remove the carton by cutting only marked
areas of the carton. CAUTION: Hoses are
connected to the washer.
NOTE: If the washer is moved without the
carton in place, be sure to keep sharp edges
from damaging the washer cabinet or
attached hoses.
• Lift the carton up and clear of the washer.
Carefully remove any packaging materials
from the outside of the washer. NOTE:
Retain the corner posts for later use.
• Untape and raise the washer lid. R e m ove the
s t y r o foam tub bl o ck, remove the items shipped
in the spin basket, then replace the tub bl o ck .
S ave the l i t e rature for future refe r e n c e. C l o s e
and tape lid.
Step 5
Water hoses are attached to the washer and
labeled as “Hot” and “Cold.” Push the screens
and washers (located in the parts package)
into the remaining ends of the hoses. Attach
the “Hot” and “Cold” hoses to the correspond-
ing faucets. Tighten by hand until snug and
then an additional 2/3 turn with pliers. Turn on
faucets to check for leaks at the faucet and
machine. Tighten if necessar y. Fill hoses
should have slack in them when attached to
faucets.
Front Feet
Backguard
Pop plastic
away from or
remove hex
head screw
Shipping
Base
Carton corner
posts (stacked
on each other)
Corner
Post
Step 6
Unhook the hose retainer and drain hose from
the back of the cabinet and place the drain
hose in the drain facility (standpipe, laundry
tub, etc). A small amount of water may still be
in the drain hose from factory testing. The
height of the drain facility is important. Refer
to the “DRAIN FACILITY” section to determine
if special provisions are needed. NOTE: Do
not remove the hose retainer from the drain
hose. If the hose is twisted after it has been
placed in the drain, adjust the end of the hose
to remove the twist. To remove the twist, turn
the short end of the hose while holding the
base of the hose stationary.
NOTE: If you must make an airtight seal, an
antisiphon kit must be used.