Refrigerator use, Using the controls – Maytag MSB26C6MDM User Manual
Page 13
13
5.
Slide the cap closed, and check that the indicator is visible
through the rectangular hole in the cap.
NOTE:
The cap will not easily close if the indicator’s rear
bubble has not been popped.
Replacing the Produce Preserver (on some models)
The disposable pouches should be replaced every 6 months,
when the status indicator has completely changed from white to
red.
To order replacements, see “Accessories” in the User
Instructions or User Guide.
1.
Remove the old pouches from the Produce Preserver
housing.
2.
Remove the old status indicator.
3.
Install the new pouches and status indicator using the
instructions in the previous sections.
REFRIGERATOR USE
Using the Controls
The refrigerator and freezer controls are located on the dispenser
panel.
IMPORTANT:
The display screen on the dispenser control panel
will turn off automatically and enter “sleep” mode when the
control buttons and dispenser pad have not been used for
2 minutes or more. While in “sleep” mode, the first press of a
control button will only reactivate the display screen, without
changing any settings.
■
Touch any control button on the dispenser panel to activate
the display screen. The home screen will appear as shown.
Adjusting the Controls
For your convenience, your refrigerator and freezer controls are
preset at the factory. When you first install your refrigerator, make
sure that the controls are still set to the “mid-settings.” The
factory recommended set points are 37°F (3°C) for the
refrigerator and 0°F (-18°C) for the freezer.
IMPORTANT:
■
Wait 24 hours before you put food into the refrigerator. If you
add food before the refrigerator has cooled completely, your
food may spoil.
NOTE:
Adjusting the set points to a colder than
recommended setting will not cool the compartments any
faster.
■
If the temperature is too warm or too cold in the refrigerator or
freezer, first check the air vents to be sure they are not
blocked before adjusting the controls.
■
The preset settings should be correct for normal household
usage. The controls are set correctly when milk or juice is as
cold as you like and when ice cream is firm.
■
Wait at least 24 hours between adjustments. Recheck the
temperatures before other adjustments are made.
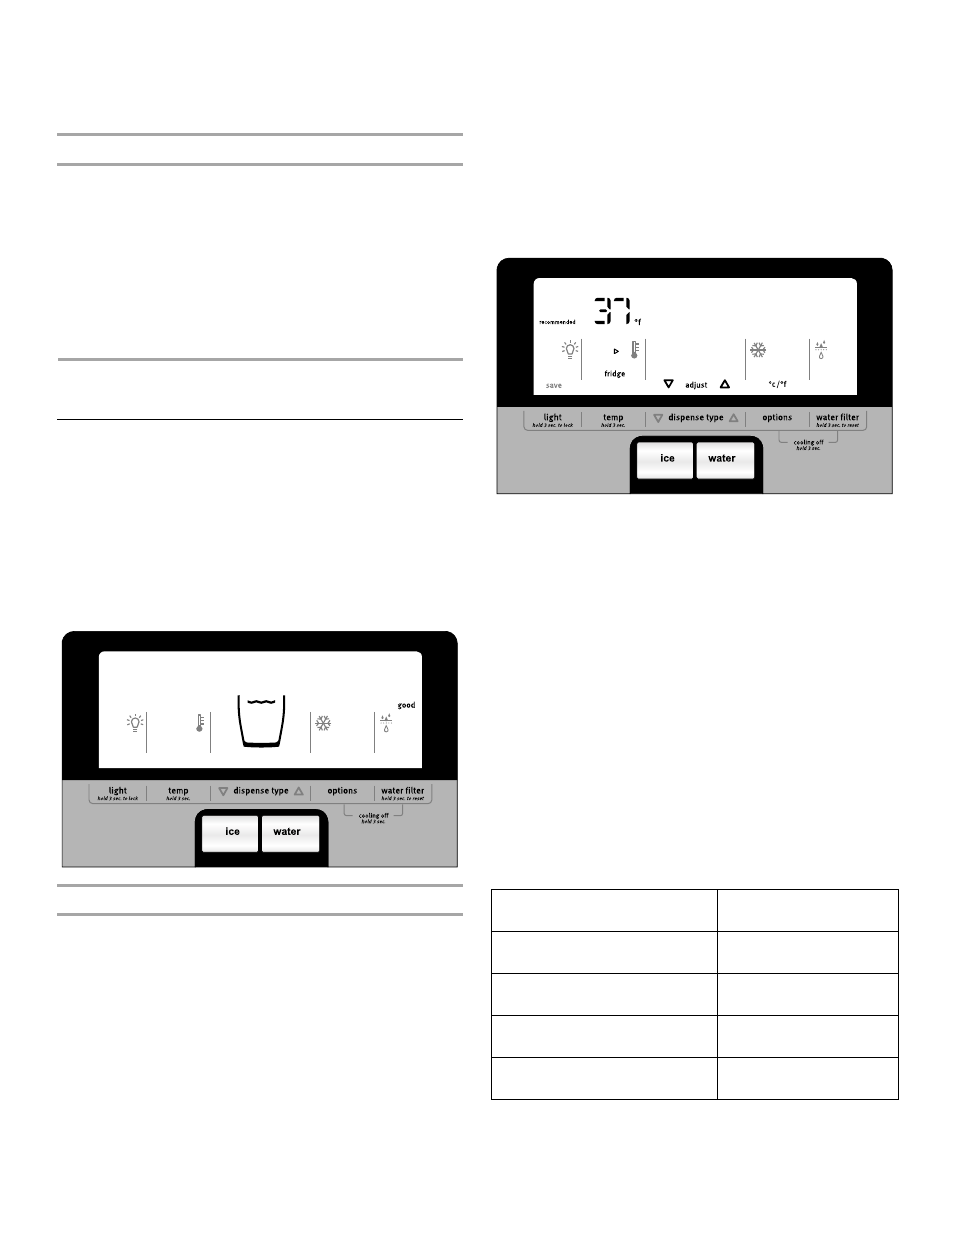
To view and adjust the set points, press and hold the TEMP
button for 3 seconds. When adjust mode is activated, adjusting
information will appear on the display screen.
NOTE:
To view Celsius temperatures, press the OPTIONS button
when adjust mode is activated. To return the display setting to
Fahrenheit, press OPTIONS again.
■
When adjust mode is activated, the display screen shows the
refrigerator set point and “FRIDGE” appears.
■
Press the DISPENSE TYPE arrows to raise or lower the set
point.
■
When you have finished viewing (and adjusting if desired) the
refrigerator set point, press TEMP to change the display to
show the freezer set point. When the zone has been changed,
“FREEZER” appears on the display screen.
■
Press the DISPENSE TYPE arrows to raise or lower the set
point.
■
When you have finished viewing (and adjusting if desired)
both the refrigerator and freezer set points, press LIGHT to
save the settings.
NOTE:
To exit without saving changes, allow about
60 seconds of inactivity and adjust mode will turn off
automatically.
When adjusting temperature set points, use the following chart as
a guide.
The set point range for the refrigerator is 33°F to 45°F (0°C to
7°C). The set point range for the freezer is -5°F to 5°F (-21°C to
-15°C).
CONDITION:
TEMPERATURE
ADJUSTMENT:
REFRIGERATOR too cold
REFRIGERATOR Setting
1° higher
REFRIGERATOR too warm
REFRIGERATOR Setting
1° lower
FREEZER too cold
FREEZER Setting
1° higher
FREEZER too warm /
Too little ice
FREEZER Setting
1° lower