Handle installation and removal – Maytag MSB26C6MDM User Manual
Page 7
7
Leveling and Door Closing
Your refrigerator has two adjustable front feet — one on the right
and one on the left. In most cases, the refrigerator should be
steady when both feet are touching the floor. If your refrigerator
seems unsteady or if you want the doors to close more easily,
adjust the refrigerator's tilt using the instructions below:
1.
Move the refrigerator into its final location. If necessary, open
both doors to 90° and remove the base grille. See Graphic 1.
2.
The two leveling feet are located on the brackets on each
side of the product. See Graphic 8.
NOTE:
Having someone push against the top of the refrigerator
takes some weight off the leveling feet. This makes it easier to
make adjustments.
3.
Use a ¹⁄₄" open-ended or adjustable wrench to adjust the
leveling feet. Turn the leveling foot to the left to raise that side
of the product, or turn it to the right to lower that side of the
product.
NOTE:
Both leveling feet should be snug against the floor,
and the rollers should not touch the floor. This keeps the
refrigerator from rolling forward when opening the doors.
4.
Open both doors again and check that they close as easily as
you like. If not, tilt the refrigerator slightly more to the rear by
turning the leveling feet to the left. It may take several more
turns, and you should turn both leveling feet the same
amount.
5.
Use a bubble level to check the leveling of the refrigerator.
NOTE:
Whenever you need to move the refrigerator, turn the
leveling feet to the right until they are no longer touching the
ground. This will allow the refrigerator to roll more easily.
Door Alignment
A refrigerator that is not level from side-to-side may appear to
have doors that are not properly aligned. If the doors appear this
way, use the instructions in the previous section to check the
leveling.
The doors are designed to be slightly different heights when the
refrigerator is empty, in order to account for the weight of food
that will be placed on the doors. If the doors are still not aligned
after checking the leveling and loading the refrigerator with food,
follow the steps below to adjust the door alignment.
1.
If necessary, open both doors to 90° and remove the base
grille. See Graphic 1.
2.
Locate the alignment screw on the bottom hinge of the
refrigerator door. See Graphic 9.
3.
Use a ⁵⁄₁₆" open-ended or adjustable wrench to turn the
screw. To raise the refrigerator door, turn the screw to the
right. To lower the door, turn the screw to the left.
4.
Check that the doors are even at the top. If necessary,
continue to turn the alignment screw until the doors are
aligned.
5.
Open both doors to 90°. Replace the base grille. See
Graphic 1
.
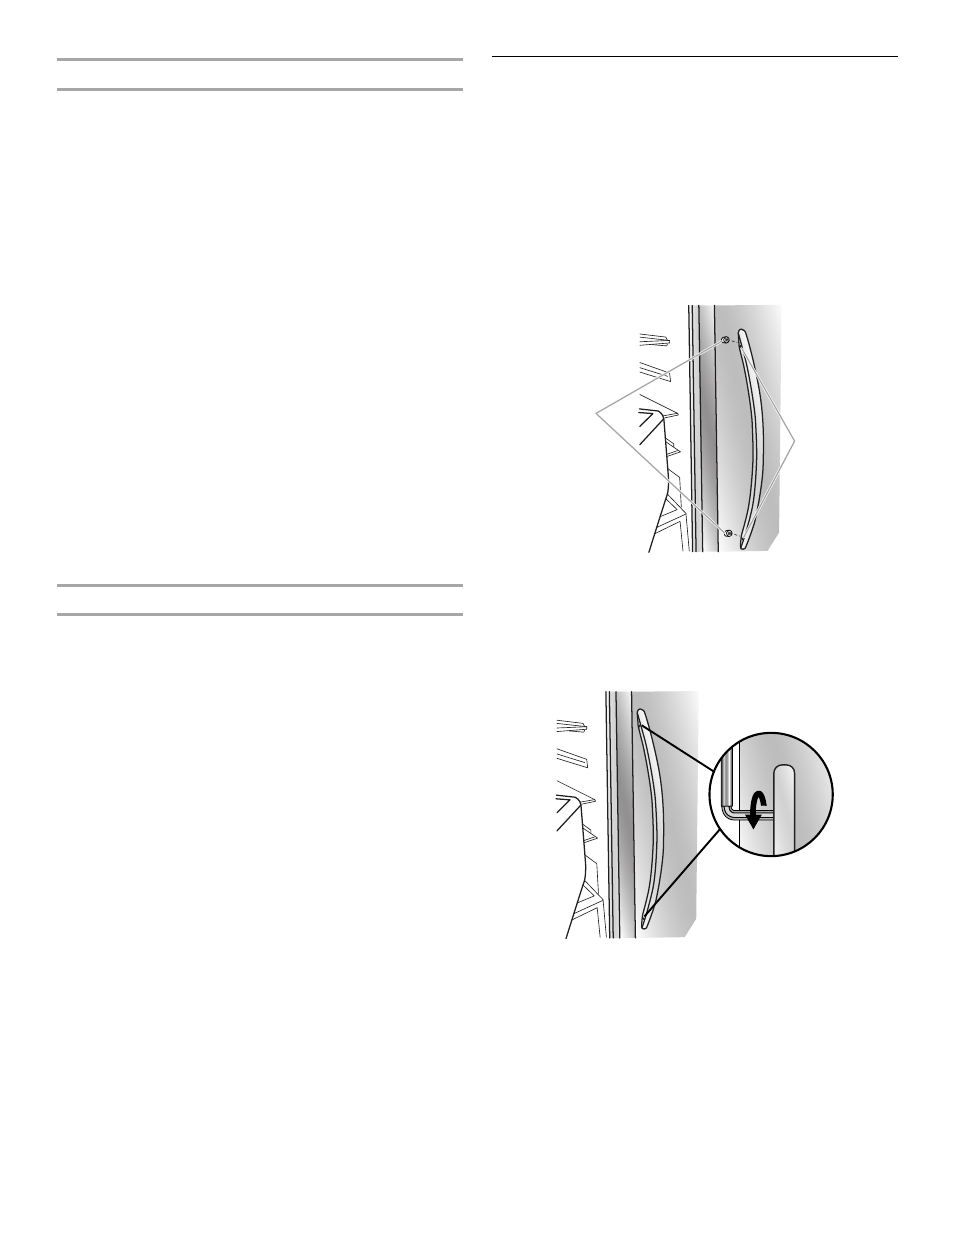
Handle Installation and Removal
PARTS INCLUDED:
Door handles (2), ¹⁄₈" hex key, spare
setscrew(s)
To Install the Handles:
NOTE:
The handle mounting setscrews are preinstalled in the
handle.
1.
Remove the handles, which are packed inside the refrigerator.
NOTE:
To avoid scratching the finish, place the handles on a
towel or other soft surface.
2.
Open the freezer door. On the refrigerator door, place the
handle on the shoulder screws with the setscrews facing the
freezer.
3.
Firmly push the handle toward the door until the handle base
is flush against the door.
4.
While holding the handle, insert the short end of the hex key
into the upper hole and slightly rotate the hex key until it is
engaged in the setscrew.
5.
Using a clockwise motion, tighten the setscrew until it begins
to contact the shoulder screw.
6.
Repeat steps 4 and 5 to begin fastening the lower setscrew.
7.
Once both setscrews have been partially tightened as
outlined in the previous steps, fully tighten both the upper
and lower setscrews.
IMPORTANT:
When the screws feel tight, tighten them an
additional quarter-turn. The handle is not properly installed
without this extra tightening.
8.
Open the refrigerator door and close the freezer door. Repeat
steps 2 through 7 to install the other handle onto the freezer
door with the setscrews facing the refrigerator.
9.
Save the hex key and all instructions.
A. Shoulder screws
B. Setscrews inside the handle
A
B