4 – recording, Recording formats, Setting where to save files – Teac DR-70D Reference Manual User Manual
Page 18: Setting the channels to record, Adjusting the input balance, Recording formats setting where to save files
18
TASCAM DR-70D
4 – Recording
This unit can record sound from external microphones and
external audio devices, including CD players.
The unit can be set to record audio files in WAV or BWF
(44.1/48/96kHz, 16/24-bit) format.
Slate tones added when recording to Broadcast Wave Format
(BWF) files can be used as marks with software that supports this
format. This unit can record using dual recording, which allows
the same input signals to be recorded at two different levels,
and 4-channel recording, for example.
Recording formats
You can select the format of files created by this unit.
8
MONO mode
The channels selected for recording will be recorded as mono
files.
A file will be made for each channel selected for recording.
8
STEREO mode
Stereo files will be recorded.
Examples:
If only channel 1 is selected for recording, a stereo file with
channel 2 silent will be created.
If only channels 1 and 3 are selected for recording, stereo
files with channels 2 and 4 silent will be created.
8
MIX mode
The input signals set on the BASIC screen will be recorded as a
stereo file.
Even if all four channels are selected for recording, a stereo file
will be created.
Setting where to save files
Set the folder where recorded files are saved.
The recorded file will be saved in the currently selected folder.
For details, see the SELECT pop-up menu item in “Folder opera-
tions” on page 30.
If no setting is made, new files are created in the MUSIC folder.
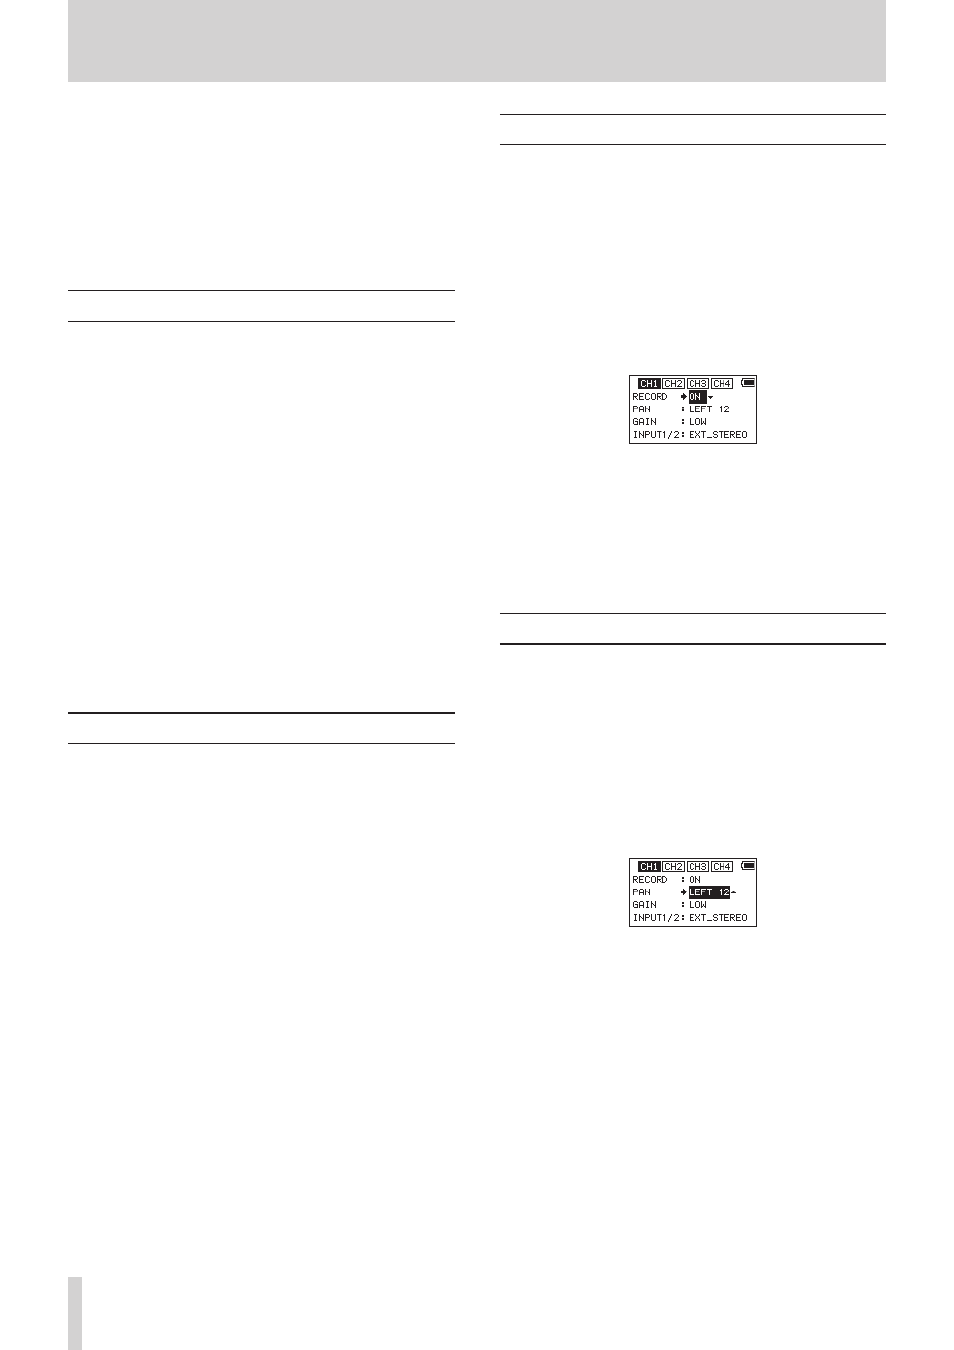
Setting the channels to record
By default, the channel recording settings are
ON
. To turn
recording for a channel off, set the
RECORD
item on the BASIC
screen to
OFF
.
1. Press the MENU button to open the
MENU
screen.
2. Turn the DATA dial to select
BASIC
, and press the DATA
dial.
The BASIC screen opens.
3. Press the 1/8, 2/7, 3// or 4/. button to select the
recording channel that you want to set.
4. Turn the DATA dial to select
RECORD
for the selected
channel, and press the DATA dial.
CH1 BASIC screen
5. Turn the DATA dial to turn the recording setting ON/OFF.
Options: ON (default), OFF
6. Repeat steps 3 to 5 as necessary to turn recording on/off for
each channel.
7. When finished, press the MENU button to return to the
Home Screen.
Adjusting the input balance
You can set the left-right position of each recording channel
with the PAN item on the BASIC screen.
1. Press the MENU button to open the
MENU
screen.
2. Turn the DATA dial to select
BASIC
, and press the DATA
dial.
The BASIC screen opens.
3. Press the 1/8, 2/7, 3// or 4/. button to select the
channel for balance adjustment.
4. Turn the DATA dial to select
PAN
for the selected channel,
and press the DATA dial.
CH1 BASIC screen
5. Turn the DATA dial to set the input balance.
Options: LEFT 12 − CENTER − RIGHT 12
6. Repeat steps 3 to 5 as necessary to set the input balance for
each channel.
7. When finished adjusting, press the MENU button to return
to the Home Screen.