Names and functions of parts, Home screen overview, Tascam hi-res editor – Teac Hi-Res Editor User Manual
Page 5: 5names and functions of parts
TASCAM Hi-Res Editor
TASCAM Hi-Res Editor
5
Names and functions of parts
Home Screen overview
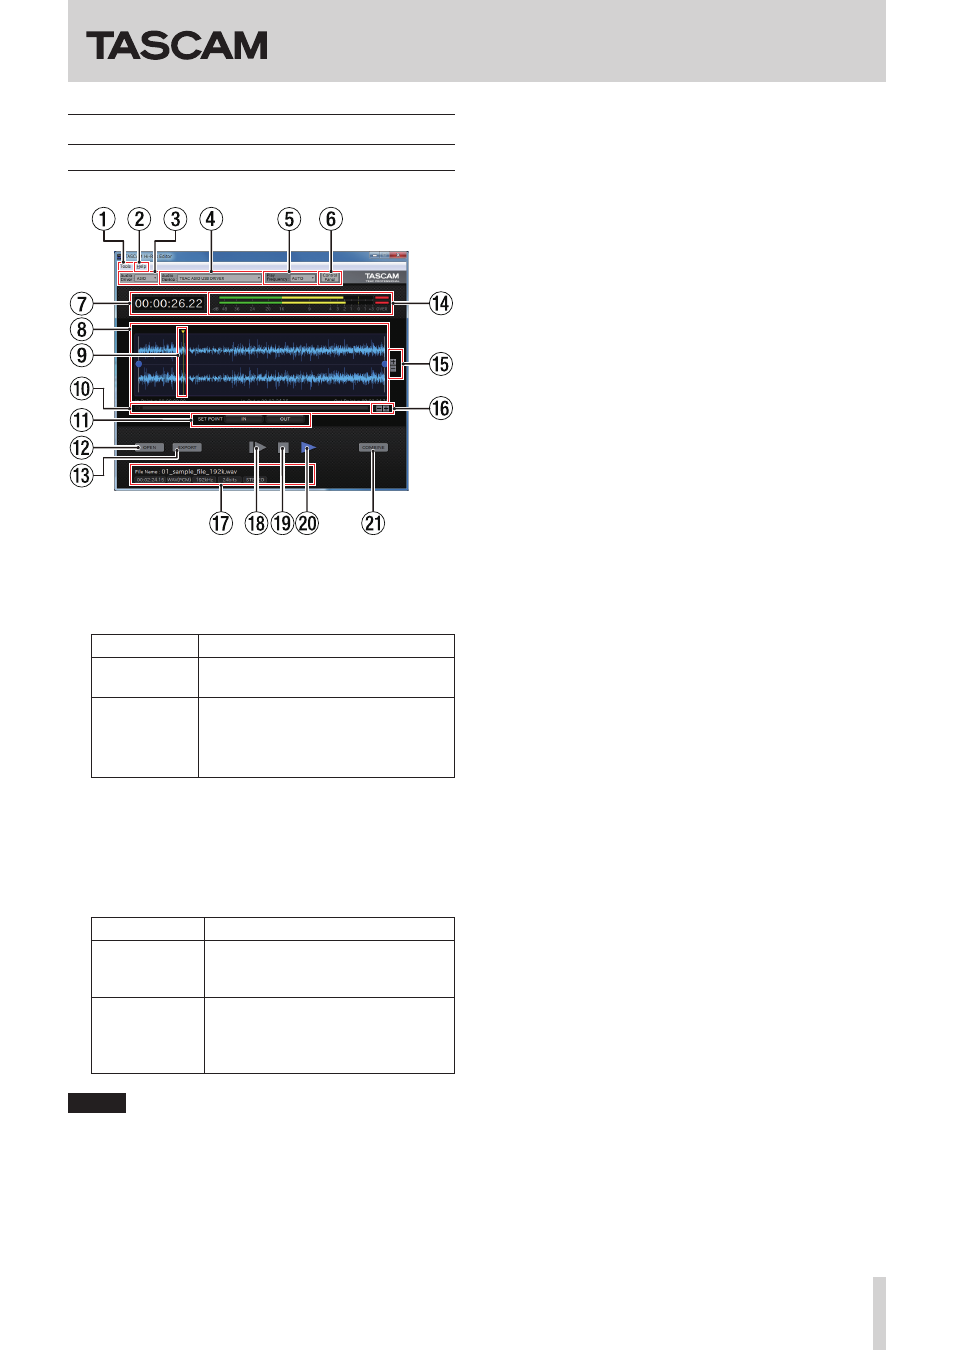
1
Tools
Opens the TOOLS menu.
OVER Indicator: Sets the amount of time that the OVER
indicator lights.
Option
Meaning
Holds 2 sec.
(default value)
OVER indicators disappear two
seconds after lighting.
Holds Until
Clicked
OVER indicators do not automatically
disappear after lighting.
Click an OVER indicator to make it
disappear.
2
Help
Opens the HELP menu.
Manual: Select and click Japanese or English to
open the operation manual for that language.
About: This shows the following options. Click an
option to show related information on the screen.
Option
Meaning
This appli-
cation
This opens the “About this appli-
cation” screen that shows the
software version.
Licenses
This opens the “Licenses” screen
that shows information related to
the open source software (OSS)
used by this application.
NOTE
On the Mac, the software version is shown by
selecting “About TASCAM Hi-Res Editor” from the
application menu. The “Licenses” item is in the Help
menu.
3
Audio Driver setting (Windows only)
Sets the audio driver used for playback.
4
Audio Device setting
Sets the audio device used for playback.
5
Play Frequency setting
Sets the sampling frequency used for playback.
When set to AUTO, the open file will be played back at
its sampling frequency.
6
Control Panel button (ASIO only, Windows only)
Click this button when the Audio Driver setting is ASIO
to open the setting screen for the device set as the
“Audio Device”.
7
Time counter
This shows the elapsed time during file playback.
When stopped, the playback time can be input to
change the playback position. (See “Changing the
8
Waveform display
This shows the waveforms of the audio file.
The IN/OUT points are shown with the audio file
waveforms.(See “Setting IN/OUT points” on page 7)
9
Cursor
This shows the playback position. Click the waveform
display area to move the cursor (playback position) to
that point. (See “Changing the playback position” on
0
Scrollbar
When the waveform display is zoomed in, drag the
scrollbar left or right to move the waveform left or
right.
q
SET POINT (IN/OUT) buttons
Sets the IN/OUT point at the cursor position. (See
“Setting IN/OUT points” on page 7)
w
OPEN button
Opens the “Open Audio File” screen where you can
open audio files. (See “Opening audio files” on page
e
EXPORT button
Opens the “Export File” screen where file conversion
functions can be set and files exported. (See
“Outputting audio files” on page 8)
r
Level meters
These show the audio levels during audio file
playback.
If “OVER Indicator” in the Tools menu is set to “Holds
Until Clicked,” clicking a lit OVER indicator at the right
end of these meters will turn it off.
t
Waveform area amplitude zoom in/out (+/−) buttons
Use to zoom in/out on the waveform display in the
amplitude (vertical) direction.
y
Waveform area time axis zoom in/out (+/−) buttons
Use to zoom in/out on the waveform display in the
time axis (horizontal) direction.