Outputting audio files, Turning the short fade function on/off, Tascam hi-res editor – Teac Hi-Res Editor User Manual
Page 8
TASCAM Hi-Res Editor
8
TASCAM Hi-Res Editor
Outputting audio files
Regardless of the format and sampling frequency of
the open file, you can select the format (DSD/PCM) and
sampling frequency used when outputting a file. When
outputting in PCM format, you can also select the quanti-
zation bit depth. See “Settings by output file type” on
page 9 for details.
Only the interval between the IN and OUT points is
included when a file is output.
•
Outputting part of the open file
Use the IN and OUT points to set the interval to be
output to the file.
•
Outputting the entire open file
Set the IN point at the beginning of the open file and
the OUT point at the end of the open file. (The IN and
OUT points are at these positions when a file is first
opened.)
Click the EXPORT button on the Home Screen to open the
following screen.
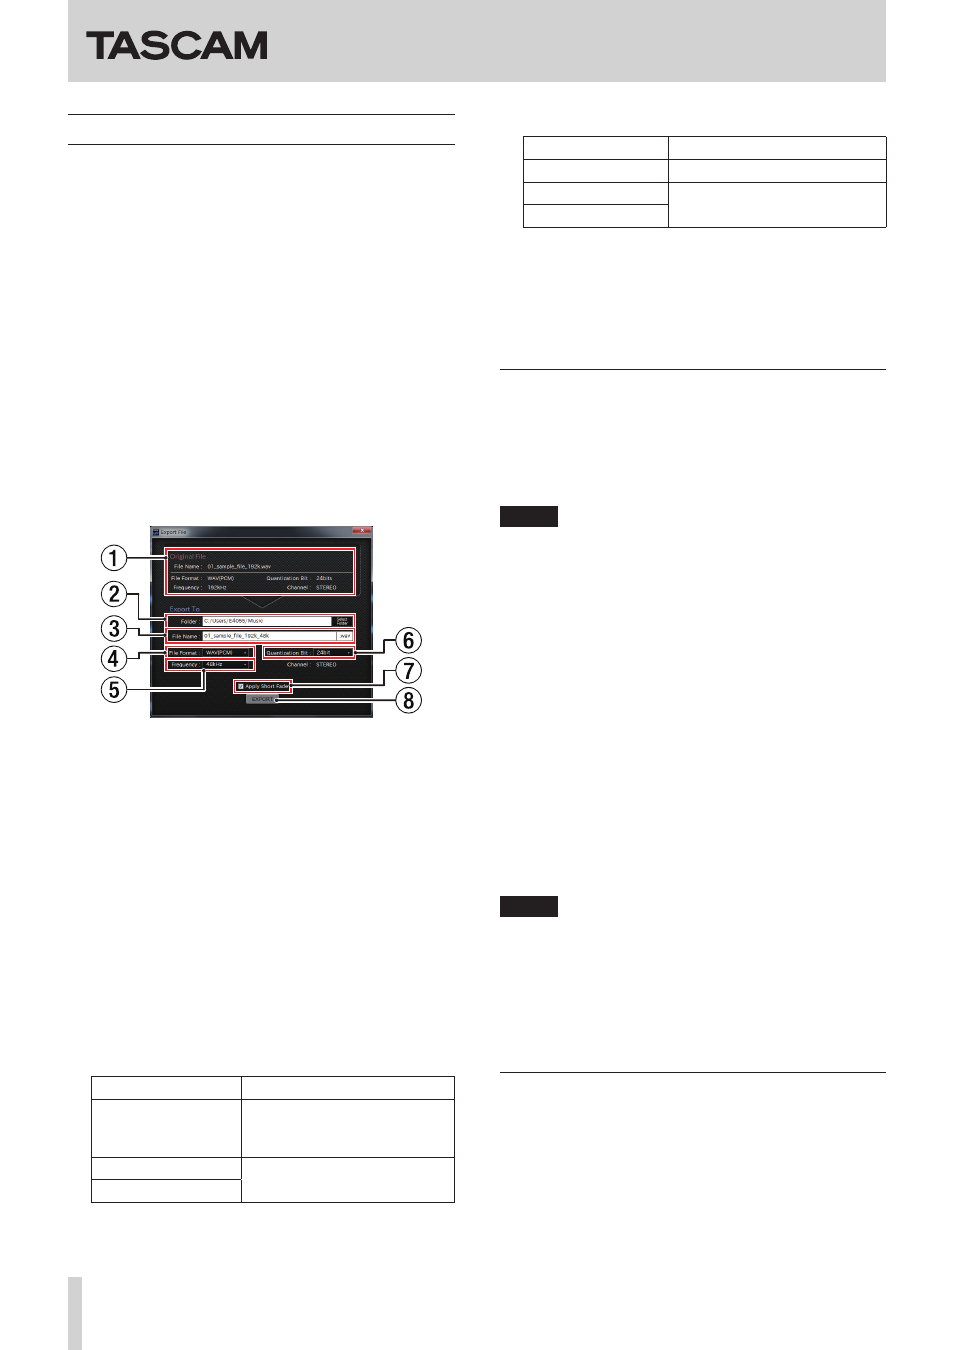
1
Original File information
This shows information about the open audio file.
2
Folder
Input the folder where the audio file will be output.
Click the Select Folder button to open the Select Desti-
nation Folder screen where folders can be selected.
3
File Name
Input the name to use for the output audio file.
4
File Format
Set the audio file format to use for the output audio
file.
Options: WAV (PCM), DSDIFF (DSD), DSF (DSD)
5
Frequency
Set the sampling frequency to use for the output
audio file. The options shown depend on the File
Format setting.
File Format setting Frequency options
WAV (PCM)
(default value)
44.1 kHz, 48 kHz, 88.2 kHz, 96
kHz, 176.4 kHz, 192 kHz, 352.8
kHz, 384 kHz
DSDIFF (DSD)
2.8 MHz, 5.6 MHz, 11.2 MHz
DSF (DSD)
6
Quantization Bit
Set the quantization bit depth of the output audio file.
The options shown depend on the File Format setting.
File Format setting Frequency options
WAV (PCM)
16-bit, 24-bit, 32-bit float
DSDIFF (DSD)
1-bit (fixed)
DSF (DSD)
7
Apply Short Fade option
Turn the short fade function on or off. (See “Turning
the short fade function on/off” on page 8)
8
EXPORT button
Start file conversion.
Outputting audio files
1. Open the source audio file.(See “Opening audio files”
2. To output only part of the open audio file, use the IN
and OUT points to set the interval to be output to the
file.
NOTE
To output the entire open file, set the IN point at the
beginning of the open file and the OUT point at the
end of the open file.
The IN and OUT points are at these positions when a
file is first opened.
3. Click the EXPORT button on the Home Screen to open
the Export File screen.
4. Set the audio file format, sampling frequency and
quantization bit rate for the output audio file. See
“Settings by output file type” on page 9 for details
about settings.
5. Set whether or not to add short fades to the output
audio file. (See “Turning the short fade function on/
6. Click the EXPORT button at the bottom of the screen.
The “Exporting…” screen opens and file output starts.
7. “Completed.” appears when file output is finished.
Click the “OK” button.
NOTE
•
When outputting a file, the size of the output file could
be larger than the original file.
When outputting files for playback on another device,
be sure to confirm the maximum file size and other
operation limits of that device.
•
Due to limits of the file format, PCM (.wav) files larger
than 4GB cannot be made.
Turning the short fade function on/off
When this software is installed, the short fade function
is on by default. (A check (4) appears in the box next to
“Apply Short Fade”.)
When the short fade function is on (4 appears next to
“Apply Short Fade"), a fade in and fade out will be added
to the beginning and end of the output audio file.
Remove the check (4) to turn the short fade function off.