Elecom BT-MG2 User Manual
Page 2
-2-
Enable Skype before installing the BT-MG2.
Copy Skype profile data such as the Skype contact list of the VoIP software you will use
into the BT-MG2. Before installing the BT-MG2, install Skype in the computer, create an
account and enable Skype.
Install and enable Skype before installing the BT-MG2.
After installing Skype in your computer, you can save the Skype profile data from the
computer in the BT-MG2 and back up the Skype profile data stored in the BT-MG2. For
details, download the user’s guide from our website at www.elecom.co.jp.
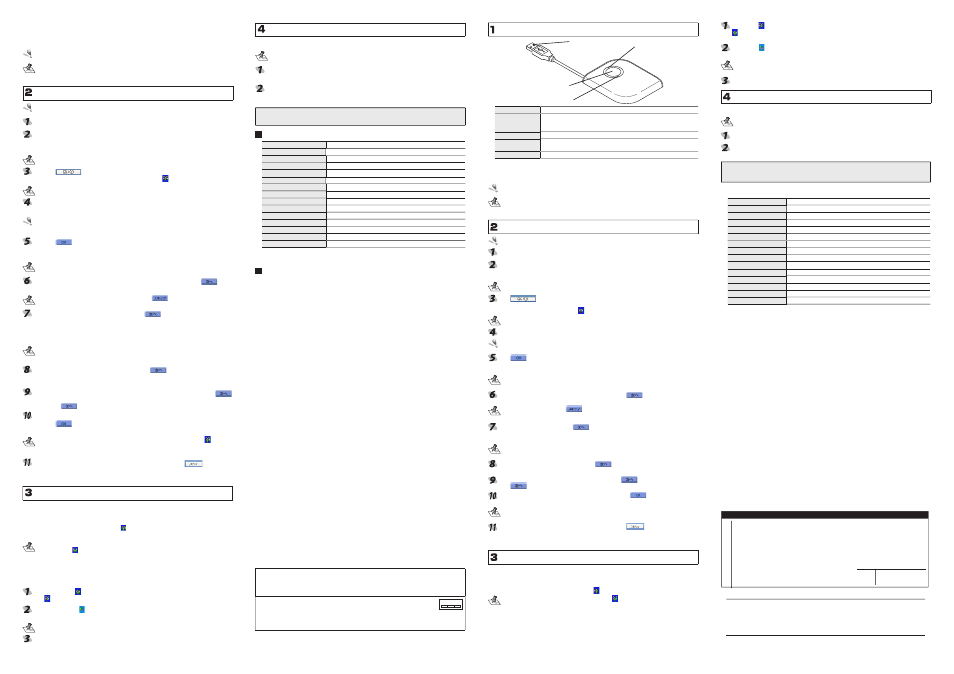
Installation
Log in with administrator authorization.
Extend the USB connector from the storage space on the rear of the BT-MG2. (2-1)
Connect the BT-MG2 to a USB port on your computer. (2-2)
Your computer should automatically detect the BT-MG2 and start the installation pro-
cess. Once installed, a message appears prompting you to restart the computer.
The location and configuration of the computer’s USB port differ according to computer.
Click on
. (2-3)
The computer restarts itself. Once the computer restarts, a icon appears in the task tray.
While the computer is restarting, the scan disk message may appear. In such case,
wait until disk scanning automatically ends.
If the procedure in “2. Installation” is followed correctly, the Setup BT-MG1/BT-
MG2 window appears after the BT-MG2 has been restarted.
If the CD-ROM Auto Run feature of your computer is OFF, the setup window may not
appear. See the “Troubleshooting” section in the software user’s guide available for
download at our website at www.elecom.co.jp.
Click on
. (2-4)
A confirmation message appears asking if it is OK to copy Skype profile data such as
the Skype contact list, from your computer to the BT-MG2.
Skype ends so that you can set up the BT-MG2. If using Skype for conversing, etc.,
stop all use so that it may be ended.
To copy the Skype profile data from the computer to the BT-MG2, click on
. (2-5)
A window appears prompting you to input the security code.
If it is unnecessary to copy the data over, click on
.
Input the BT-MG2 security code and click on
. (2-6)
The security code of the BT-MG2 is set to “0000” when the product is shipped from
the factory.
After inputting the security code, a window appears for inputting the Skype account
number.
To improve security, the security code of the BT-MG2 can be changed by the
user. To change the security code, download the software user’s guide from our
website at www.elecom.co.jp.
Input the acquired Skype account and click on
. (2-7)
A confirmation message appears prompting you to copy the Skype profile data from the
computer to the BT-MG2.
To copy the Skype profile data from the computer to the BT-MG2, click on
.
(2-8)
Clicking on
starts copying.
When copying ends, a message appears notifying you that setup is complete.
Click on
. (2-9)
The Skype login window appears.
Steps 4 ~ 10 can be repeatedly as often as you like by clicking on the
icon that
appears in the task tray after setting up the BT-MG2, and selecting “BT-MG1/2のセ
ットアップ”.
Input the registered Skype name and password, and click on
. (2-10)
Your computer logs into Skype.
The BT-MG2 can now be used with Skype.
Using the BT-MG2
Once installed, the BT-MG2 can be used by simply connecting it to the computer.
To Use Skype with the BT-MG2
Connect the BT-MG2 to a USB port on the computer.
Once connected to the computer, the icon appears in the task tray and, at the same
time, Skype starts up automatically.
• Though this depends on computer processing speed, it may take as much as 1
minute for the
icon to appear in the task tray.
• For instructions on how to use Skype, see the Skype User’s Guide that was bundled
with the BT-MG2.
To Disconnect the BT-MG2
When the BT-MG2 is disconnected from the computer, Skype automatically ends. Before
disconnecting the BT-MG2, end audio chatting, etc.
Left-click on the icon in the task tray and select [ 中止 ]. (3-1)
The icon disappears and Skype ends automatically.
Right-click on the icon in the task tray and select “USB 大容量記憶デバイス ド
ライブ (x;x) を安全に取り外します ”. (3-2)
Two drives appear. Moreover, the drive number will vary according to your computer
environment.
Disconnect the BT-MG2 from the USB port on the computer.
Pairing with Bluetooth Headsets
A computer can be used with Bluetooth headsets by pairing it with the BT-MG2.
For pairing procedures, see the Bluetooth headset user’s guide.
Set the Bluetooth headset to the pairing mode as explained in the Bluetooth
headset user’s guide.
Press and hold the pairing button until the Bluetooth LED on the BT-MG2 starts
flashing rapidly. (4-1)
The BT-MG2 locates and pairs with the Bluetooth headset.
The setup procedures shown here and other more detailed information can be obtained
by downloading the user’s guide from our website at www.elecom.co.jp.
Specifications
Outer dimensions
Approx. W56.0 x H10.0 x D70.0 mm
Weight
Approx. 30 g
Transmission
FHSS (Frequency hopping)
Frequency range
2.4 - 2.4835 GHz
Electromagnetic wave reach Approx. 10 m (Varies according to environment.)
Power supply
USB DC5V
Signal output
1mW
Security
128-bit encoding
BT Profiles supported
Headset & Handsfree
Operating environment
PC/AT compatible with USB1.1 or USB2.0 port as standard equipment
Supported OS
Windows
®
2000/XP
Applicable standard
Bluetooth Ver.1.2
Working temperature
5 - 40°C (non-condensing)
Flash memory capacity
32MB
Interface
USB
* Company names, trademarks and logos appearing in this publication are the
trademarks or registered trademarks of their respective owners.
Support
ELECOM does not provide user support outside of Japan.
ELECOM does not provide user support for non-Japanese OS.
ELECOM does not respond to inquiries regarding this English manual.
(中文)
■ 前言
非常感謝您購買Skype通訊錄+藍芽連接器BT-MG2。
本快速設定指南將針對關於如何能立刻使用本產品之基本設定進行解說。
有關於軟體的詳細功能請參考本公司在網頁上公開的使用者軟體指南。
■產品包裝內容確認
產品包裝裡面包含下列物品。
‧BT-MG2 …………………… 1個
‧快速設定指南(本書) …… 1份
‧Skype使用方法指南 ………… 1份
■使用安全注意事項
● 在安裝或是取下本產品時請務必遵循電腦主機以及周邊設備製造商的注意事項。
● 切勿擅自進行分解、改造、修理本產品。
這是導致火災或者觸電、故障的原因。並且是故障保證對象之外。
● 切勿在使用水或者充滿溼氣的場所上使用本產品以及安裝有本產品的電腦主機。
這是導致火災或者觸電、故障的原因。
● 在安裝或是取下本產品時,在碰觸本產品前請將手碰觸金屬製物品(像是鐵桌、門的把手
等)來進行去除靜電動作。靜電是導致本產品損壞的原因。
● 請顧客切勿自行進行產品的分解、修理、改造。
● 發覺有異常之場合請立刻停止使用,並與購入店家或者是本公司的綜合諮詢中心進行洽詢。
■ 使用時注意事項
● 在安裝或是取下本產品時請務必遵循電腦主機以及周邊設備製造商的注意事項。
● 對於使用本產品以及軟體所發生之運作障害或者資料流失等的損害,本公司將一概不負其
責任。
● 本產品請不要透過USB集線器而請直接將本產品連接到電腦上來進行使用。並且不要改變
連接埠請連接到固定的USB連接埠上來進行使用。
● 請勿在充滿溼氣或者是塵埃的場所使用本產品。
● 請勿使本產品受到強烈的衝擊。
● 進行維護時請使用柔軟的乾布輕輕的進行擦拭。請勿使用石油醚、去光液、酒精等
■關於藍芽的注意事項
● 本產品非用作於與所有使用藍芽無線技術機器進行連接動作確認的產品。在使用時請確認
使用藍芽無線技術機器的相容運作條件以及可否連接等的資訊。
● 本產品是依據藍芽1.2規格所製。與使用藍芽Ver.1.0B規格的藍芽無線技術機器是沒有相容
性的。
● 在於無線網路與其他無線機器的周遭、微波爐等會發出無線電波的機器周遭、有許多障礙
物的場所其他像是電波狀態惡劣的場所上來使用藍芽進行接續之場合,有可能會發生頻繁
的斷線、通信速度極端的變慢、發生錯誤等的情形。
本機器所使用的週波數範圍為2.4GHz區域。該週波數除了微波爐等的產業.科學.醫療機
器之外,其他像是同種累得無線電電台、工廠的生產線上等所被使用而需要有執照的移動
物體識別用的場內無線電電台、不需要有執照的特定小型無線電電台、業餘無線電電台等
(以下通稱為「其他的無線電電台」)等亦被使用著。
2.4FH2
1. 在使用本機器之前請確認在附近是否有「其他的無線電電台」被使用著。
2. 萬一本機器與「其他的無線電電台」之間發生電波干擾的場合,請立刻將
本機器所使用的無線頻道進行變更或者是改變使用場所,亦或停止機器的
運用(將電波的發射停止)。
3. 如果發生了其他電波干擾的場合等困擾的情形請洽詢技術支援中心。
安裝之前
配套按鈕
USB 接頭
SkypeLED 燈
藍芽 LED 燈
名稱
功能
藍芽 LED 燈
偵測到有藍芽機器進行配套中處理中時燈會亮起。
偵測不到藍芽機器時燈會快速的進行閃爍。
與藍芽機器完成配套時燈會緩慢的進行閃爍。
配套按鈕
按下配套按鈕後,會進行與其他藍芽相容機器的配套處理。
SkypeLED 燈
將本產品接到電腦上,成為可使用狀態時燈會亮起。
Skype 程式動作時並且資料傳送時燈會快速的進行閃爍。
USB 接頭
將之連接到電腦的 USB 連接埠上。
■ 請在事前將 Skype 設為可以使用的狀態
本產品會將所使用的VoIP軟體Skype通訊資料等的Skype的設定資料複製到本產品上。在
安裝本產品之前請進行安裝Skype並且取得帳號,使得Skype處於可以使用的狀態。
在安裝本產前,請進行安裝 Skype 使之處於可以使用的狀態。
在安裝之後可以將保存在電腦上的 Skype 的設定資料保存到本產品上或者也可以將本
產品上所保存著的 Skype 的設定資料備份到電腦上。詳細內容請參考本公司網頁上所
公開的使用者軟體指南。
進行安裝
請用具有 Administrator 使用權限的帳戶來登入。
將本產品上的 UBS 接頭拉出來。(2-1)
將本產品連接到電腦的 USB 埠上。(2-2)
電腦將會自動辨識本產品並開始進行安裝。
安裝後電腦將會顯示重新開機的訊息。
USB 接頭的形狀會由於所使用的環境的不同而有所差異。
按下
按鈕。(2-3)
電腦會進行重新開機。
電腦重新開機後,任務欄上會出現
圖像。
在電腦開機當中會有出現磁碟掃描畫面之場合。在此時請等待磁碟掃描自動結束。
依照「2 進行安裝」的操作順序來進行,於重新開機後將會出現本產品的設定畫面。
所使用的電腦如果有將 CD-ROM 的自動執行功能關閉的話,有可能不會出現設定畫面。
請參考本公司網頁上所公開的使用者軟體指南所記載的「疑難排除」。
按下
按鈕。(2-4)
畫面上會顯示出是否將所使用電腦上所保存的 Skype 通訊資料等的 Skype 設定資料複製
到本產品上的確認畫面。
在設定執行中時會將 Skype 結束。如果在通話中等情況而在使用 Skype 的場合請使之
處於可以結束的狀態。
同意將 Skype 設定資料從電腦複製到本產品上時請按下
按鈕。(2-5)
將會出現保全密碼輸入畫面。
沒有必要複製資料時請按下
按鈕。
輸入本產品的保全密碼然後按下
按鈕。(2-6)
本產品的保全密碼在出貨時是設定為 0000。
接著會出現 Skype 帳號的輸入畫面。
為了將保全性提升,可以進行變更本產品的保全密碼。關於變更方法詳細內容請閱讀
本公司網頁上所公開的使用者軟體指南。
輸入已經取得的 Skype 帳號資料然後按下
按鈕。(2-7)
畫面上會顯示出是否將從電腦複製到本產品上的確認畫面。
要將 Skype 設定資料從電腦複製到本產品上時請按下
按鈕。(2-8)
按下
按鈕的話將會開始進行複製。
複製結束後,通知設定完成的畫面將會顯示出來。請按下
按鈕。(2-9)
將會出現 Skype 的登入畫面。
步驟 4 到 10 的操作於設定結束後將可以從任務欄上所顯示的本產品的圖示上選擇
「BT-MG1/2 のセットアップ」的話可以任意重複進行。
請輸入事前所登記的 Skype 用戶名稱以及密碼然後按下
按鈕。(2-10)
進行登入到 Skype。
到此為止本產品以可以開始使用Skype。
要使用 BT-MG2 時
將本產品進行安裝後,只要將本產品連接上就可以進行使用。
■使用 BT-MG2 來利用 Skype 時
將本產品連接到電腦的 USB 埠上。
將本產品連接上的話會在任務欄上顯示出
圖示。此外在此同時 Skype 也會自動的啟動。
‧按照電腦的處理速度的不同在任務欄上顯示出
圖示的時間可能會花上1分鐘左右。
‧有關於 Skype 的使用方法請參考附屬在本產品上的「Skype 使用指南」。
■取下 BT-MG2 時
將BT-MG2取下的話,Skype也會自動結束。請在取下之前將交談等結束掉,使得Skype處
於可以結束的狀態。
在任務欄的
圖像上按下滑鼠的左鍵,選擇「中止」。(3-1)
圖像將會消失。
Skype 會自動的結束。
在任務欄的
圖像上按下滑鼠的右鍵,選擇「USB 大容量記憶デバイスドライブ(x;x)
を安全に取り外します」。(3-2)
會顯示出兩個磁碟。按照所使用的電腦環境的不同磁碟的號碼會有所不同。
將本產品從電腦的 USB 埠上取下。
與藍芽相容的耳機組進行配套時
將所擁有的藍芽相容耳機組與本產品進行配套,在電腦上進行使用。
有關配套的方法請參考藍芽耳機組的使用說明書。
參考藍芽耳機組的使用說明書,將藍芽耳機組設定到配套模式。
直到在本產品的藍芽 LED 燈閃爍的速度變慢為止請一直按著配套按鈕。(4-1)
與藍芽耳幾組的配套將會被確立起來。
本公司的網頁 (http://www.elecom.co.jp) 上備有比起這裡所介紹的設定步驟更加詳細的
使用者軟體指南。敬請閱讀。
■規格
外型尺寸
約 寬度 56.0× 高度 10.0× 長度 70.0mm
重量
約 30g
傳送方式
FHSS 跳頻方式
週波數範圍
2.4GHz~2.4835GHz
電波傳送距離
約 10m(按照使用環境不同而有所差異)
電源
USB DC5V
發射功率
1mW
保全方式
128bit 密碼化
相容設定
耳機組‧免手提
運作環境
備有 USB1.1 或是 USB2.0 連接埠的 PC/AT 相容機
相容 OS
Windows
®
2000/XP
適用規格
藍芽 Ver.1.2
運作溫度
5℃~ 40℃(無冷凝)
快閃記憶體總容量
32MB
界面
USB
※ 所揭載的公司名稱、商標、標章為各公司所有的商標以及註冊商標。
■ 有關於技術支援
在日本以外使用時恕無法進行技術支援。
使用日文以外的OS無法進行技術支援。
恕無法接受本中文使用手冊的諮詢。
Skype アドレス帳+ Bluetooth アダプタ BT-MG2
クイックセットアップガイド
発行 エレコム株式会社
2005 年 11 月 9 日 第 1 版
©
2005 ELECOM Corporation. All rights reserved.
保 証 書 【
BT-MG2
】
店名 住所 TEL
担当者名
販
売
店
保証期間 お買い上げ年月日
6ヶ月
年 月 日