Kichler 15276 User Manual
Kichler Lighting
Date Issued: 7/12/02
IS-15276-US
INSTRUCTIONS FOR INSTALLING THE KICHLER
®
POWER POST
®
120-VOLT INSTALLATION
1)
Prepare ground excavation to receive Power Post and underground
conduit and / or supply cable.
2)
IMPORTANT: Turn off electrical power at source.
3)
When using rigid conduit, run conduit up through Power Post housing
stopping within 2” of the top opening. Extend electrical cable a sufficient
amount for ease of making wire connections.
4)
Set Power Post housing at proper grade level, back fill enough to stabi-
lize. (NOTE: Do not bury Power Post top cap below grade level. Access
to splice compartment required by the C.E. code.)
5)
Fixture Assembly: Thread 1/2” NPSM Power Post top cap to fixture
stem.
6)
Wire Fixture: Lighting fixture must be CSA certified for outdoor location
service, provided with a suitable ground wire.
• Connect fixture ground to supply ground wire if provided.
• If metal conduit is used and no grounding conductor is supplied
fixture ground wire must be attached to metal conduit with suitable
UL label grounding and bonding clamp (not provided).
• Make wire connections (connectors not provided.)
Reference chart below for correct connections and wire
accordingly.
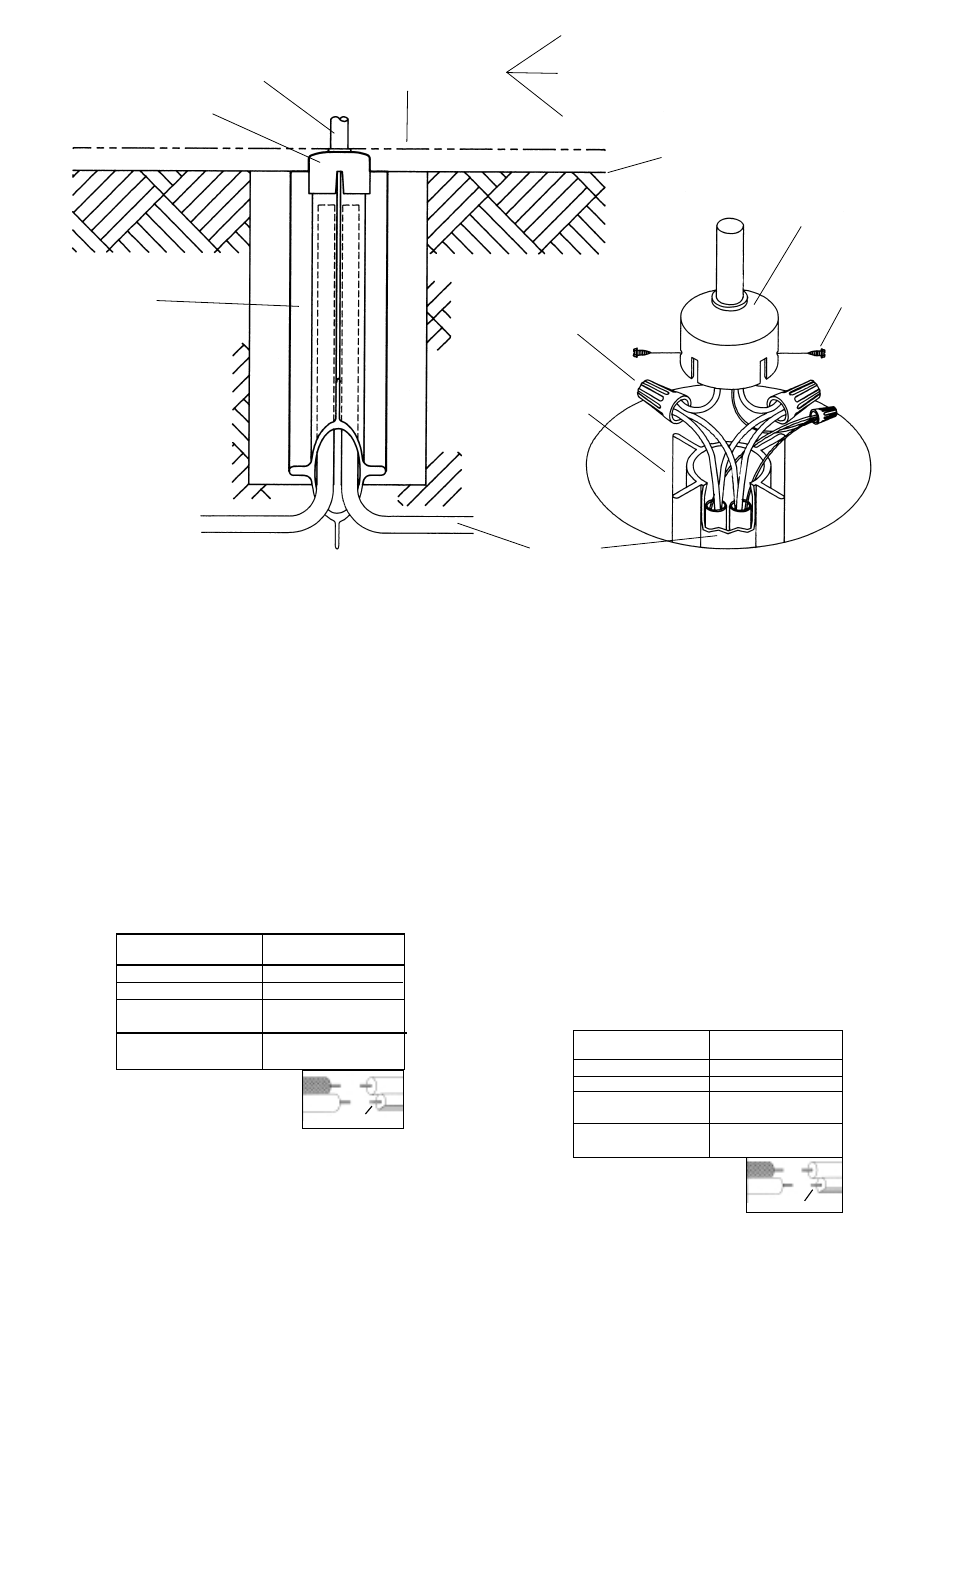
7)
Slip fixture / stem / cap assembly over Power Post housing. Secure in
place using provided stainless steel self-tapping screws. (Suggest use
of power screwdriver to drive screws.)
8)
Align fixture, back fill remainder of hole.
ALL INSTALLATIONS MUST COMPLY WITH LOCAL AND / OR N.E.C..
ELECRICAL CODES.
POWER POST
®
POSTE DE POTENCIA
CONDUIT
CONDUCTO
LOOSE GRAVEL
GRAVA SUELTA
WOOD CHIPS
VIRUTAS DE
MADERA
PEAT MOSS
TURBA MUSGOSA
TOP CAP
TAPA SUPERIOR
LOOSE FILL GROUND COVER
RELLENO SUEL TO PARA CUBRIR
EL TERRENO
Connect Black or
Red Supply Wire to:
Connect
White Supply Wire to:
Black
White
*Parallel cord (round & smooth)
*Parallel cord (square & ridged)
Clear, Brown, Gold or Black
without tracer
Clear, Brown, Gold or Black
with tracer
Insulated wire (other than green)
with copper conductor
Insulated wire (other than green)
with silver conductor
*Note: When parallel wires (SPT I & SPT II)
are used. The neutral wire is square shaped
or ridged and the other wire will be round in
shape or smooth (see illus.)
Neutral Wire
WARRANTY
WE WARRANT THE LANDSCAPE PRODUCTS FEATURED IN OUR LANDSCAPE LIGHTING CATALOG (WITH THE EXCEPTION OF LIGHT BULBS) FOR FIVE YEARS AGAINST
DEFECTS IN MATERIALS AND WORKMANSHIP IF IT WAS PROPERLY INSTALLED AND FAILED UNDER NORMAL OPERATING CONDITIONS, PROVIDED IT IS RETURNED TO
THE POINT OF PURCHASE, WHERE IT WILL BE REPAIRED OR, AS IT MAY BE DETERMINED, TO REPLACE THE LANDSCAPE PRODUCT OR PARTS USED ON THAT PRODUCT.
GARANTIA
NOSOTROS GARANTIZAMOS POR CINCO ANOS LOS PRODUCTOS PANORAMICOS QUE OFRECEMOS EN NUESTRO CATALOGO DE ILUMINACION PANORAMICA (CON
EXCEPCION DE LAS BOMBILLAS), QUE ESTAN EXENTOS DE DEFECTOS DE MATERIALES Y MANO DE OBRA, SI SE INSTALARON CORRECTAMIENTE Y FALLARON EN
CONDICIONES DE OPERACION NORMAL, SIEMPRE QUE SE DEVUELVAN AL LUGAR DE COMPRA, DONDE SERAN REPARADOS O, SEGUN PUEDA DETERMINARSE, SERAN
CAMBIADOS LOS PRODUCTOS PANORAMICOS O LAS PIEZAS UTILIZADAS EN ESE PRODUCTO
POWER POST
®
POSTE DE POTENCIA
TOP CAP
TAPA SUPERIOR
HEX HEAD SCREW
TORNILLO DE
CABEZA HEXOGONAL
GRADE LEVEL
NIVEL DEL
TERRENO
CONNECTOR
CONECTOR
INSTRUCCIONES PARA LA INSTALACION DEL POSTE DE POTENCIA
KICHLER
®
INSTALACION DE 120 VOLTIOS
1)
Prepare la excavación del terreno para recibir el poste de potencia y
el conducto subterràneo y/o el cable de abastecimiento.
2)
IMPORTANTE: Apague el suministro de energia eléctrica en la fuente.
3)
Cuando use conductos rigidos, pase el conductyor a través del alojamiento
del poste de potencia parando a unas 2” de la abertura superoir. Extienda
el cable eléctrico una contidad suficiente para hacer fácilmente las
conexiones de los alambres.
4)
Coloque el alojamiento del poste de potencia al nivel adecuado del terreno,
suficiente como para estabilizar. (NOTA: No entierre la tapa superior del
poste de potancia debajo del nivel del terreno. El código N.E.C. requiere
acceso al compartimiento del empalme.)
5)
Montaje del artefacto: Resque la tapa superior del poste de potencia de
1/2” NPSM a la base del artefacto.
6)
Alambre del artefacto: El artefacto de alumbrado debe ser listado UL
para servicio en lugar mojado, provisto con un manguito de tamano de
1/2” y un alambre de conexión a tierra adecuado.
• Conecte el alambre de tierra del artefacto al alambre de tierra del
suministro si se provee. (Por ejemplo, el tipo de cable UF con 2 conductores
más el conductor de tierra).
• Si se usa el conducto de metal y no se suministrea conductor de tierra,
el alambre de tierra del artefacto se dibe acople al conductor de metal
con una conexion a tiera listada UL adecuada y une abrazadera de
conexion (no provista).
• Haga les conexiones de los alambres (no se proveen los conectores).
La tabla de referencia de abajo indica las conexiones correctas y los
alambres correspondientes.
7)
Deslice el artefacto/base/conjunto de la rapa sobre el alojamiento del
poste de potencia. Asegure en el lugar usnado los tornillos de acero
inoxidable y sutororoscantes que se proveen. (Se sugiere se use un
destornillador macánico para atornillar los tornillos.)
9)
Alinee el artefacto, rellena el resto del agujero.
TODA LA INSTALCION DEBE CUMPLIR CON LOS CODIGOS ELECTRI-
COS LOCAL YO DEL N.E.C.
Conectar el alambre de
suministro negro o rojo al
Conectar el alambre de
suministro blanco al
Negro
Blanco
*Cordon paralelo (redondo y liso)
*Cordon paralelo (cuadrado y estriado)
Claro, marrón, amarillio o negro
sin hebra identificadora
Claro, marrón, amarillio o negro
con hebra identificadora
Alambre aislado (diferente del verde)
con conductor de cobre
Alambre aislado (diferente del
verde) con conductor de plata
*Nota: Cuando se utiliza alambre paralelo
(SPT I y SPT II). El alambre neutro es de forma
cuadrada o estriada y el otro alambre será de
forma redonda o lisa. (Vea la ilustracíón).
Hilo Neutral
FIXTURE STEM
BASE (O VARILOA
DE ARTEFACTO)