Screen elements – MacroSystem Bogart SE Ver.3 Addition to the manual User Manual
Page 10
10
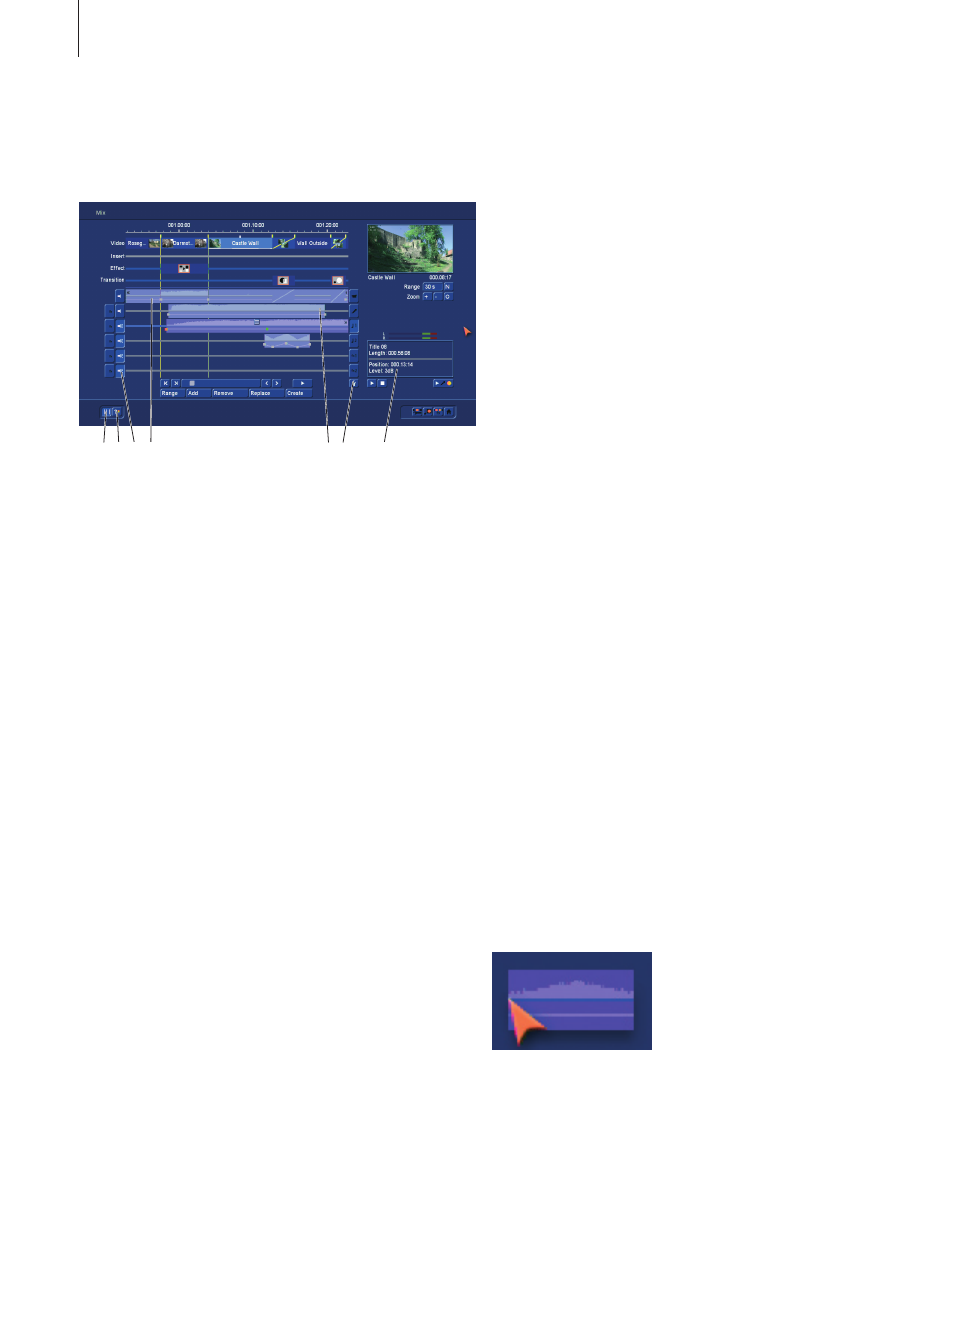
changes . The lower half displays the sound envelope . This
allows to apply transitions and other sound volume changes as
you see fit . Details will be described later .
Sound samples that are subject to transition effects are dis-
played differently in the video sound track (4) . Here, the transi-
tion between the sound samples is displayed as a diagonal
line . The sound curve display can be switched on or off in the
settings .
6 This button is used to call up the audio settings . In addition
to the existing functions, there is an additional button on the
right for each of the tracks . If it has been activated (checkmark
present), the corresponding sound track will be shown in the
mixing display . If the button is deactivated, the track will not be
displayed .
Switching off the display of individual tracks increases the
display of the others and makes it easier to work with them .
It is therefore advisable to deactivate unused tracks or tracks
on which you are currently not working . Hidden tracks remain
active and will be taken into account when you play or finalize
your work .
7 The upper part of this output field contains information about
the active sample . In addition to the name and the length of
the sample, the sound volume is also displayed, if it has been
changed .
The lower part of the field contains also several bits of informa-
tion . This is where you will see the time code during playback,
the position of a sound sample while you are moving it and
when you change the sound envelope, it will contain its level
and position .
Inserting sound samples
Use the button „Insert“ to insert new samples from the bin
(music, comments, noise) in one of the sound tracks .
Click on this button to open the bin . Select a sound sample
and confirm by clicking OK . The window closes and you get a
different pointer: You now no longer only move the red arrow
over the screen, but also a stylized sound sample (The length
and the look do not correspond to those of the selected sound
sample) .
When you move the pointer over one of the sound tracks, it will
automatically be activated . When you leave the sound track
area, left or right, the timeline will automatically scroll in the
corresponding direction .
The sound sample can only be inserted in a free spot if you
go to that location and click on the left button . The current
insertion position (left side, arrowhead) is indicated right in the
information field .
When you insert a sample, its start will stop against the end
Screen elements
Using a screenshot of the mixing screen, the individual ele-
ments will be described below .
1 Use this button to extend the well-known yellow guide lines
from the video track to the full height of the sound track . They
indicate the start of a scene and improve clarity when ar-
ranging the samples on the various sound tracks . When you
move samples or when you insert samples, the guide lines
are „magnetic“, which makes it possible to position them with
great accuracy - more on this later .
2 Since audio no longer has to be calculated, it is also no long-
er obvious when clipping has occurred in the mixed sound . A
click on this button will test the audio and tell you if clipping
is occurring . If clipping is indeed occurring, a message will
inform you and you will be able to jump directly to the relevant
position on the timeline . You can then deal with the problem
easily . Additionally, areas with clipping will be colored red in
the narrow blue strip on top of the video sound track .
If there are several clipping areas, you can edit these one after
another by repeatedly clicking the test button . If a very long
project has not yet been tested at all, the test can take some
time .
3 There are several buttons next to the sound tracks . In addi-
tion to the existing buttons for selecting tracks (right) and
selecting effects (left), a new button has been added at the left .
It displays a stylized symbol of a speaker . With this button, the
sound of any track can be switched on or off at any time . This
way, you could mute the video sound (temporarily) while you
are concentrating on comment .
Muted tracks are also taken into account when a project is
finalized (Exporting, DVD burning . . .) . This makes it easy to cre-
ate several different versions (With/without music, German or
English comments . . .) . You should be careful not to accidentally
„forget“ a track .
4 and 5 The individual sound tracks contain sound samples .
The sound samples are shown in the top half of the so-called
sound curve . This is a general indication of the sound volume
1 2 3 4
5 6
7