Editing, Recording – MacroSystem Bogart SE Ver.3 Addition to the manual User Manual
Page 8
8
Editing
The clipboard switch is now available in the Edit menu . It can
be started with a simple click . If you exchange scenes via the
clipboard, some adjustments are now done automatically:
• The aspect ratio (4:3 / 16:9) is automatically adjusted for SD
projects
• The resolution is automatically and correctly recalculated for
HD projects
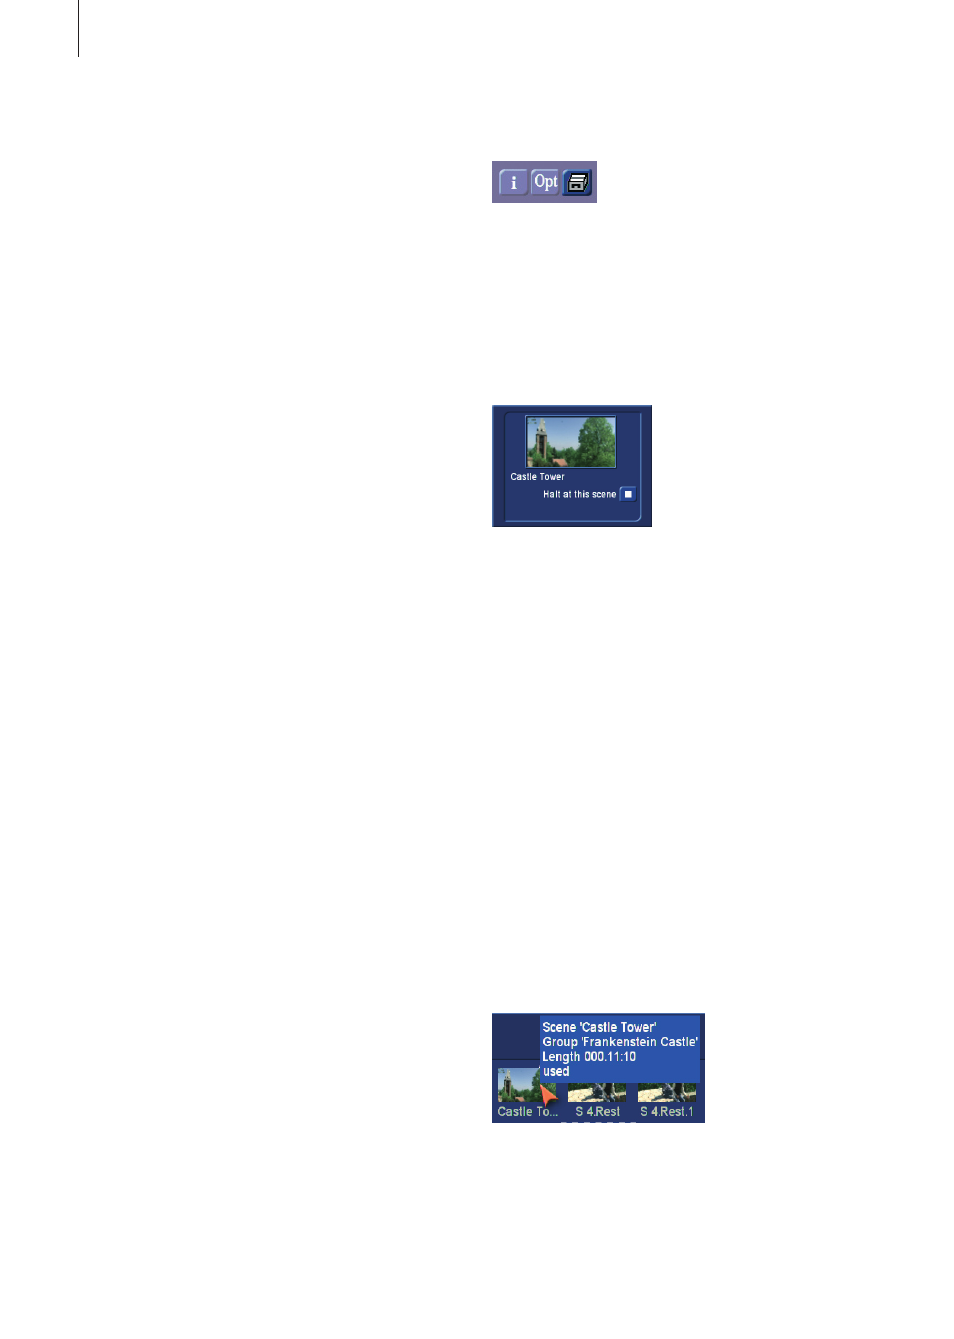
When the Storyboard is played, a window can be displayed
with information relevant to the scene that is being played .
The reference image from the storyboard and the name of the
scene are displayed .
In addition, you have the ability to stop playing at the scene
that is being displayed, regardless of where playback was
started. This information window is quite large. It should
therefore only be opened for information purposes and should
usually not remain open when everything is being played . If
you use your system in 2-monitor mode, this information will
automatically be displayed in the playback window on the VGA
monitor .
The multiline scene bin now also appears at lower screen
resolutions, such as 1280 x 720 (16:9 project). Until now, it
was only possible to move on the middle line, so it frequently
moved . It is now possible to select or highlight any scene
in the active window . To scroll up or down, you can use the
scrollbar on the right or the arrow button below . It is even
faster when you move through the scene bin using the left/
right/up/down arrow keys (cursor) on a Powerkey-keyboard .
The display of help texts has been extended to scenes . Go
with the mouse pointer to a scene in the bin or the storyboard
and let it stay there for a second . Information will be displayed
with respect to this scene or the effect that has been applied
to it . In the storyboard, you will see the name of the scene and
Now you can select the destination project . Only empty pro-
jects can be chosen here .
Note: You must have at least one empty project in order to be
able to copy a project.
It usually does not take more than a few seconds to copy a
project .
Storage indicator
The indicator for the used capacity of the active hard disk
has been changed . The percentage value now also takes into
account the storage in the MediaManager and vice-versa . For
example, when you export a storyboard to the movie archive,
the used capacity will increase . In order to be able to use this
capacity again, you must erase the exported movie in the Me-
diaManager (and empty its trashcan) .
Recording
Recording modes that were not available in HD projects, are
now available . You can now use the recording menu to switch
between the modes „Normal“, „Time“, „Photo“ and „Fast M .“ .
For more information, please refer to Chapter 4 .6 (point 3) in
the Bogart 2 manual .
It is now possible to mix DV and HD videos directly in one
project . You can also import HDV and AVCHD footage in a DV
project . In the same way, it is possible to insert DV footage in
an HD project . The footage is automatically converted to the
current project setting .
When importing via Firewire, the format will automatically be
recognized and displayed during the recording (SD / HD) . If
the format is displayed in yellow, it is not compatible with the
project and will be converted during the recording . You should
pay particular attention to the format display, in case you oc-
casionally change the HD->SD conversion (i .Link conversion)
of an HDV camcorder .
The USB recording function (previously AVCHD import) can
now be used to import several different video formats, in HD
as well as in SD projects. Compatibility and quality can vary,
depending on the source footage .