MacroSystem Bogart SE Ver.3 Addition to the manual User Manual
Page 11
11
Bogart SE 3 Addition to the manual
The lower half displays the sound envelope of the sample . This
is where the changes are carried out, by setting points .
Note: This new type of sound view is only available in the
timeline view.
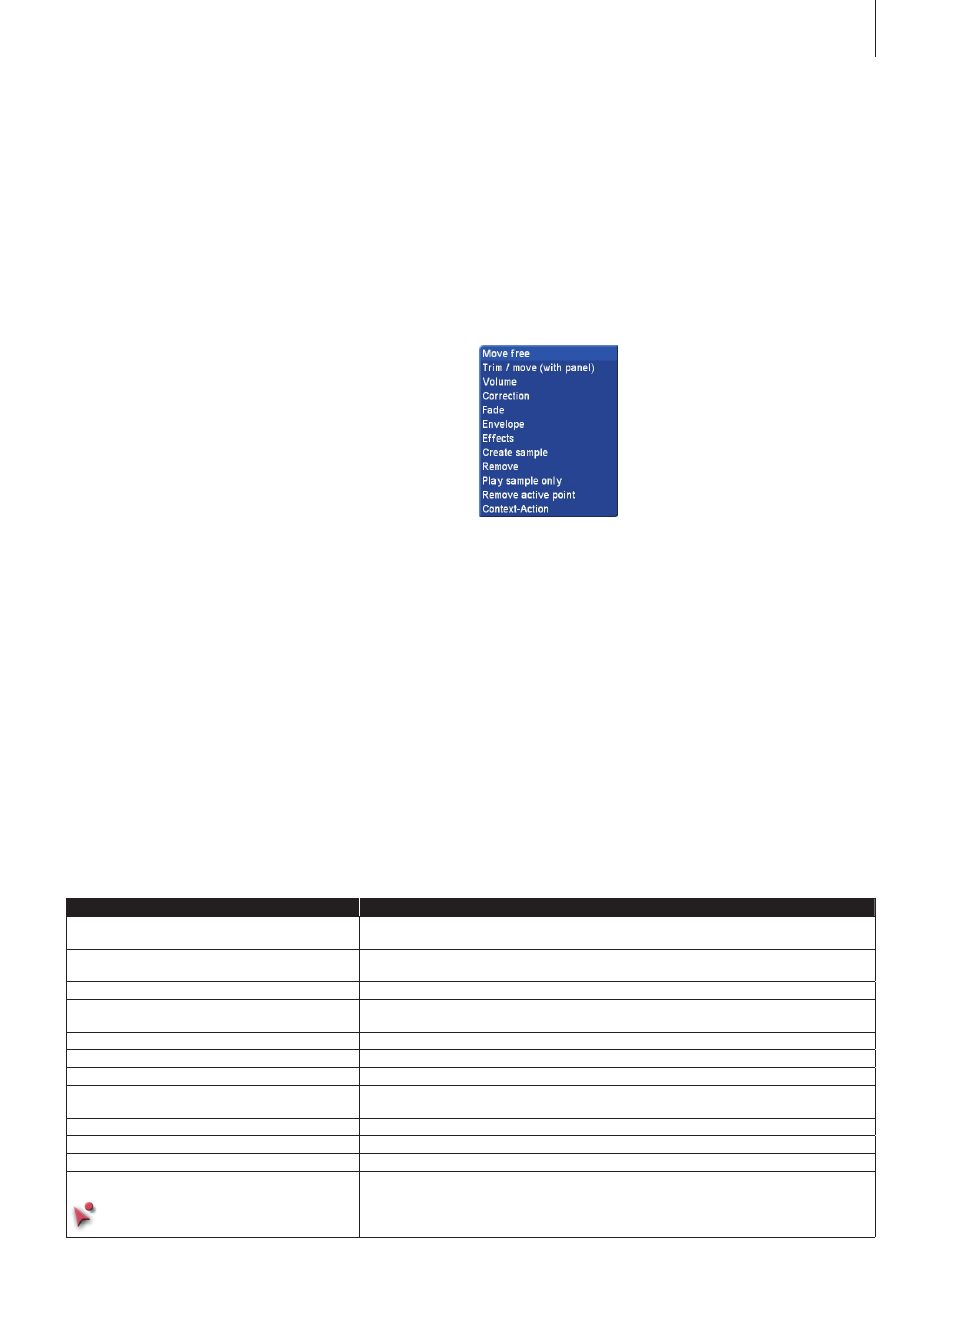
Sound sample menus
You can see a menu icon in the middle of the active (clicked
upon) sample. Use this to access additional sound editing
functions . You should click on the sound sample you want to
work with . This will call up the corresponding menu .
The functions displayed here are directly connected to the
corresponding sound sample . This is called a „context menu“ .
Thanks to this type of menu, you can prevent long clicking se-
quences with the trackball, and save a lot of time as well. Here,
you should find several functions you are familiar with, but also
new functions .
You should move the mouse pointer to the icon and then click
on the left trackball button . Fewer functions will be displayed
for samples of the video sound than for samples of the mixing
tracks .
The table below contains a description of the functions .
of other sound samples or the yellow guide line . This way, it
becomes a lot easier to accurately position the sample .
When you drop a sound sample on top of another one, it will
be positioned directly behind it, as long as there is room .
This makes it a lot easier to put several samples behind one
another .
When a sample is dropped in a free spot that is shorter than
the sample, the sample will automatically be trimmed at the
end .
Should you decide not to insert the sample, simply click the
right trackball button once .
Freely moving audio samples
In addition to the existing possibility to move sound samples
inside a sound track (Range button), it is now also possible to
move them around freely .
In order to do this, you should click on the little button at the
center on top of the sample you want to move . This will open a
menu in which you can select what you want to do, the sample
menu . Select the first option „move free“ (We‘ll talk about the
other options later) .
The sample is the removed from the track and you get a dif-
ferent pointer, the one that was described previously when we
were talking about inserting new samples . It will also behave
the same way as described previously . You can now move the
pointer and insert the sample somewhere else .
Click on the right button to cancel this procedure - the sample
will now return to the location where it was before . Samples
that have been trimmed do not change when they are being
moved around . Should you want to lengthen a sample that had
previously been shortened (automatically), you should use the
Range function .
Audio samples
View
The upper half of the view contains the sound curve of the
recording or the sound sample .
Function
Description
Move free
The sound sample is represented by an icon . Move the sample freely within a track, move
it to another track or to another time point .
Trim/move (with panel)
Opens the big menu for trimming and moving sound samples in the sound track where it is
located .
Volume
Opens a volume control to change the sound volume of the entire sound sample .
Correction
Opens a menu with which you can modify the sound volume of other tracks in function of
this sound sample .
Fade
Opens the menu for fading the sample in or out .
Envelope
Bigger menu and envelope display with extended functionality .
Effects
Sound effects can be applied to the sample .
Create sample
You can create a new sound piece out of the sound sample and the sound tracks
around it .
Remove
This enables you to remove the sound sample from the audio-mix track .
Play sample only
Only plays the active sound sample, without mixing it with the other sound tracks .
Remove active point
The green dot of the envelope is deleted .
Context-Action (mainly for users with a two-button
trackball/mouse)
When context action is activated, the mouse pointer changes and you will now be able to
use the left mouse button to activate the context menu for individual points in the envelo-
pe . Clicking on the right trackball button will stop this context action .