MacroSystem Bogart SE Ver.2 User manual User Manual
Page 35
33
Bogart SE 2 user manual
Note: The scenes contained in the clipboard are deleted when
you turn off your machine.
These Special Image Processing effects (only to be found in
the Edit menu) are shown first in the list . The remaining effects
in the Special menu are the same as the Image Processing
effects (The individual Image Processing effects are explained
in chapter 4 .8) .
(21) In general, you will record scenes that have more than one
camera setting (take) . These scenes must usually be split up in
order to make the video you intend . You can skip this step only
if you want to keep the complete footage as is without transi-
tion effects .
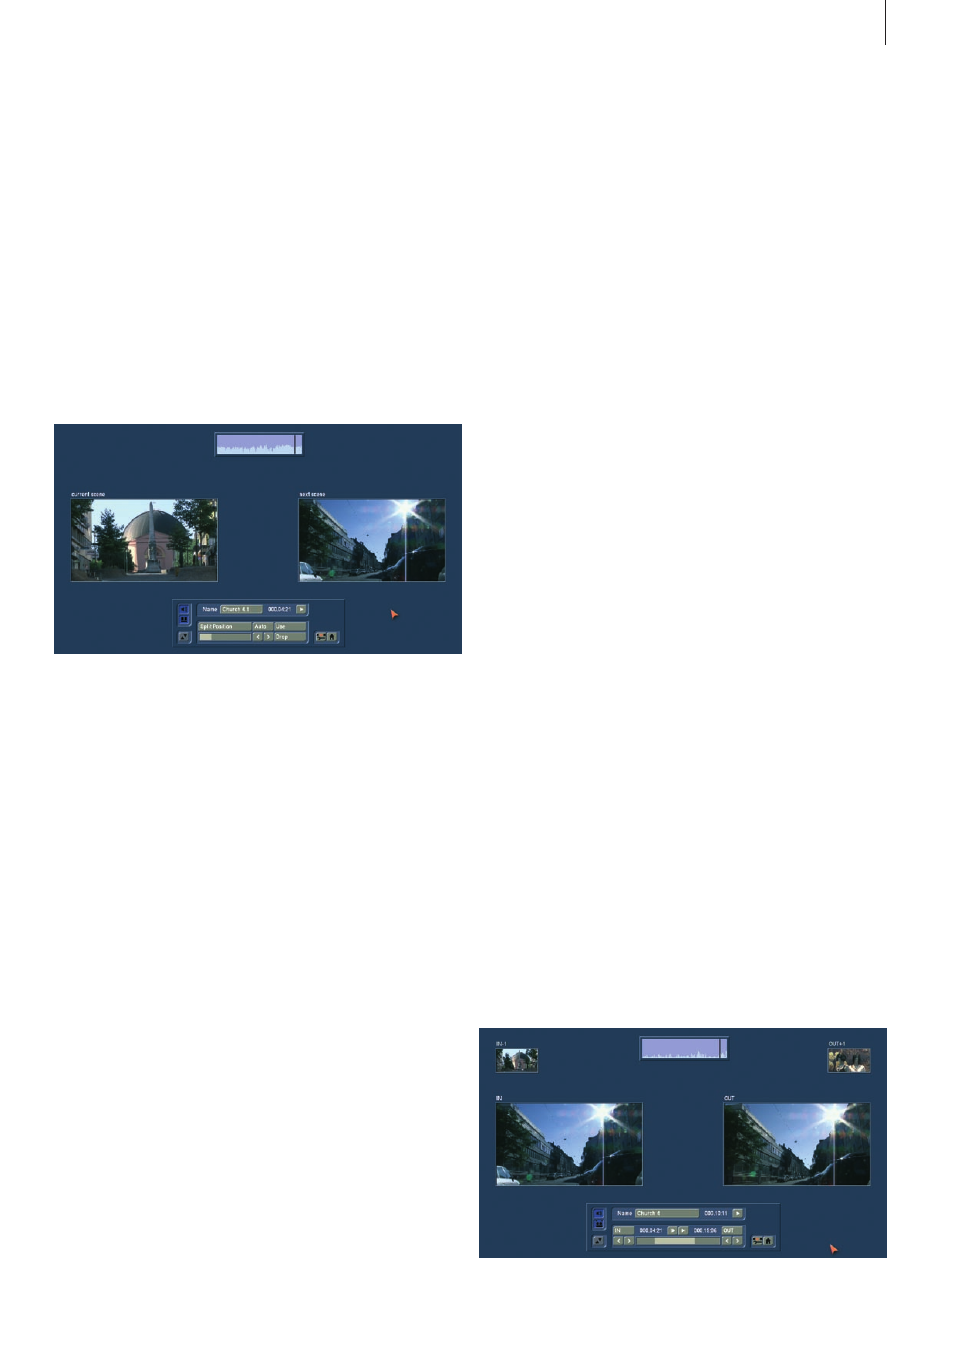
Clicking on the "Split" button brings you to the Split menu:
Splitting can be compared to cutting a roll of film .
The film is still on the roll . A segment of film, (the first take in
the scene selected in the scene bin), is pulled out of the roll .
This happens by clicking on "Split position" .
The trackball can be used to scroll through the entire scene .
Select the last frame of the first take and click on the left track-
ball button . Check (and correct if necessary) with the arrow
buttons ("<,>") that you have hit the exact split points .
The audio wave form (section 3 .2) can help you . You can turn
if on and off with the loudspeaker symbol . Audio "scrubbing"
can help you with splitting by allowing you to make splits ac-
cording to specific moments in the audio .
Now you have isolated the first take . The segment is highlight-
ed in light blue . You can playback the segment (and rename
it, if desired) . You must now decide whether the segment is
valuable or can be deleted . Clicking on "Use" causes the seg-
ment to be "cut" and placed into the scene bin, where you can
access it later . "Drop" skips the segment and moves on to set
the next the split position in the scene .
Bogart SE offers a further display mode for splitting a scene,
which makes it even easier to determine the correct splitting
position . Click onto the button beneath the speaker symbol to
see the display of two scene images next to each other . The
left scene is the current frame at the set split position . The right
frame display the direct next frame after the split position . You
can therefore see both options at the same time and can de-
cide more easily which frame really ends the scene, just prior
to a new scene, or when new content begins .
Note: In this mode, it is not possible to move the menu to the
top of the screen.
Bogart SE does not delete any video material during this
procedure . The individual scenes are only copied ("Use") or
not copied ("Drop") . The original scene with all takes (the "film
roll") remains unchanged until it is intentionally deleted in the
Edit menu .
After clicking on "Use" or "Drop" you continue to work with
the rest of the roll . Another strip must be taken out and judged
either as good ("Use") or bad ("Drop") . The last scene is auto-
matically displayed as " .Rest" in the scene bin . This enables
you to easily interrupt your work and to continue later with the
" .Rest" .
An additional function is splitting a scene in series through the
"Index" button . Click (in the splitting menu) on the Play button
so that you see the "Index" button . While the video is running
with audio, each time you click on the "Index" button a split
position is set . Afterward the split segments are positioned
after the original scene in the scene bin . This function serves to
roughly split up a scene before you begin with final editing .
In addition, you can make use of the automatic splitting
function if the video material has been recorded via DV/HDV/
AVCHD .
Click on the "Auto" button to cause your footage to be auto-
matically split . You now can decide where the divided scenes
are to appear . You can choose from the options `Add to Story-
board´ and /or `Add to Scene Bin` .
The newly created scenes will appear directly after the cur-
rently selected scene . Please note that the system cannot add
scenes in between Insert scenes in the Storyboard .
The video scene that you have filmed most recently is split up
very quickly according to shot changes . (If there are no camera
changes, no splits will be made .)
(22) Scenes must generally be trimmed before they are suitable
for production . Jittery and blurred images can be removed
down to the last unsuitable frame .
Clicking on "Trim" brings up the trim menu .