MacroSystem Bogart SE Ver.2 User manual User Manual
Page 13
11
Bogart SE 2 user manual
These points are set to mark certain segments of a scene .
This can be a Trim procedure, but also the placement of an
Image Processing effect in the storyboard (using the Range
function) . When you click with the left trackball button on "IN"
or "OUT", the trackball function changes . Rolling the trackball
then causes the video to scroll forward or backward through
the video scene with a speed depending on the speed the ball
is rotated . An additional click with the left button sets the new
beginning (IN) or end (OUT) point . A click with the right button
reinstates the original setting .
The time (Timecode) is shown in the same format you have
chosen for the Timecode display: 000:00:00 (min:sec:frames)
or 00:00:00:00 (hrs:min:sec:frames) .
Scene check
These two buttons (see above) serve to quickly review the first
and last few seconds of a scene or audio segment . The "|>"
button plays the first 3 seconds starting from the IN point . The
">|" button plays the 3 seconds just prior to the OUT point .
Arrow buttons
Stepping through individual frames (see slider) works by
clicking on the ">" and "<" symbols . Clicking on ">" moves
forward to the next frame . Clicking on "<" moves backward
to the previous frame . This behavior is found at several points
in the program, for example when trimming, splitting, or using
sliders within the effect lists .
Symbols for recording, playback, pause, stop
Several menus have buttons for recording, playback, pause,
and stop, with which you can play your video and audio ma-
terial . You are probably familiar with these functions on other
devices, such as your DV-player .
This is the symbol for Record and can be found in the
recording menu . Clicking on it causes your system to start
recording, at which time you can start your video input device .
(For best results, be sure to start the input device first) .
This is the symbol for Play . Clicking it will play the video
scenes or audio samples . In the recording menu it starts the
DV/HDV input device .
This button causes a Pause in the playback . Clicking on it
again ends the pause and the video material is played from the
point at which the pause was made .
The Stop symbol stops playback/recording . If you
initiate playback again, the video material will be repla-
yed from the beginning . Playback can also be stopped by
pressing the right trackball button . If you are using a DV/
HDV input device, then you can control it directly from the
Record screen . (But please be aware that most devices
are compatible, but some are not . If this is the case, the
DV/HDV device can be started manually and should then
input correctly .) In the recording menu you will also find
the three symbols listed above: stop, playback, and pause,
plus the symbols:
rewind:
and forward:
Both of these buttons have a triple function . Fast rewind and
fast forward are achieved while the DV source is in stop mode,
viewable slow rewind and slow forward in playback mode, and
frame-by-frame backward and forward in pause mode .
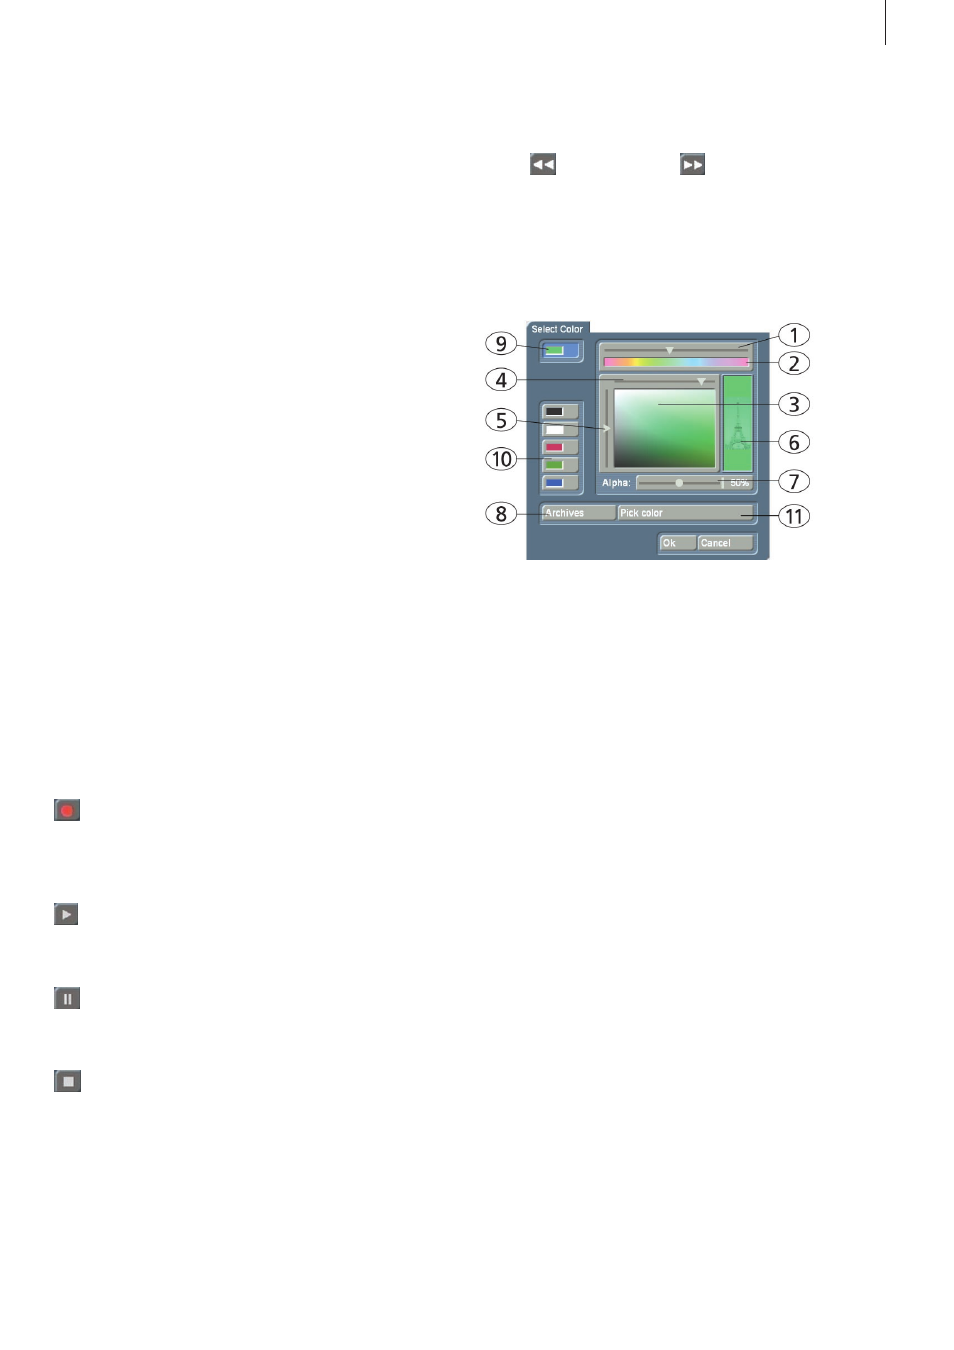
The color box
The color box enables you to select a color .
Clicking on the palette arrow (1) enables you to choose a spe-
cific color . Scroll through the color palette (2) until your desired
color is displayed in the color window below (3) . After con-
firming this color by clicking the left trackball button you can
define the color more precisely . Click in the large color window
and use the upper arrow (4) to scroll left or right in order to at-
tain the desired saturation . Use the left arrow (5) to scroll up or
down to set the color brightness . With a little practice you can
specify your desired color by simultaneous use of both arrows .
The intersection point of both arrows (if you imagine them ex-
tending until they touch within the box) indicates the selected
color, which is always displayed to the right in the rectangle
(6) . Clicking on the left trackball button confirms the setting .
You can also click directly on the color you wish without
having to use the arrow keys, by simply clicking on the desired
color within the color window (3) . The color that you selected is
at the same time displayed in the top left color button (9) for as
long as the button remains activated .
Beneath it you will see five other color buttons/memory
buttons (10), which allow you to select frequently-used colors
quickly and conveniently . To assign your preferred colors to
the memory buttons, first activate a memory button and then
select a color in the big color window . Once the required color
is assigned to the memory button, activate another memory
button or the upper color button (9) .
In many cases (e .g . when titling) the color box provides the
Alpha option (7) . Here you let the desired color shine through
your motif displayed on the right (6), (the Eiffel tower is shown
here as an example) . You can specify the alpha value in per-
cent by moving the scroll bar . The lower the percent value the
more transparent your selected color and the more clearly your
motif shines through .