Cycle parameters – HEIDENHAIN TNC 620 (81760x-01) Cycle programming User Manual
Page 326

Touch Probe Cycles: Automatic Datum Setting
15.2 DATUM SLOT CENTER (Cycle 408, DIN/ISO: G408, software option
17)
15
326
TNC 620 | User's Manual Cycle Programming | 3/2014
Cycle parameters
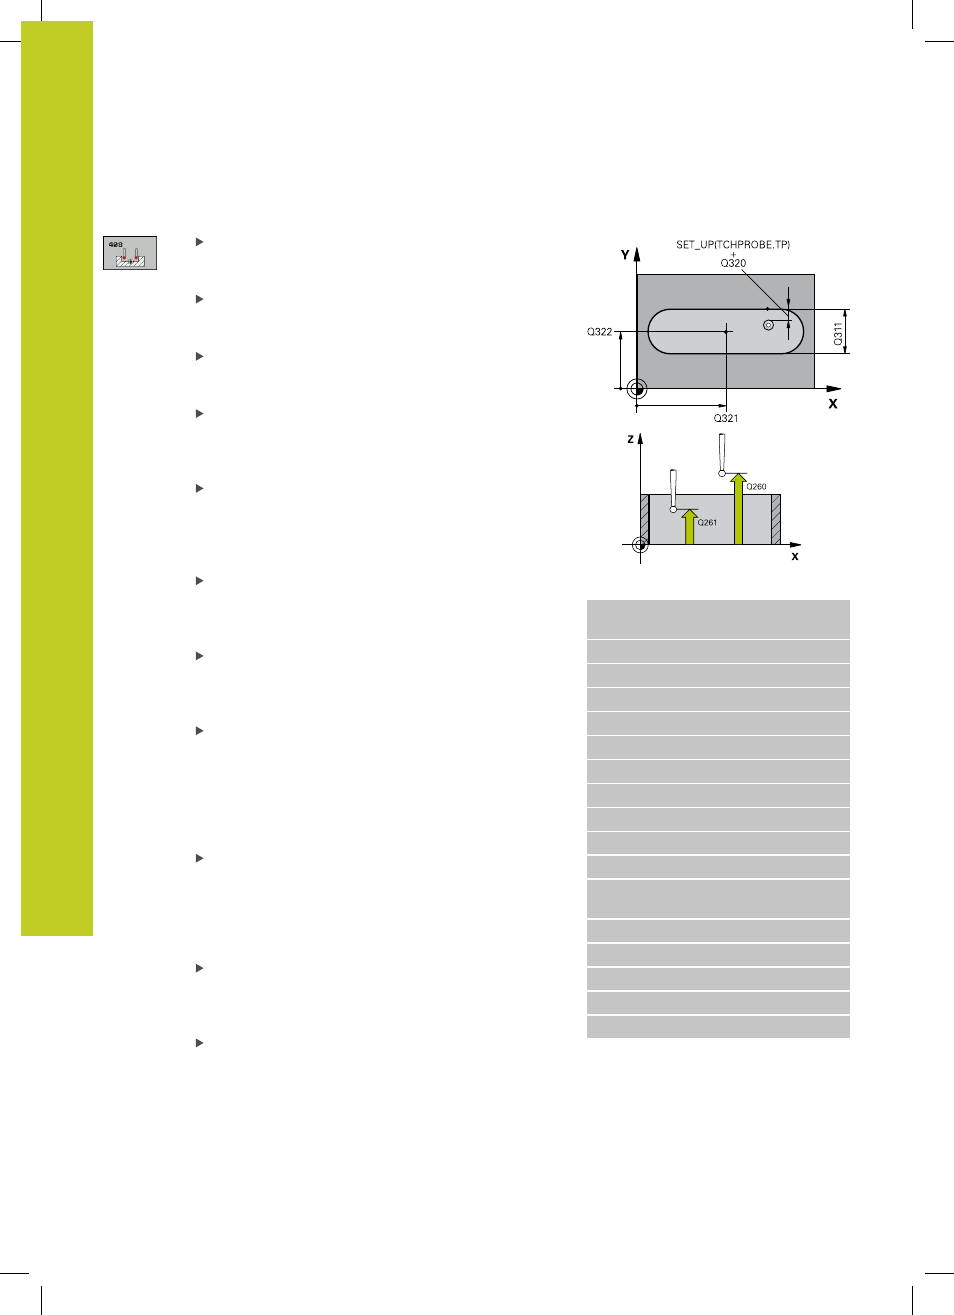
Center in 1st axis Q321 (absolute): Center of the
slot in the reference axis of the working plane. Input
range -99999.9999 to 99999.9999
Center in 2nd axis Q322 (absolute): Center of the
slot in the minor axis of the working plane. Input
range -99999.9999 to 99999.9999
Width of slot Q311 (incremental): Width of the slot,
regardless of its position in the working plane. Input
range 0 to 99999.9999
Measuring axis Q272: Axis in the working plane in
which the measurement is to be made:
1
: Principal axis = measuring axis
2
: Secondary axis = measuring axis
Measuring height in the touch probe axis Q261
(absolute): Coordinate of the ball tip center (=
touch point) in the touch probe axis in which
the measurement is to be made. Input range
-99999.9999 to 99999.9999
Set-up clearance Q320 (incremental): Additional
distance between measuring point and ball tip.
Q320 is added to
SET_UP (touch probe table). Input
range 0 to 99999.9999
Clearance height Q260 (absolute): Coordinate in
the touch probe axis at which no collision between
touch probe and workpiece (fixtures) can occur.
Input range -99999.9999 to 99999.9999
Traversing to clearance height Q301: definition
of how the touch probe is to move between the
measuring points:
0
: Move at measuring height between measuring
points
1
: Move at clearance height between measuring
points
Number in table Q305: Enter the number in the
datum/preset table in which the TNC is to save the
coordinates of the slot center. If you enter Q305=0,
the TNC automatically sets the display so that the
new datum is on the slot center. Input range 0 to
2999
New datum Q405 (absolute): Coordinate in the
measuring axis at which the TNC should set the
calculated slot center. Default setting = 0. Input
range -99999.9999 to 99999.9999
Measured value transfer (0, 1) Q303: Specify if
the determined basic rotation is to be saved in the
datum table or in the preset table:
0
: Write the measured basic rotation as datum shift
active datum table. The reference system is the
active workpiece coordinate system
1
: Write the measured basic rotation into the
preset table. The reference system is the machine
coordinate system (REF system).
NC blocks
5 TCH PROBE 408 SLOT CENTER REF
PT
Q321=+50
;CENTER IN 1ST AXIS
Q322=+50
;CENTER IN 2ND AXIS
Q311=25
;SLOT WIDTH
Q272=1
;MEASURING AXIS
Q261=-5
;MEASURING HEIGHT
Q320=0
;SET-UP CLEARANCE
Q260=+20
;CLEARANCE HEIGHT
Q301=0
;MOVE TO CLEARANCE
Q305=10
;NO. IN TABLE
Q405=+0
;DATUM
Q303=+1
;MEAS. VALUE
TRANSFER
Q381=1
;PROBE IN TS AXIS
Q382=+85
;1ST CO. FOR TS AXIS
Q383=+50
;2ND CO. FOR TS AXIS
Q384=+0
;3RD CO. FOR TS AXIS
Q333=+1
;DATUM