Please note while programming, Cycle parameters – HEIDENHAIN TNC 620 (81760x-01) Cycle programming User Manual
Page 408

Touch Probe Cycles: Automatic Workpiece Inspection
16.12 MEASURE BOLT HOLE CIRCLE (Cycle 430, DIN/ISO: G430, software
option 17)
16
408
TNC 620 | User's Manual Cycle Programming | 3/2014
Please note while programming:
Before a cycle definition you must have programmed
a tool call to define the touch probe axis.
Cycle 430 only monitors for tool breakage; there is
no automatic tool compensation.
Cycle parameters
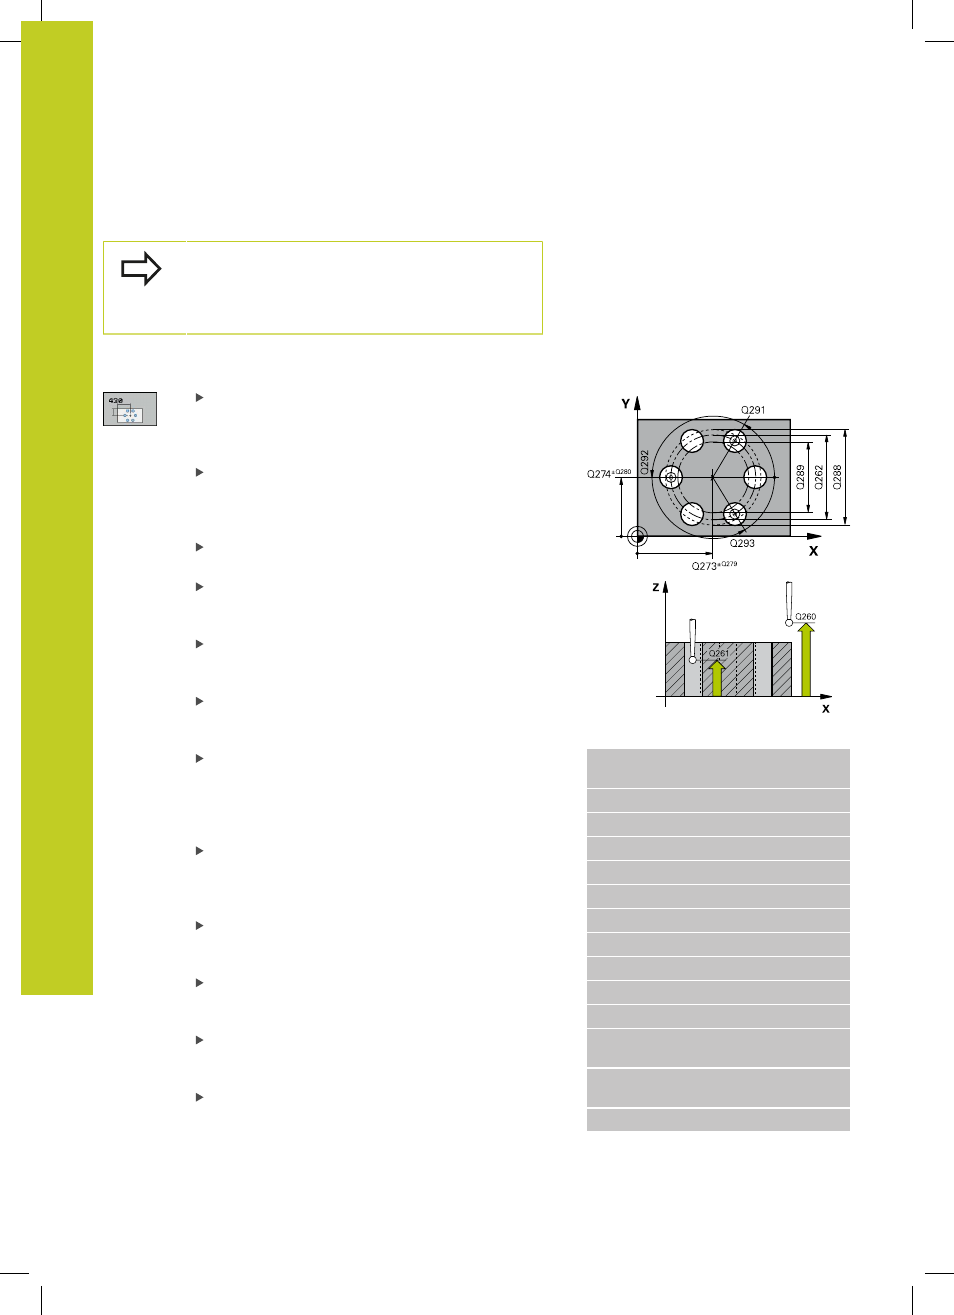
Center in 1st axis Q273 (absolute): Bolt hole circle
center (nominal value) in the reference axis of
the working plane. Input range -99999.9999 to
99999.9999
Center in 2nd axis Q274 (absolute): Bolt hole
circle center (nominal value) in the minor axis of
the working plane. Input range -99999.9999 to
99999.9999
Nominal diameter Q262: Enter the bolt hole circle
diameter. Input range 0 to 99999.9999
Angle of 1st hole Q291 (absolute): Polar coordinate
angle of the first hole center in the working plane.
Input range -360.0000 to 360.0000
Angle of 2nd hole Q292 (absolute): Polar coordinate
angle of the second hole center in the working
plane. Input range -360.0000 to 360.0000
Angle of 3rd hole Q293 (absolute): Polar coordinate
angle of the third hole center in the working plane.
Input range -360.0000 to 360.0000
Measuring height in the touch probe axis Q261
(absolute): Coordinate of the ball tip center (=
touch point) in the touch probe axis in which
the measurement is to be made. Input range
-99999.9999 to 99999.9999
Clearance height Q260 (absolute): Coordinate in
the touch probe axis at which no collision between
touch probe and workpiece (fixtures) can occur.
Input range -99999.9999 to 99999.9999
Maximum limit of size Q288: Maximum
permissible diameter of bolt hole circle. Input range
0 to 99999.9999
Minimum limit of size Q289: Minimum permissible
diameter of bolt hole circle. Input range 0 to
99999.9999
Tolerance for center 1st axis Q279: Permissible
position deviation in the reference axis of the
working plane. Input range 0 to 99999.9999
Tolerance for center 2nd axis Q280: Permissible
position deviation in the minor axis of the working
plane. Input range 0 to 99999.9999
NC blocks
5 TCH PROBE 430 MEAS. BOLT HOLE
CIRC
Q273=+50
;CENTER IN 1ST AXIS
Q274=+50
;CENTER IN 2ND AXIS
Q262=80
;NOMINAL DIAMETER
Q291=+0
;ANGLE OF 1ST HOLE
Q292=+90
;ANGLE OF 2ND HOLE
Q293=+180
;ANGLE OF 3RD HOLE
Q261=-5
;MEASURING HEIGHT
Q260=+10
;CLEARANCE HEIGHT
Q288=80.1
;MAXIMUM DIMENSION
Q289=79.9
;MINIMUM DIMENSION
Q279=0.15
;TOLERANCE 1ST
CENTER
Q280=0.15
;TOLERANCE 2ND
CENTER
Q281=1
;MEASURING LOG