Sealey SWSKIT User Manual
Page 11
SECTION 5 - TROUBLESHOOTING
3
4
- After entering into Remote Querying mode, the LCD display
will flash the total number of remote controls currently
enrolled to the system
(e.g. If 3 remotes are enrolled the LCD display will flash “03”)
- The ID No. of the Remote can then be checked by pressing
any key on the remote (e.g, if the LCD display flashes “02”
then that is the ID of the remote)
Complete the query and return the Smart Panel to STANDBY
by pressing
Press to complete the
query
Press then to
go into Remote Querying
mode, and then press
any key on the remote to
check its ID.
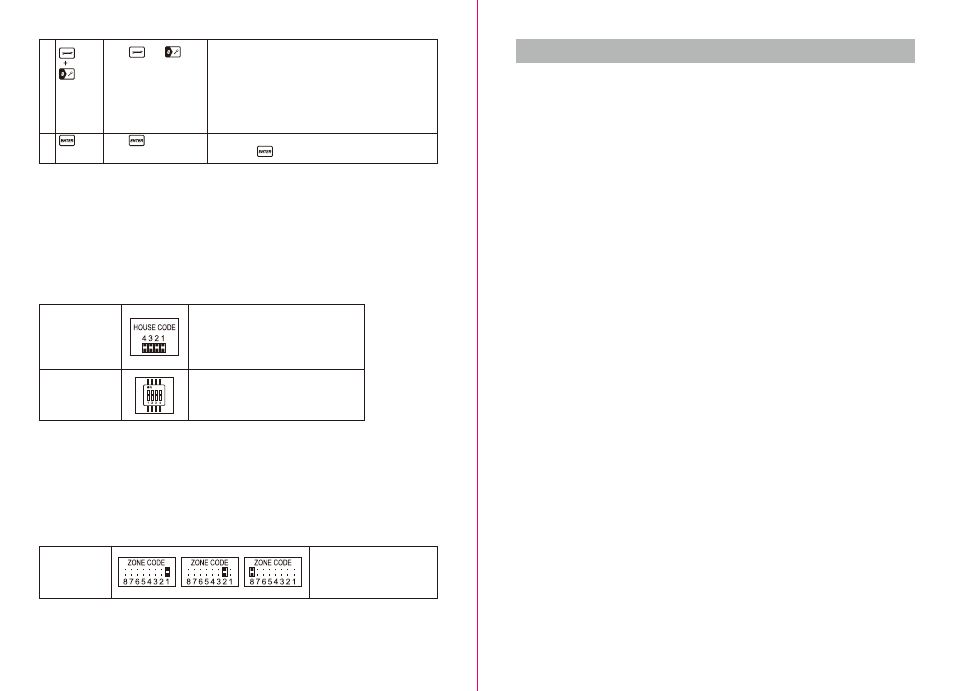
4.3 House Security Code settings
In most cases the factory settings of the House Security Code will NOT need to be changed.
However, if the Smart Panel and Sensors activate intermittently or do not work at all, this may be due to
interference with other systems, which can be avoided by changing the House Security Code. To change this
code, take the following steps with each system module:.
1) There are 4 Jumpers/Dip-switches on each device. To locate these remove the battery compartment cover.
2) Then set the Jumpers as shown below (ON-Push in / OFF –Pull out) to change the House Security Code
setting. Make sure the Jumpers on the Smart Panel and its Sensors exactly match each other AND the
Dip-switch setting on the Key Fob Remote Control.
4.4 Zone Code settings
Sensors are supplied with pre-assigned Zone settings to make setup easy – the Door/Window Sensors are
pre-assigned to Zones 1 & 2 and the Motion Sensor to Zone 8.
To assign a Sensor to a different zone, the Zone Code on the Sensor needs to be changed. To change this
code, take the following steps:
1) There is a Zone Code Jumper on each Sensor which can be located by removing the Jumper compartment
cover.
2) Then pull out the Jumper and reassign it to the new Zone (Zones 1 to 8) as shown in the diagram below.
3) Replace and screw back the cover to complete the Zone Code setting.
- Smart Panel
- Each sensor
Default House Security Code:
1: ON, 2: ON, 3: ON, 4: ON
*Jumper: ON = Pushed in, OFF = Pulled out
Jumpers for House
Security Code
Dip-switches for
House Security
Code
Jumper for Zone
Code
- Key Fob Remote Control
Default House Security: 1: ON, 2: ON,
3: ON, 4: ON
Default zone code:
Door/Window sensor – Zone 1
Door/Window sensor – Zone 2
Motion sensor – Zone 8
5.1 FAQs
Q.1: What is the best way to set up my system? Where should I put my Smart Panel and the sensors?
A.1: We recommend that you take some time in advance to think about the placement of the Smart Panel and
Sensors. The best location for the Smart Panel is usually by the main entry/exit point, in a hallway, or in another
central location in your home. However, it must be plugged into a power socket, which may dictate where it can
be placed.
• Please note that the alarm is pre-programmed with default settings, allowing you a pre-determined amount
of time to enter (30 seconds) and time to exit (20 seconds) the front door before the alarm sounds. You can either
change the default setting to allow more time to enter/exit your home or, alternatively use the Key Fob to disarm
the system.
Q.2: How many Sensors can the Smart Panel support?
A.2. An unlimited number of sensors can be supported by the system, added to different zones in your house,
as you see fit.
Q.3: What wireless range should I expect from Sensors?
A.3: The range will vary depending on the type of structure; however, in an open space, the sensors should be
capable of transmitting a signal up to 250 metres from the Smart Panel. Determine the location of the sensors
first and change to a different location for better RF performance.
Q.4: How do I attach my Sensors?
A.4: Adhesive tape and screws are provided for the purpose of securely mounting these items. Please refer to
the user guide for more information about mounting the Smart Panel and the wireless sensors.
Q.5: Do I have to programme the Smart Panel?
A.5: The Wireless Home Protection System is designed for easy installation. This means that the
wireless sensors are in a default setting already registered to the Smart Panel and will therefore function
immediately after the sensors are powered up. If you choose to buy additional accessories, these will need to
be added to your system using the easy to follow instructions.
*Note: Due to the strong signal of the alarm, we advise that you change the House Security Code settings
following section 4.3 of this manual, if you suspect that one of your in-range neighbours may also be using this
alarm system.
Q.6: Can I still use the same system if I move?
A.6. The Wireless Home Protection System is completely portable. If you move, you can remove your
Smart Panel and wireless accessories and re-install them in your new property.
Q.7: What if I forget my PIN?
A.7: If you forget your PIN, you may press the “Reset” button inside the battery compartment of the Smart Panel
and the PIN will be reset to the factory default PIN 1234.
Q.8: Why does my Motion Sensor not respond to movement?
A.8: Motion Sensor are very sensitive so to preserve battery life the Sensor will go to “Sleep” after an event has
been identified and reported to the panel. This “Sleep” period lasts 3 minutes, after which, if no activity is
detected, the Motion Sensor will again become active and ready to detect other events.
Q.9: Why does my Motion Sensor keep generating false alarms?
A 9: If you have a pet, make sure they have not triggered the system. Remember, sensitivity to pets increases
in certain circumstances e.g. the nearer the pet to the Sensor.
- 19 -
- 18 -