Introduction, Turning on/off the power, Selecting a sound (program) – Roland JD-XA Analog/Digital Synthesizer User Manual
Page 4: Selecting a part, Turning on/off the power” (p. 4), Init program
4
Introduction
Turning On/Off the Power
* Once everything is properly connected (p. 3), be sure to follow the procedure below to
turn on their power. If you turn on equipment in the wrong order, you risk causing malfunction
or equipment failure.
* Before turning the unit on/off, always be sure to turn the volume down. Even with the volume
turned down, you might hear some sound when switching the unit on/off. However, this is
normal and does not indicate a malfunction.
1.
Before turning on the JD-XA’s power, consider these two questions:
5
Are your speakers or headphones connected correctly?
5
Is the connected equipment powered-off?
2.
Turn the MASTER [Volume] knob on the top panel all the way to the left.
3.
Turn on the [POWER] switch located on the rear panel.
* This unit is equipped with a protection circuit. A brief interval (a few seconds) after turning the
unit on is required before it will operate normally.
4.
Switch on power to the connected equipment, and raise the volume to an
appropriate level.
Turning Off the Power
1.
Before turning off the power, consider these two questions:
5
Have you minimized the volume of the connected equipment?
5
Have you saved any sounds or patterns that you created?
2.
Turn off the power for all connected audio devices.
3.
Turn off the [POWER] switch of the JD-XA.
About the Auto Off Function
The power to this unit will be turned off automatically after a predetermined
amount of time has passed since it was last used for playing music, or its buttons or
controls were operated (Auto Off function).
If you do not want the power to be turned off automatically, disengage the Auto Off
function.
&
“Making the Power Automatically Turn Off After a Time (Auto Off)” (p. 15)
NOTE
5
Any settings that you are in the process of editing will be lost when the power is
turned off. If you have any settings that you want to keep, you should save them
beforehand.
5
To restore power, turn the power on again.
&
“Turning On/Off the Power” (p. 4)
Selecting a Sound (Program)
About the program select screen
:
INIT PROGRAM
A program consists of a total of eight parts: four analog parts and four digital parts.
After editing a program, you can save it in internal memory (INT:A01–INT:P16) or on
a USB flash drive (USB:A01–USB:P16).
Selecting a Program
1.
Press the [Program Select] button so it’s lit.
The program select screen appears.
The [01]–[16] button corresponding to the currently selected program number is lit.
2.
Press one of the [01]–[16] buttons.
The program changes.
Saved location
[USB Memory]
Bank
[Bank]
0
[01] (A)–[16] (P)
Number
[01]–[16]
Internal memory
([USB Memory] button unlit)
INT:A–INT:P
01–16
USB flash drive
([USB Memory] button lit)
USB:A–USB:P
01–16
MEMO
If no USB flash drive is connected, the [USB Memory] button does not light even
if you press it.
Switching banks
1.
In the program select screen, press the [Bank] button to make it light.
The [01] (A)–[16] (P) button corresponding to the currently selected bank number
(A–P) blinks.
2.
Press one of the [01] (A)–[16] (P) buttons.
The bank is switched, and the [Bank] button goes dark.
3.
Use the [01]–[16] buttons to select a program.
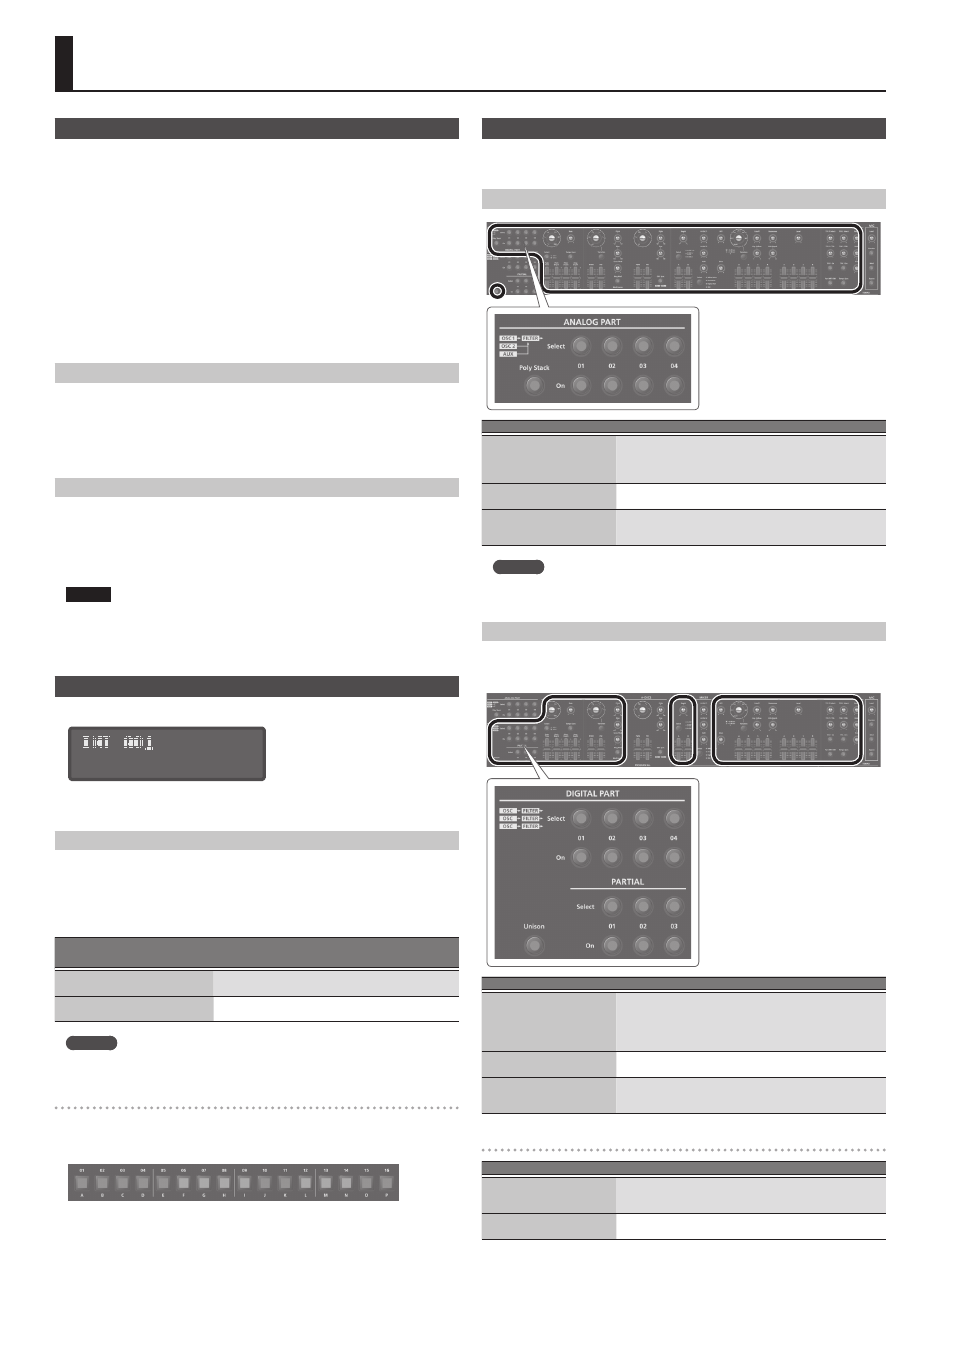
Selecting a Part
Each analog part is monophonic.
The [Poly Stack] button lets you make the four monophonic analog parts operate in
four-voice polyphony (p. 5).
Selecting an ANALOG Part
Function
Operation
Select a part to edit
Press a Select [01]–[04] button to make it light.
You can select multiple parts by pressing multiple buttons
simultaneously.
You can’t select analog parts and digital parts simultaneously.
Select a part to play from the
keyboard
Press an On [01]–[04] button to make it light.
If the button is unlit, that part won’t produce sound.
Part mute
Hold down the [Shift] button and press an On [01]–[04] button
(blinking: muted / lit: unmuted).
The mute status is shown while you hold down the [Shift] button.
MEMO
Since the analog synth parts consist of analog circuitry, their sound may be
affected by the temperature, the power supply, and the environment in which the
instrument is located.
Selecting a DIGITAL Part
The digital parts are polyphonic.
Each part is a three-partial SuperNATURAL synthesizer, and you can use four such
parts.
Function
Operation
Select a part to edit
Press a Select [01]–[04] button to make it light.
You can select multiple parts by pressing multiple buttons
simultaneously.
You can’t select analog parts and digital parts simultaneously.
Each digital part consists of three partials.
Select a part to play from the
keyboard
Press an On [01]–[04] button to make it light.
If the button is unlit, that part won’t produce sound.
Part mute
Hold down the [Shift] button and press an On [01]–[04] button
(blinking: muted / lit: unmuted).
The mute status is shown while you hold down the [Shift] button.
Selecting a partial (Digital part only)
Function
Operation
Select a partial to edit
Press a Select [01]–[03] button to make it light.
You can select multiple partials by pressing multiple buttons
simultaneously.
Play a partial’s sound
Press an On [01]–[03] button to make it light.
If the button is unlit, that partial won’t produce sound.