Beurer GL 40 (mmoL) User Manual
Page 20
20
Beurer GL40 mmol/L
5
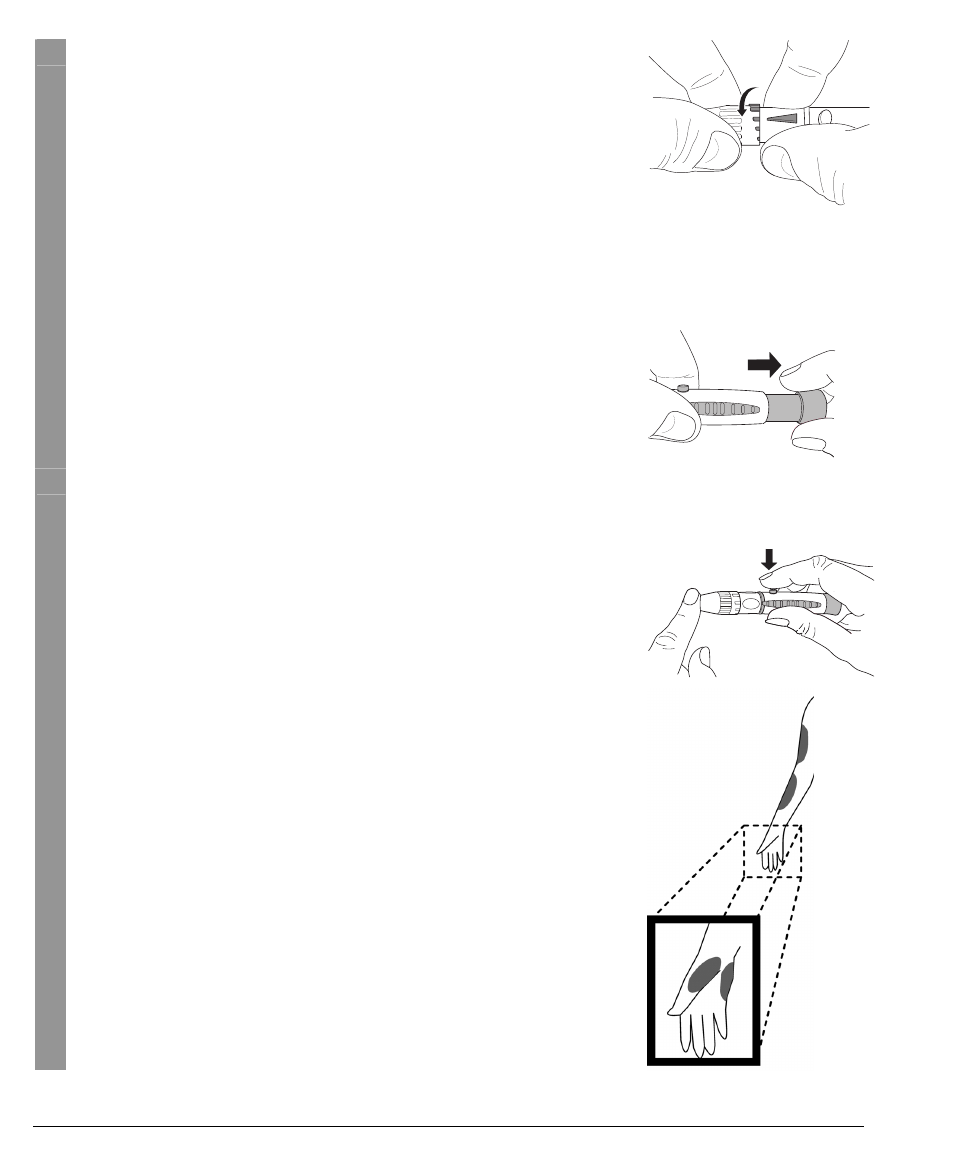
Setting the puncture depth:
You can preset six different puncture depths on the lancing
device by turning the cap. A small bar means a shallow punc-
ture depth, and a large bar means a deep puncture depth.
The difference in puncture depth between the smallest and
largest click position is approx. 2 millimetres
• Small bar (1 to 2):
Delicate or thin skin
• Medium bar (3 to 4): Normal skin
• Large bar (5 to 6):
Thick or rough skin
Turn the cap to the required click position until the arrow indi-
cates the desired puncture depth.
6
Pull back the tensioning device until you hear it click into pla-
ce. If it does not engage, the lancing device may have unin-
tentionally already been tensioned when inserting the needle
lancet and could already be engaged.
7
The lancing device can now be used to take the blood sam-
ple. Ensure that the blood remains in a droplet form and is not
smeared.
Blood sample from the fingertip
Place the lancing device firmly against the finger, slightly to
the side of the centre of the fingertip. Press the release but-
ton. Lift the lancing device from the finger. You need a round
blood drop of at least 0.6 microlitres to form (corresponds to
approx. 1.4 mm, original size: z).
Blood sample from an alternative site (AST)
Choose a site that is soft, not next to a bone, with no visible
veins and without excessive body hair. Warm the puncture
site to ensure good circulation, for example by lightly massag-
ing the area. Place and hold the lancing device against the
puncture site for a few seconds and press the release button.
Continue to hold the lancing device against your skin until a
round droplet of blood has formed under the cap. Keep apply-
ing pressure until the size of the blood drop is at least 0.6 mi-
crolitres (corresponds to approx. 1.4 mm, original size: z).
Lift the lancing device carefully away from the skin.